February 06, 2023

The #Fairfield Attic Sitting Room, Kitchen Pieces

I have been working slowly on some things. Took a break, too, as I really didn't feel like doing more trim yet, as you'll notice. ha! (Yeah, ignore that untrimmed roof edge! 😏)

(Previous post: trimmed tower, attic bath, a few kits.  * See archives list for more posts and sign up for email updates in the left column. Click photos for full size.)

Instead, I got some furniture finished and decided to work on the attic sitting room, which is next to the boy's room. This was fun as it ended up with a kind of retro feel to it. 

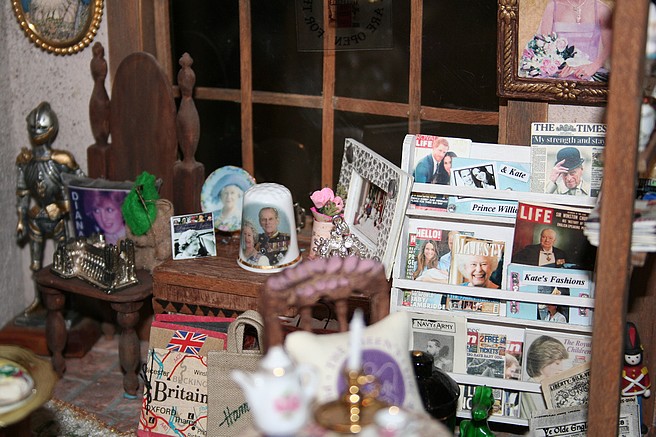
There's a lot of fun stuff in this room. I had to add a bookcase, of course, with assorted books and some newspapers about the Queen's death. The small paint jars on top are from a past HS group swap. My favorite: I found this unpainted metal phone in my "buy it and I'll use it someday" stash and had to add it for a touch of realism. The phone cord is thin coated wire I cut off a tiny light bulb and painted. I also have a wall phone I painted for the kitchen. I made the vintage-flavored Eiffel Tower glitter picture for a past swap. I made the clock on the wall from a printie, rhinestone and a medium jump ring. 

 The reading chairs are '50s style MCM chairs from All About Miniatures. I decided to contrast the chairs by color with the blue floral fabric and the matching/contrasting pink print. The coffee table is from one of those Woodcraft punch-out kits of assorted furniture.

I did decide to cut off the top of the fake brick wall on a slant as it looks better since the back of the house is open. Luckily I glue things to hold but not that I can't pull it off with (hopefully) minimal damage. (There was none.) The textured red brick paper is from Starboc 2 in Greece on Etsy. Love her brick.

I am thinking of trying some white brick on the inner front walls when I eventually do the Park Ave. Mansion. Still have in mind to do a kind of rooming house, with the wealthy widow/owner living in the top floor penthouse apartment, which I'm leaning toward decorating in a Brooke Tucker style since I  now have the book and two lamps. (And sad to hear she died recently. Another miniatures legend gone.)

The fabric on the vintage resin couch (Georgia Matuschak kit 1995) is kind of busy so you can barely see that I decided to add a couple dirty spots and some stuffing sticking out. The lady of the house says the couch is too comfy to throw out. The kit came with a chair, too, that I'll use in another room. I like when I find these kits as they come out nice simply by gluing fabric on. The bottom section is grooved so you can tuck the fabric in. I made the hassock by covering a foam piece (shaped foam beads I found a while ago at The Dollar Tree) with fabric and bunka thread. 

The writing table (Vesper Narrow Table, Small Scale Living from All About Miniatures) has a typewriter from a past HS group swap and that weird "sculpture" plant whatever from Michael's. I got the chair as a kit at a show. 


The outer wall has an old radio (fun gift from last year's HS group swap.) It just seemed to work well in this corner.


Full view:


Kitchen pieces:

Working on some of the kitchen pieces. The baking table and stove are from TMC, Teresa's Miniature Creations (minitmc@comcast.net). She'll be at the Spring Miniatures Show at the Wyndham Gardens Hotel in Schaumburg, IL, April 27-29 as will SDK Miniatures. I like her Gothic furniture and flower kits. The Bishop International Show is also that weekend, Sat. April 29 and Sunday, April 30 at the Marriott Chicago O'Hare.) 

Before: (finishing up the sink yet.)


After:

I added some plastic confetti pieces, the top shelf and the orange seed beads for handles to the baking table. The pie making set is by Patsy M from a long ago swap. The tarts are Reutter Porzellan. I made the teeny jam jar.

The stove is so cute but ugh!! Those teensy-teensy beads for the handles and top of the stove burners are no-fun! I kept losing them and finally had to cut a couple tiny pieces of the square tube for a couple of the bead  "knobs." I gave up adding the beads to the side of the door and just painted the "hinges" silver. In case you're wondering and aren't familiar with 1/24, half scale sizes: the stove is 2.5" high and 1.75" wide. 

Here's another view for size: the chair is 1.25" wide and just over 1.25" high. Small, but doable. I've tried 1/48 scale which is much smaller. Too small for me. - Chris V. www.cverstraete.com


Thanks again for visiting. More updates coming soon! 


January 30, 2023

Fave January Read: Stephen King's Fairy Tale #fantasy


I like to mention books here occasionally between my mini-making, so I thought I'd share my favorite January read: Stephen King's Fairy Tale. (PS - he also has a new murder mystery, Holly, based on the PI from his Mr. Mercedes trilogy, coming out Sept. 5. There's an excerpt at his website.)

* Amazon - Barnes & Noble - see Goodreads.

I admit having reserved the library book previously, then deciding I wasn't up for a 598-page book. But I saw it again and decided to check it out: glad I did.

This is a fun, imaginative twist on a selection of classic fairy tales we know. Definitely odd in parts, sometimes scary, with some weird monsters but heroic moments. And it has a wonderful German Shepherd, Radar, whom you'll shed a few tears for. Being a longtime GS owner, I just loved the dog in the book and how she's saved. 

Some great monsters and villains here, and some great characters you grow to love. I can't comment much on the surprising or cool parts, as I don't want to give the surprises away. I didn't know anything about the book, so it was fun seeing where it went. Really enjoyed it and not a section of padding that I had to skip over despite the book's massive size. King really is on top of his game.


January 23, 2023

More Mini Collectibles are Coming Out!


Everyone seems to be getting in on the mini-mini trend of collectibles.

The Mini Brands  have come out with Fashion purses and mini food. Besides the Mini Brands Toys, I like the mini Disney and Star Wars figures in the Mini Brands Toys Disney version. I've always loved dolls so the teensy doll figures and princesses are hard to resist. Here's some I put in my mini Haunted Toy Store.

And now....

While I'm not a big Bratz doll fan, I was really surprised to see these mini Mini Bratz dolls at Walmart. (Amazon link.)($10 at Walmart; $7.99 on sale on Amazon at this writing.) I had no idea they were making these! How cute! This Japanese style figure is really cute. 


Then.... I saw an online post about mini Mini Funko Pops (not the mystery figures but tiny versions of the Funko box and figure) coming out soon. 


Haven't collected the full size figures either but I'm sure I'll get a few of the mini ones, too. I wonder who else will be getting on the mini bandwagon? Kind of fun seeing what comes out next.


January 22, 2023

#Fairfield #Dollhouse: Some outside trim, kits, bath done

The tower all trimmed.

 I'm in the process of adding trim (boring stuff) and then have to get the porch railings, posts, etc. installed.  (*Click photos for full size. See past posts in left column archives. Previous post: finishing the attic. * Also sign-up in left column for email headline updates.)

In the meantime, I got a few more things done. 

The attic bathroom: made a faux cabinet for an old metal Cassidy Creations sink; added crystal beads for the hot/cold and used a piece of solder glued on for the faucet. Also made a fake wood tank for the vintage toilet. (I added all the fake walls and door to divide off the boy's bedroom behind it on the left side (not shown.)

Decided to add a partial curtain, which I think makes this little space fit in better. Love the print for the curtain and I think it adds a nice touch of color. I have the same print in a pink and orange I'm going to use on some furniture. Decided to add in the mirror, too (from a Hobby Lobby set.) 

The back roof piece is on now since this photo so you don't see all the top of the wall, which is a shame, but I'll add some art prints above the wall cut-out (entrance to the attic) anyway I think. I also decided to cut the outer edge of the fake brick wall on the left here on a slight diagonal since the roof piece is angled. It didn't look right since it stuck out so much. Luckily I glue things to hold, but at least I can still get them off if needed (without destroying it all). ha!

The tower: (top photo) Added the brackets underneath, the trim on the top sides, and decided to add the gingerbread underneath the top strip. The bracket by the door will be used as a plant hanger. I do have another fuchsia plant to make (if I'm brave enough. ha!) Love them, but they are a difficult plant to make.

I recently got a set of metal weathervanes (vintage set, Karen's Miniatures) from a seller. The round cap was made by cutting off part of a plastic chess piece, painting it (used ivory multi-surface paint as a primer), and drilling a hole on the top. There were several different styles; they're cute but such thin metal and very dainty so they bend too easy.

Kits: In-between, I decided to work on some kits. These are really nice and are coming together pretty well. For a change of pace, I decided to paint the table (Vesper Narrow Table, Small Scale Living from All About Miniatures.) to match the curtain, which turned out pretty cute. Nice kit. Tired of all stained furniture. The MCM chair is also from them. The chair is a bit daintier to build (I broke the chair leg tips and had to reglue) but it'll look fine once painted.

Other kits in progress: vintage sink, baking table, and stove from TMC, Teresa's Miniature Creations (minitmc@comcast.net). (Wish she had a website; she does occasional shows.) Love her kits. I saw these pieces and had to get them! I added the small shelf on the top edge of the table. Beads, handles, burners, etc. on all pieces will be added once I paint them.

The teensy side table is from a couple who also sell small kits among their other items at shows (and I can't think of their name right now.) The small round Dining Table is an older MiniEtchers kit. I think I'm going to paint all these, too. She has some fantastic 1/2" scale kitchen furnishings and some cool Victorian and unique Edwardian furniture. I'll share the furnishings once I get them all painted and decorated.


That's it for the moment! More to come soon. Thanks for stopping by again!


January 16, 2023

#Fairfield Dollhouse: Attic floor completed!


Favorite pic of the week: lamp by the attic window.

It's hard to believe, but this week I finished the attic trim, which means the third floor is done! So now all the floors are done, meaning they are papered and trimmed. After a year, it doesn't seem real! (Check archives in left column for previous posts. Also see end of year recap.) *Click photos for full size.

Fitting the bath pieces. The door at left goes into the boy's bedroom.


Here's the bath niche unfinished and a view of both attic spaces. I added the false wall and door on the left side which goes to the boy's bedroom. I had to cut angled pieces of mat board which were glued together in a double layer and then papered. I love that mustard yellow paper. Not sure where I got it but it has typed words on it so I'll have to add a small typewriter table for the writer, of course! I'm finishing up the bath pieces to put in there, so that's coming up.

 * Added: As someone asked: the brick is textured paper from  Starboc2 on Etsy. She's in Greece, but has nice products and fast shipping. Used the brick paper on the Van Buren house  interior and exterior also. See finished exterior. 

The right side attic space. Lucky I had enough wood floor pieces left to fit here. Thought it would be fun to add a crate with an uncovered lamp. And what is that peeking out? 

A visitor: A ghost mouse! haa!


For fun, here's the attic with stuff in it, which I took out for now and will change around yet. I'm thinking of putting my extra art on the walls for storage.

I'm not entirely done as I'm still adding edge trim and a few pieces I missed, plus I have to (yes, still) put in the spiral stairs, but the house is really almost finished. Working on the foundation now and have a great idea for front lattice. (More on that later.)

The roof tower section is trimmed. I'll show that once I get my latest find for the tower tip in the mail. 

Other updates:

Side of the house with the stained glass windows, window boxes, and the angled pieces above the lower windows covered with corrugated cardboard.

It's hard to show the colors but the flowers (soft plastic) are nice shades of rose. 


Next up is to decorate all the rooms, which is the fun part. I have to say I don't like all the trimming but I do like coming up with ideas on different ways to do things. I still have some furniture pieces to make too and probably some flowers.

The bare wall was bugging me so I added some art in the second floor bathroom. Yeah, that was fun trying to reach in there. ha! I got it in with tweezers and a glue dot on back which I hope stays on. 😃 I also added that post on the end of the stairs with a "fancy" bead top. I have to trim the top of the walls on both sides and add some artwork.

Girl's bedroom:

I like how the wood grate looks in the fireplace. Here's the Tootsietoy bed I decided to paint brown, with linen colors to go with the maroon wallpaper. I like how the larger bead caps worked for ceiling lights with a gold filigree medallion. I've done more feminine girl's rooms before but I really liked this wallpaper/scrapbook paper and think it turned out well with the brick.

I'll save the finished boy's room photos and show them next time with the finished girl's room. Plus I have to fill both attic spaces.

Then it's on to hanging art, furniture kits, decorating.... and after that?

Well, I may work on a couple smaller projects before I tackle the next big house. Sometimes you have to take a break between large projects. 

The good thing is between this I finished making my items for the annual Half Scale Group swap and mailed them. Can't share what I made yet. Now just have to wait until March for the return box. Always fun to see what other people have made.

So.... stay tuned for more decorating updates.... Thanks for visiting! 


January 05, 2023

New Year, New #dollhouse project... almost

What is this, you ask?

 Well, just got my belated birthday-Christmas gift. (*click photos for full size.)

A new 1/24, half-scale house. First fully-laser-cut house kit I've gotten and I have to say the details are really nice.


The doors and windows even have the inner and outer trim so I don't have to add it. Handy. Nice that we don't have to cut moldings. May have to do some taping when I paint/stain, though.


The fencing and detail on the staircase rails is really nice, too. I like that. The only downside I see, so far, are the poor directions sheets. Very small gray-tone photos.  I'll check around and see if anyone did any YouTube videos... that would be helpful, too. ** ADDED: Just found out: they have a color PDF page of directions on their website. Much better! They have a few videos, too, but not of this house.

*********

Have you guessed yet what house it is?

It's the 1/24, half-scale Park Avenue Mansion from LaserDollhouseDesigns. (And no, I didn't pay that; got a deal on Ebay. 😏 ) 


Cool house, huh? I've been wanting something different and wanted to do a taller vs. wider house. I have an idea of doing a kind of rooming house. One level will have the wealthier tenant with the fancy sitting room. I have a 1/24 Marcia Backstrom resin doll kit that I've been saving to do. We'll see what I come up with. I've been saving photos for inspiration, too, and I'd like to use some ideas from the Brooke Tucker Golden Christmas book.

*********

Now, it'll be a while before I get to this as the Fairfield is still-not-done. Oh, it's getting close. Half the roof is on (see below); stained glass windows and flower boxes are in. (Love how these turned out! Closer pix will be coming.) Luckily I found a close-enough match in paint color for the roof. I'd used Americana Rookwood Red on the windows and found the Apple Barrel Spiced Berry Satin, which is a multi-surface paint and has a slight sheen to it. It's only slightly different in tone so I went over the parts I had already painted and like the finish. 

I've got lots of trimming yet, like on the roof sides and tower, which I hate doing. ha! But I have a "cute" small gingerbread piece that should add a nice touch to the tower front. I also have the strips for the tower top to add that are painted the reddish-orange. Still trying to figure what to use on the tower tip; maybe a glittery ball, some kind of ornament... I'll know it when I see it.

Right now I'm figuring out an attic bathroom nook. Luckily I had these pieces. Not sure but I think the toilet is an old Tootsietoy or painted vintage piece. Had a better idea so it won't take up too much of the attic. I found it looks and fits better in the little space behind the attic wall next to the bedroom door I added, which I hadn't really planned on. I'll show the "ugly" stages shortly in an upcoming post if you need an idea. I'll share some other progress, too, as I'm pretty happy with how things are looking.

That's it for the moment. Stay tuned for more photos.  ** You can subscribe to email headline updates in the box in the left column. I've also added the blog to my website miniatures page. That page includes a growing list of half scale dollhouse supplies sources if you are interested.

Thanks for stopping by!


January 01, 2023

Happy New Year!


Hope 2023 is far better than this past year.

May you have lots of good mini days and plenty of projects to keep you busy! I'll have much to do,  so stay tuned for more updates!

December 29, 2022

Thirsty? Hungry? #Miniature Food and Coffee

 Just wanted to share some of the different miniatures I got for Christmas. These were a fun, complete surprise as they came from my writing and non-miniaturist friend, Jean. (And btw, if you read, she has a fantastic set of books, The Sheriff Piper Blackwell mysteries by USA Today Bestselling Author Jean Rabe, set in Santa Claus, Ind. Check out the cool covers and more details at the link above.)

Love these bottles! The coffee bottles are, dare I say it, so cute! The bottles are about 1" tall.

The drink cups above are fun as they'll fit in the coffee shop I'd planned some time ago in  a travel trailer. They're not exactly 1" scale but are too cute not to use. In stores, I'm not a stickler on exact size. When you mix things together and put them on shelves, it usually works.

 Or I may include these in the other idea, a Witch's Bakery I'd been saving things for. That'll be in the last building I have (the one window store) of the Houseworks' Street of Shops. I made a Witch's Greenhouse (wow, back in 2010) previously using the same kit. Yeah, I've been collecting and working in miniature even longer than that! I have a lot of projects! haa! 😁 (See more photos: 2, 3

 I recently made the record store and a Halloween store in the other two shops of the set, along with a teapot shop from the first set (same double window shop as the Halloween store.) It may seem like a lot of ideas, but as I'm running out of display space, I'll only be doing a few more 1 inch scale projects, mostly shops since they fit on bookshelves. The rest are half scale since they're smaller in size (except for my giant Victorian dollhouse. Look in the 2021 archive in left column beginning in May for more photos.)  I buy these shop kits when I see them on sale, and glad I did as prices sure have gone up! 

Here are some of the bakery goods and food plates. I have a ton of handmade polymer clay cakes by my friend Kitty set aside also so these will be nice fill-ins on the shelves. These are plastic but I can also touch them up with paint if needed. Love the hot dog, hamburger and sandwich for on a table!


These are cute little desserts.


She also sent several House of Miniatures kits. Here's the bigger one, which, for a change from the usual stained furniture, I think would look good painted for the bakery. Hoping it fits as I have a showcase to put in too, otherwise I can use it as a display in a small scene. I've saved several of these kits over the years when I find them, but I never saw this one. 

I hadn't wanted to build the last shop so soon, (they can be difficult to assemble) but this is tempting. But still working on the Fairfield and hoping my other project is coming, so we'll see. Sometimes it takes months to get to a project, or I've been saving things for years!

Thanks for visiting! Stay tuned for more updates. (You can subscribe to headline updates in the box in the left column.)


December 27, 2022

End of Year 2022 #Miniatures Recap


It's the end of the year.... already? Where did it go? At this time of year, I like to look back and see what I've accomplished, especially when it seems like I am working on things soooo slowly. 😊

So here's a self-indulgent look back on the projects I worked on over the past year. Besides, it's kind of fun to take another peek, isn't it?  (click photos for full size and to see more photos. ) I'm not including every post, so feel free to check the archives list in the left column for other projects and posts.

January:


I was working on the half-scale Greenleaf Van Buren house. I did get this Miss Havisham-style table done (well, I still have to put out the silverware!). I hate to admit that the house is still sitting there haunted, but empty. I've fallen in love with the brick look without the labor by using the brick printed on textured papers from Starboc2 on Etsy. See post.

I also made a bunch of spooky and eerie pictures; here are just a small selection of them. I used a few in the Fairfield bedroom. That large gold frame is probably going in the Fairfield parlor. My favorite may be the Medusa. Now that I think of it, that may go in the girl's bedroom, above the fireplace. I am working on the bed now, so hope to get further on that room next.


February:

I added in a magazine display and more newspapers in the Tudor Tea Shoppe. I also added a few more images with the Queen and Prince Philip. I have a few other items I want to add in a small glass case as a kind of memorial scene.

March-April:

Besides still working on the Van Buren, I got hooked on those Mini Toy balls, so I added some items and changed the would-be bookstore into a Haunted Toy Shop. Well, not all haunted, but some fun stuff like the tiny Disney princess dolls, and more. My Mini Living Dead doll loves shopping here! As I was still working on this, here's another post in April. That includes the new British tea set I'd bought for the Tudor Tea Shoppe.


May: 


The very beginning - I had some progress working on the half-scale Greenleaf Fairfield, but it was also show time. I shared some of my finds at the late April shows, plus my photos of the incredible Frasier show display and a record store by "The Bearded Miniaturist" at the Spring Miniature Show. This was a real treat to see. Such great details.

June-July:


Still working on the Fairfield, but lights are going in. I do love the wallpaper and the look of the first floor parlor and dining room. I can't wait to take photos once it's all decorated. (Working on the attic yet and - grr! Shingling!)

August:


Rinse. Repeat: still working on the Fairfield. It's fun looking at these photos as I never really thought I'd get this far. At first, I literally opened the box three times before I finally started it. This was a hard house to work on. (And am still at it!) Lots of trimming and figuring things out. It looks so different now! (This is a later photo with some of the trim on.)

Sept. - October:

Lots going on in October! Participated for the first time in a Halloween swap with the Half Scale Minis group on Facebook. Really fun!

Also held a shortened version of the annual Halloween in Miniature, focusing on some past favorites. See first post.

November:


Wow, time flies! Well, in my case, I've been working on the Fairfield dollhouse for....months and months! ha!! But here are photos of the first room, the bedroom, all set up. Plus a video! Check in the archives list in the left column for other past posts. Here's the second bedroom almost done.

December:

Happy Birthday to me! Took some of my miniatures to display with a friend at a local museum. See some of our work at the post link.

As of this writing, still working on the Fairfield, of course! haa! Hope you're not tired of it. There's lots to go yet! Shingling the roof, planning the inside. Have lots of kits to make and - the best part - figuring out the interior! The spiral staircase also has been done (have to glue on handrail thread and glue it in once the house doesn't have to be turned over or put on its side again. Have to get the bathroom fixtures in on that second floor also.

Thank you for visiting here all year; I really appreciate it! A new big project will be coming soon, along with more Fairfield updates.

Deciding on other writing projects, too. Yes, I still write between doing minis. 😉 Check the website for updates. 

The best in the New Year! May your mini dreams all come true. Come back soon for more projects and updates!