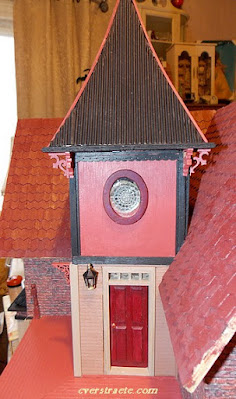
The tower all trimmed.
I'm in the process of adding trim (boring stuff) and then have to get the porch railings, posts, etc. installed. (*Click photos for full size. See past posts in left column archives. Previous post: finishing the attic. * Also sign-up in left column for email headline updates.)
In the meantime, I got a few more things done.
The attic bathroom: made a faux cabinet for an old metal Cassidy Creations sink; added crystal beads for the hot/cold and used a piece of solder glued on for the faucet. Also made a fake wood tank for the vintage toilet. (I added all the fake walls and door to divide off the boy's bedroom behind it on the left side (not shown.)
Decided to add a partial curtain, which I think makes this little space fit in better. Love the print for the curtain and I think it adds a nice touch of color. I have the same print in a pink and orange I'm going to use on some furniture. Decided to add in the mirror, too (from a Hobby Lobby set.)
The back roof piece is on now since this photo so you don't see all the top of the wall, which is a shame, but I'll add some art prints above the wall cut-out (entrance to the attic) anyway I think. I also decided to cut the outer edge of the fake brick wall on the left here on a slight diagonal since the roof piece is angled. It didn't look right since it stuck out so much. Luckily I glue things to hold, but at least I can still get them off if needed (without destroying it all). ha!
The tower: (top photo) Added the brackets underneath, the trim on the top sides, and decided to add the gingerbread underneath the top strip. The bracket by the door will be used as a plant hanger. I do have another fuchsia plant to make (if I'm brave enough. ha!) Love them, but they are a difficult plant to make.
I recently got a set of metal weathervanes (vintage set, Karen's Miniatures) from a seller. The round cap was made by cutting off part of a plastic chess piece, painting it (used ivory multi-surface paint as a primer), and drilling a hole on the top. There were several different styles; they're cute but such thin metal and very dainty so they bend too easy.
Kits: In-between, I decided to work on some kits. These are really nice and are coming together pretty well. For a change of pace, I decided to paint the table (Vesper Narrow Table, Small Scale Living from All About Miniatures.) to match the curtain, which turned out pretty cute. Nice kit. Tired of all stained furniture. The MCM chair is also from them. The chair is a bit daintier to build (I broke the chair leg tips and had to reglue) but it'll look fine once painted.
Other kits in progress: vintage sink, baking table, and stove from TMC, Teresa's Miniature Creations (minitmc@comcast.net). (Wish she had a website; she does occasional shows.) Love her kits. I saw these pieces and had to get them! I added the small shelf on the top edge of the table. Beads, handles, burners, etc. on all pieces will be added once I paint them.
The teensy side table is from a couple who also sell small kits among their other items at shows (and I can't think of their name right now.) The small round Dining Table is an older MiniEtchers kit. I think I'm going to paint all these, too. She has some fantastic 1/2" scale kitchen furnishings and some cool Victorian and unique Edwardian furniture. I'll share the furnishings once I get them all painted and decorated.
That's it for the moment! More to come soon. Thanks for stopping by again!


