I like book boxes for miniature rooms. Want to try doing this with a real book.
The frame - want to try this.
May 28, 2019
#Paris #Miniature Project 16: Painting!
Painting & More Painting!
Greetings
again! For the U.S. followers, I hope
your Memorial Day weekend was safe and hopefully dry. I did get one day of the three-day weekend to
work on minis!
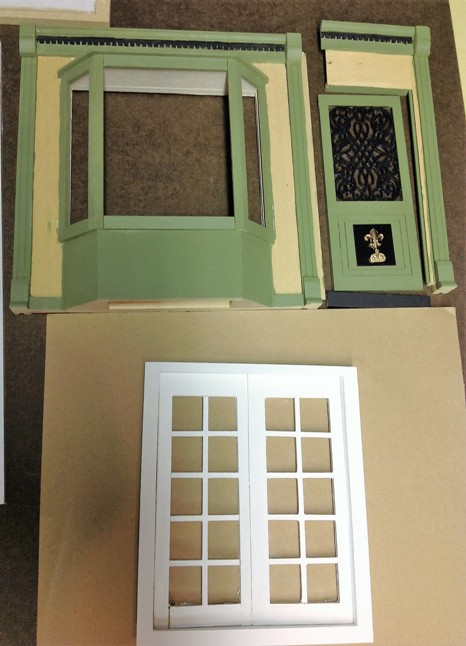

Paint, paint, and painted some
more! As you can see the shop front is
ready for the stucco.
 The door is ready
and I found a Fleur-de-Lis that looks like it might work. I also finished painting the two windows, the
French doors, and all the trim for the third floor.
The door is ready
and I found a Fleur-de-Lis that looks like it might work. I also finished painting the two windows, the
French doors, and all the trim for the third floor.
Like I said, paint...paint…paint. I also painted the tops and bottoms of the
shutter; the door frame and the “iron” scroll of the forthcoming door for the
second floor entrance.
The two little
“iron” works (above) are also painted which will be decorative items in the shop. (Liking the look of this already!--Chris)

I
also painted the cabinet for the shop in a soft red which matches the design in
the floor. So far, it has taken three coats.
I may need another coat of paint,, too!

Finally,
the third floor floors (three walls) are getting ready for wallpaper, just need
to sand first. As you can see from the
picture, the lines in blue are the added pieces of wood to make the rooftop
flat as opposed to the original angle. The red lines indicate where there used to be windows on the side
walls. I first put on Kilz primer, then the
wood was glued onto the walls and open window spaces, and filled with light
joint compound. The next step is to sand
to make it is a smooth finish and then I can apply the wallpaper.
So, the next step is to see if the items painted in black and the cabinet need another coat of
paint. Once the cabinet is done I'll
varnish to give it a shine and assemble the item (the top has shelves with a
mirrored back).
Also, on
my list is the shop floor and the windowpanes for the shop front. Then I can put up the four walls and see
where I want things to go to be able to glue on shelves, etc. before
permanently gluing the walls together. It’s so much easier to have everything hung, etc. before putting it
together.
-----------------------------

The planning continues for the Paris Miniature Project which is my friend Gigi's Serendipity Shed renovation for the HBS 2019 Creatin’ Contest.
* Don't forget you can put your email in the subscribe to updates box under the Paris photo in left column also to let you know when a new post goes up.
--------------------------------------
It's moving along! Until the
next time… Happy Creating!--Gigi
May 21, 2019
#Paris #Miniature Project 15: What's New?
Lots new this week!!


The planning continues for the Paris Miniature Project which is my friend Gigi's Serendipity Shed renovation for the HBS 2019 Creatin’ Contest.
* Don't forget you can put your email in the subscribe to updates box under the Paris photo in left column also to let you know when a new post goes up.
Although
there is progress, it seems like a lot of little things have been done. But once all the little things come together,
like puzzle pieces, the bigger picture appears.
I'm excited to share the latest update. I completed more kits from Artofmini.com which are the posters, books, and
the new door for the shop. Originally, I
had a different shop door, but it was just too plain. (See top photo.)

I came across the door kit also from
ArtofMini.com in my stash. It consists
of three pieces (all the same size). The
kit comes together like a sandwich with the “iron” window panel in the
middle. I first painted the “iron”
window, then cut a “glass” window from a clear plastic container and
assembled the pieces.The door just needs
the door handle and a decorative touch on the bottom panel. I also painted the trim above the door and
window black. (LOVE that door panel. Really gives it the perfect "look."--Chris)

The
tedious work on painting has begun. Two
windows from the third floor are done. The four shutters for the second floor are done. The other pieces are the two windows that
will be in front of the second floor. The next pieces to be worked on are the second painting of the store
cabinet (reddish color), the black scroll works from Artofmini.com, along with
the tops and bottoms of the shutters, and there is my list which includes doing
a gray-wash on the shutters to “age” them.

I am asking again for your valued
feedback.

The door in the middle was
what I was thinking of using for the second floor entrance (on the left side
accessible from the outside staircase). At the right is the door I can substitute. It
is similar to the front shop door, but with a different “iron” pattern. It will be in a different color than the
green shop door. What do you think? Let me know.
(I like the door at right as it's similar in style with the iron work and the panels. What does everyone else think?--Chris)
Also, if
you have not done so already, see last week's posting on the colors for the outside.
Moving right along!! Thanks for coming along on the journey with me! Until the next time. Happy Creating!--Gigi
May 14, 2019
#Paris #Miniature Project 14: All About COLOR!
COLOR!!


(My two cents; I like the sage or Cape Cod Blue. The Arroyo Red could look nice, too. The white is well, white, and doesn't show well here. ha!--Chris)
The planning continues for the Paris Miniature Project which is my friend Gigi Nephew's Serendipity Shed renovation for the HBS 2019 Creatin’ Contest.
* Don't forget you can put your email in the subscribe to updates box under the Paris photo in left column also to let you know when a new post goes up.I'm baaaaack!!
Finally, another update on my beloved Paris Project. Finished up the class with the paper that was
way too long for “just an assignment.” Today, I started a new class and what a breath of relief as there are lots of assignments, but they are bite-sized so to speak which means more mini
time!
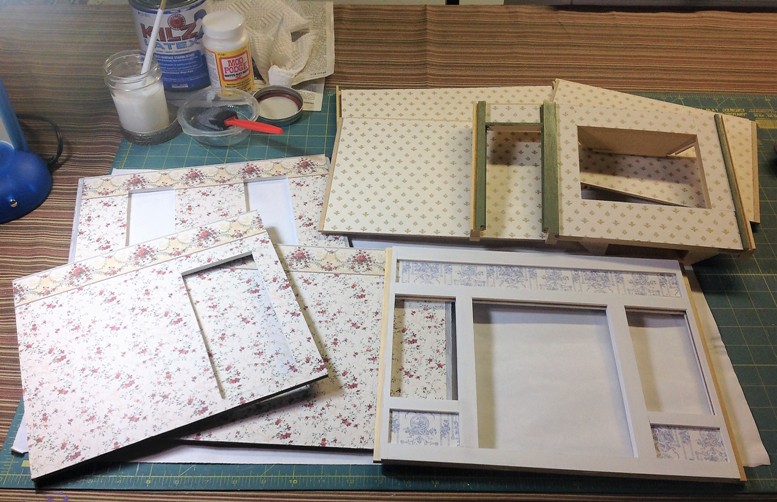
All the
remaining walls, ceilings and floors have been covered with Kilz (primer). I am done wallpapering the second floor
also.The third floor's three walls need
to be sanded and a little work done to the walls to make it a flat roof (plan B
implemented for easier wallpapering) so once this is done I will provide before
and after pics of the walls.

So,
here are some progress pictures. The
outside stairs arrived from China (ordered them through Wish.com), and I
prepared them with Kilz. Yes, what you
see is a toilet with the pull string (also from Wish.com) which will be
incorporated into the second floor…still noodling that idea because of small
space. As you can see, the picture shows
two of the walls from the shop with some completed items. (Love it!! It all fits and looks great!--Chris)
The storage cabinet (lower half is a kit from
Artofmini.com) and the glass shelving on top came like that. he idea is to have these urns with beautiful
flowers on each side and the cabinets filled with lots of goodies to buy. In front is a French side table and on top is
a small suitcase and a box with pictures (all three items were kits from
Artofmini.com). So, pretty sweet, four
kits I bought last month at the miniature shows are already put together.
Another reason for showing you the
walls of the shop is that I am asking you for input on what color to use on the
outside. The three stories will have
“stucco” (plaster) which I want to paint a white-wash color (faintly, not
heavy) to provide some interest. In
looking online at Paris shops, the shops are in all colors, while the floors
above are one more color. Here is a
close-up picture of the green I am thinking of using as an accent color on the
outside of the store for the trim. (Looks nice. I like the green!--Chris)


Now
it is your turn. What color or colors do
you suggest? See above for the
available colors. Remember, it will be a
diluted application for the second and third story (which will have white
window trim and a black iron balcony). The
first story can be different than the second and third story. Please submit your suggestions in
the comments box. Thank you in
advance!!!! Happy Creating!!--Gigi
(My two cents; I like the sage or Cape Cod Blue. The Arroyo Red could look nice, too. The white is well, white, and doesn't show well here. ha!--Chris)
May 07, 2019
#Paris #Miniature Project: Lucky 13 Planning!
Ta-Dah! Today is the Lucky 13th Day for the #Paris #Miniature Project Blog!
* Don't forget you can put your email in the subscribe to updates box under the Paris photo in left column also to let you know when a new post goes up.

Speaking of teachers, a great teacher was my
Oma (grandmother) who taught me so many wonderful things during the summers I
went to visit her in Germany. It’s
because of her that I learned my numbers, colors, and even read a few words in
German before first grade, which made it easier to learn English. It’s because of Oma, that I love to sew and
do crafts. She taught me to make
something out of nothing.
Well, today I am just going to talk about my next plans for
the Paris Project. I am in my final week
(of eight week courses) - and this course has --five-- assignments due this Friday
(as opposed to Sundays). So, needless to
say, I have to make it my priority. ☹
The courses are for the master’s in
teaching Secondary Education as I want to teach middle school and high school
students. It’s my second career after
being in business/project management over 30 years, and quite honestly, less
stressful, less hours, and less corporate junk (if you get my meaning).


So, onto the Paris Project plans. After these "lovely" assignments are completed, I want to finish putting
on Kilz (primer) on the fourth walls (and all the floor) , then I can glue the wedge
to make a flat roof (as the original kit has an angled roof). Then I can wallpaper
that floor.

Next, I want to age the glass roof and put the “glass” (sheet plastic) in. (See previous post comments on Day 12 (link at top) if you have questions about the ideas for that process.) Then I can put together the first floor, but I need to figure out the color trim and base. I plan on having the outside walls stuccoed to make it look a little older. In keeping with my vow to use what I have on hand, I'll next be pulling out possible paint colors. Hopefully by Friday, I hope to ask you, the readers and followers, for your input to the color combination. Chris will be posting pics for me to have you vote and decide what looks best.
May 03, 2019
#Paris #Miniature Project 12: Le Decor!
Wow, Day 12 of the Paris Miniature Project!
The planning continues for the Paris Miniature Project which is my friend Gigi Nephew's Serendipity Shed renovation for the HBS 2019 Creatin’ Contest.
* Don't forget you can put your email in the subscribe to updates box under the Paris photo in left column also to let you know when a new post goes up.
If you like to decorate then this is for you!
April
showers bring May flowers…so what do May showers bring? I think winter is hanging on too tight…enough of
the rain please! So, to hide from the rain
when I got home today from substituting at my son’s school, I worked on the
Paris Project.
Since
Tuesday’s update, I painted the trim and the inside of the openings (door and
windows) as this is a lot easier to do now, then when the wallpaper is
on.
Last
night I had to “Kilz” (primer) the walls before papering…totally forgot this process… I
hate doing this, but it is so much better when wallpapering! Then I put on the wallpaper and noticed that I forgot a wall of the second floor
to apply Kilz on (far left three walls). The
good news is that the first floor store walls are all done. Now I can at least start putting them together and
then work on the floor of the shop! (Looks good! Can't wait to see it go together!!--Chris)
It’s a short update this time as I have to get ready to substitute tomorrow again for a
different teacher. I am not used to having to
get dressed up and going into work! I have not
done it in over a 1½ years!
Until
the next time… Happy Creating!--Gigi
Subscribe to:
Posts (Atom)