March 29, 2019

Latest #Miniature Find & Half Scale Books!


The Paris Project will resume Monday. In the meantime, check out some of my latest minis:

Realized I didn't share my latest cool find! I found this real mini brick set at Goodwill - for $2.50! I like the look of Spanish roof tiles so now I have real ones to use. It also has larger rectangular bricks. It must be an older kit. I found one on Amazon for - gasp  - $88!


Book-Making!

The legal kind! Still at it. I had a bunch of half-scale books saved that I made before to fill book shelves in various projects. Like real life, right? I should have piles of books all over!


I've also been making the "fancier" books in half scale. I'm adding gold accents on the covers, too, with the gold paint. Next I'll be sharing the amazing items I got in this year's half scale group swap once all the boxes have been opened. Been doing this for some 10 years and it never disappoints! 


March 26, 2019

#Miniature #Paris Project 3: Color & Pattern!

(Image: pixabay.com)

 Welcome Back to the Paris Miniature Project!

Moving right along! (If you missed the start, click here, see the links at bottom or click photo in left column. You also can subscribe to the email updates in the left column (I think they're working?)

For me, today is part of the fun stuff of a miniature project - the decorating ideas. I love figuring out the decor, colors and look of a project. Gigi enjoys the building part she's said. I push myself through that part to get to the good stuff as sometimes the construction (like real life?) seems to take forevvver. ha! -- Chris

Ideas for decorating the Serendipity Shed Project:


Oh, wow, a preview!!!! Now this looks really cool!!! The possibilities!! LOVE it!


The Fun Part - The Decorating Plans - Let There Be Color!!

By Gigi Nephew


It was time to do something fun, so I selected ceiling color/textures, wallpaper, and flooring.  I am planning as much as possible to use what I have since I absorbed all of my dear Mom’s miniature items. She was an avid miniaturist building and creating a little town.  She had such an eye for details and knew many techniques.  Unfortunately, she passed away in 2011.  I am sure she is smiling as she sees me doing miniatures. 
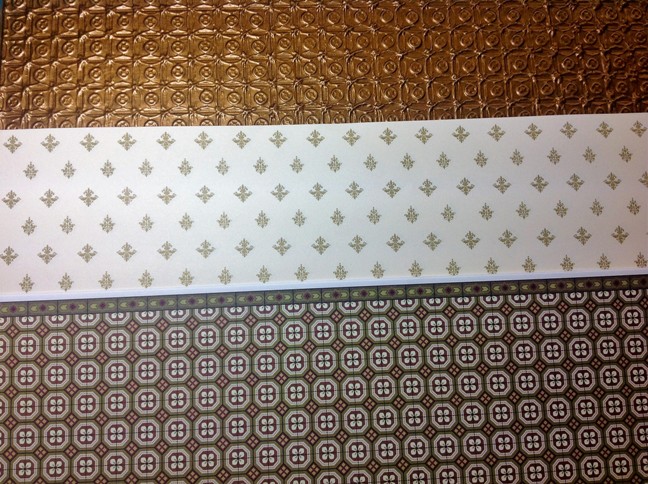

For the shop on the first floor I am doing a brass tin look ceiling.  The wallpaper has a light cream background with little designs (they remind me of Fleur de Lis?).  


The floor is actually a paper pattern resembling a tile floor and picks up the brass color from the ceiling.  I figured using the light wallpaper is better as it's not super busy with all the soon-to-come neat times for sale. (Nice combination, don't you think?)


As the second floor will be the living room, kitchen, and bathroom, I wanted to capture a classic yet historical and rich look thus the main color is a burgundy.  The ceiling will have a white textured wallpaper. The wallpaper has these beautiful roses and the border on top is so elegant. (Oh, pretty!!) 

It all ties together with a rich burgundy carpet. As the kitchen area is small, I may end up using the marble-like flooring from the bathroom that you will read about below. 


 The second floor bathroom will be small so I'm keeping it light with a gray marble floor (which may also end up being used for the kitchen floor), and a textured light rose wallpaper. The ceiling will be white paint. I'll probably use the small white tiles around the  sink and maybe the shower.


 I'm most excited about the décor for the third floor which will be the bedroom and a small sitting area. I absolutely love toile and I am finally going to make an almost-heaven-like blue toile room.  (I really like these colors too. Very Parisian.)

The ceiling will be a textured wallpaper. The floor will be covered with this sumptuous blue carpet.  Sigh…when can I move in?


I came across this heavier stock paper that resembles a smooth stone walkway.  This will be used as the sidewalk in the front and the outside area on the side that has the stairs leading to the living quarters above the shop. It feels wonderful when you slide your hand across it. (Very nice paper!)

Well, my readers that is all for now.  Don't forget to come by and see what's up next time!   By the way, feel free to share your thoughts or your own color schemes. Love to hear what others are doing, as well!


I plan on having regular updates, but at times real life will interfere, of course. The plan is for updates here every Tuesday and shorter ones on Fridays to ensure I keep on track to complete this Paris Project to submit by December 16th for the HBS 2019 Creatin’ Contest.  The deadline seems far away, but time goes quickly. (Quicker than you think!) 

* Go to: Day 1 - Day 4 

Until next time… Happy creating!


March 24, 2019

The Half Scale Slightly Haunted House

Between posts for my friend's miniature Paris Project (see link and photo in left column for first day), I thought I'd share progress on my current half-scale house project. (Click the photos for the full image.)

The Before:


The Almost There: 


I've had this Chantilly house kit by Greenleaf for years. I got it from Tracy Topps (of Minis on the Edge - check out her amazing houses!) and was never sure if I wanted to tackle it. The problem? It was partially assembled.

Well, I kept thinking of what a cool haunted house it would be. At least as a "holding" place until I build the much bigger house I want to do.  So... I gave in.

Ohhhhh... Never ever do I want to wallpaper an assembled house this small again. As it doesn't have to be "perfect," I did a lot of piecing since it was hard to make paper templates and get my hand in some spots. But I survived! (Cue Gloria Gaynor!) Oh and, glutton for punishment, I did more piecing around the front window since I wanted to put brick paper in. Yeah, fun. The large strips can't be glued on until I first cut and paint the wood strips for the front porch floor.


I made paper templates and measured the floors, too. The living room floor (first floor right)  is wood I had. It's perfect for an old house as there's a tiny section missing near the door. You can't tell too much because of how I painted it, but that's okay either way. I still have to figure out a rail by the stairs and find a post I had made a while ago or make another one since I somehow  lost the pre-punched railing.


I love the paper patterns I had for wallpaper. It's scrapbook paper. The gray on the second floor and the shabby blue in the dining room are from Michael's. I probably will use those patterns in another house as they work really well. I love the checkerboard look and use that a lot, too.


The floor is interesting on the second floor. It's actually from a scrapbook paper pad. The floor has a slightly shiny coating. I pieced it on the side wall and at the staircase opening.  It was really too nice to mess up, too, as it fit the room size perfectly.


I love the green paper's print, too, in the living room, but that's all I have. Probably got it in a garage sale find. I decided to sponge paint the bedroom a two-tone in purple with gray. The floor is another cool scrapbook paper with lamination on it. Too bad that's all I have, too. It's a cool pattern.

The upper attic is simply painted gray with some brown accents. I'll add a photo in a later post once I put in some cobwebs and stuff, meaning lots of junk. ha!


The house's outside is painted a medium gray sand paint (sand mixed in for texture). I'll be dabbing on black around the house edges to age it. I'm painting window trim now along with all the decorative trim. Too-much-trim!! The second floor balcony has to repainted and I'll be adding some plastic "wrought iron" trim around it. Once I get to it, I'm going to try using corrugated cardboard painted black for the roof. Yeah, should be fun cutting the shapes.

One thing I decided for fun was to make some flower beds for the "Punny Plants" that  I got a long time ago in a half-scale group swap. (Can you guess what the plants are?) I'm going to make raised beds with foam core and brick as then if I want to move them to the bigger house's yard later I can. I'm also thinking of making a colored brick walkway with some white square plaster pieces I have. I really really don't like all the painting I have to do, but I admit, I am liking the look of this house more as I go along.


The other big project I've been putting off is figuring how to run the wires for LED lights. I'm planning on one in each room. This is the kind of house I figure shouldn't be too bright, so we'll see. I got the 3-volt battery holder with an on-off switch and a AA battery holder from True2Scale. I didn't want to bother with electric this time and wanted to see how this will work. They also have a pretty decent LED tutorial on their site.  

Hopefully later, I want to take apart some light strings and see if I can adapt some. Cheap way to do lighting. We'll see. 

I'll share some other pix later of the furnishings I made. Some will only be in this house temporarily as it's pretty small, but it's good for the moment. 

Oh, and why the title? Well, I've been admiring some amazing dilapidated miniature house photos online - but I just couldn't do it on this one. I'll add some cobwebs and some staining, but I just couldn't totally mess it up. That really is much harder to do than you think. Maybe another house...

Don't forget to come back on Friday for another Paris Project post! Ta-dah! A preview!! (and it's really cool-looking!!)

Until then, Chris 


March 22, 2019

The #Paris #Miniature Project, Day 2

Welcome back! 

If you're new, you can start the series posts here or click the Paris photo in the left column to go to day one. (If you didn't, you also can sign up for the email updates in the box in the left column. I tested it and it works.)


The Somewhat, Sometimes Boring Stuff: Building & Planning, Day 2


By Gigi Nephew 

Today’s focus is on the plan of the structure itself.  The bottom floor of the design will incorporate the Houseworks Street of Shops Bay Window Shop kit, which has the shop window on the left and the door on the right.  The shop measures 13” wide by 11 ¼” high by 13” deep.

For the second floor, I have the room box kit that I thought I would use, but am modifying it with new wood since this kit's wood is flimsier. Already a change in plans - I'll have my husband custom make the second floor.


(Image: Parisian facade, Pixabay.com)

The idea for the second-floor shop is to have a typical Parisian-style look, with three windows with shutters in the front and the door on the side to access the apartment from the outside stairs.  It will have approximately the same dimensions as the shop. It will contain the living room, kitchen with eating area and a tiny bathroom.


Floor Three:

The third floor uses the Serendipity Shed kit from Hobby Builders Supply.  It is 13 1/16” wide by 10 7/8” high by 9 1/4” deep.  It will be accessible from the second floor via a spiral staircase.  


Another change is the angled roof will be modified into a flat surface with a "glass" roof frame, allowing an open-air view. This allows the occupant to sleep under the stars in her bedroom or sit on the open terrace where she can enjoy her morning coffee and croissants, or maybe some wine and cheese, perhaps?  That kit is from Alphastamps.com. 
  (Yay! Progress: The flat ceiling/floor piece is cut and glued. Thanks, Don!) Stay tuned for more photos! - What colors and patterns will I pick???) 


(Image: pixabay.com)

About Me:

 I plan on having regular updates, but at times real life will interfere and deter me as I am also a student pursuing my third graduate degree.  We also have a son who is in eighth grade.  Not to worry, my good friend Chris will nudge me  (NOTE: You bet I will!) to ensure I keep on track to complete this Paris Project to submit by December 16th for the HBS 2019 Creatin’ Contest.  The deadline seems far away, but time goes quickly. (Quicker than you think!) 

* Go to: Day 1 - Day 3 (Tues. 3/26)

Until next time… Happy creating!


March 19, 2019

The Paris #Miniature #Dollhouse Project, Day 1


Welcome Readers!  

Today I am beginning a series of posts featuring my friend Gigi Nephew's new miniature adventure. We both love history and reading historical fiction as well, so this project will be a fun and unique combination of all our favorite interests!

(Image: pixabay.com)

Follow along for an insider's view, some tips, ideas and general mini FUN! as Gigi delves into the creation and kit-bashing of this year's Hobby Builders Supply 2019 Creatin' Contest kit, the Serendipity Shed. 


 I'm helping her brainstorm and do some creative things, as well as serving as her project post-master here.  The idea is to have the posts run on Tuesdays and Fridays, though the Friday posts may be more sporadic, or will be shorter. The posts will be linked and be listed below so you can follow along on the mini adventure. (NOTE: You can sub to email updates in the box in the left column.)

We hope you enjoy the journey - and please vote when the time comes!
--Chris & Gigi.

Day 1 - So It Begins!

By Gigi Nephew

 On the advice of my dear friend Christine Verstraete, I will provide regular updates on my next miniature build that I now refer to as - The Paris Project.  A big thank you goes to Chris for helping me to actually do this in a public manner, and for all your inspiration and friendship!     

Book Inspiration

As I was reading the books, The Paris Key and Letters from Paris, both written by Juliet Blackwell, the vision for the Serendipity Shed came to me.  I envisioned a three-story old building in the heart of Paris that has a shop on the ground floor that makes and repairs locks and keys, sells masks, and also has some Paris memorabilia.  The two floors above the shop are the living quarters of the woman from Wisconsin who pursued her dream to own a shop and live in Paris.

(Image: Potential components for miniature building levels.)


 The mask portion of the store in the book is based on the accounts of L'Inconnue de la Seine (translated “the unknown woman of the Seine").  According to the stories, a young woman was pulled out of the Seine River at the Quai du Louvre in Paris around the 1880s.  A death mask was made of her face which became a popular fixture on the walls of artists’ homes after 1900. In reading about the history, this became a well-known method to capture a loved one or a famous person’s face upon death. (Image: wikipedia.com)

 Keys and locks have been around a long time and the many different designs of keys are a unique art form and also hold mysteries to the doors they unlock.  The theme for the miniature shop is not only to cut keys, but to repair old locks, and sell unique keys as art work. (Image: pixabay.com)

 So, with the vision of this building incorporating various historical aspects, I am excited to begin another mini adventure! I invite you to come along for the journey. Maybe I'll even inspire you to start a project of your own!

** (I will keep adding the series of links here. Links may not be immediately active.)

* Go to  Day 2   - Day 3  - Day 4  - Day 5  - Day 6 - Day 7 - Day 8 - Day 9  - Day 10Day 11Day 12 - Day 13Day 14 - Day 15 - Day 16 - Day 17 - Day 18 - Day 19 - Day 20 -  Day 21 - Day 22 - 23: Update  -  24: The Name -  1-6-20: Finale preview

Until next time... Happy creating! 

March 11, 2019

March Project - HS Dollhouse

I've been rather obsessed with getting this half scale dollhouse kit, Greenleaf's Chantilly, done. (Wow that went up in price. I think I've had this kit part-finished for probably 10 or more years! It's been a long time.)


I'm much further along than this pic, but I wanted to put a post up. I have the inside done, except I'm thinking of adding some interior doors and have to put the front door on. I have to add some staircase railing yet, too.

It's going to be a "kind of" haunted house as I simply have not been drawn to making it completely spooky and dirty. I've tried and the house refuses. haa! We'll see. I'm going to add cobwebs, a little dirt, but not overdo it. I really like the spooky, abandoned look, but I'll have to do another project, maybe a book box as those are fun. I am going to try to put some LED lights in with a switch. Have to figure out the positioning yet (and how to do them. The scary part!)  

I've decided the house will be a light-medium gray with dark gray edges (using sand in paint)  and black trim around windows. the triangles in front and the large top of the roof are dark purple. I had it in mind to do a real purple color for the posts and trim. Even had to go buy some as, of course, I had every other purple and lavender but that color! ha! You know how it is when you have a certain idea in mind. It can't be anything else! 

The underside of the roof is a medium gray. The front porch will be wood strips and may be black and gray, I think.  The roof is going to be corrugated paper painted black.

I'm painting the outside and outside trim at the moment. You have to decide what goes on first with this house. I'll be adding a wrought-iron type rail on the lower roof as it seems odd not to have anything there. I'm also cutting off the bottom posts that would be right in the center as they just make it too crowded. I don't think they're needed. 

Stay tuned. I'll add more once I get some decent updated photos.