April 26, 2021

Half Scale #Dollhouse Update 4 Shingles!


The latest - some "small" updates! Shingles! (Not the kind on TV!)  (Click photos for full size. Find recent posts in archive in left column.) ** On the last few rows on the back side now. Almost done!!!

Yeah, never, say never. Ha! I wanted the asphalt shingles but the construction guy chose the wood. He's doing the shingling, so this is where we're at so far. Mixing the styles (and hoping we have enough!) Nearly used one bag (400 shingles) of square ones so far.

You see a peek of the trim in the photo above, so here's a look at the windows with the top trim. I'll be adding light green/sage shutters on the front windows yet. Have to add thin gold trim on the tower yet but no shutters. I like how they turned out so far. They're painted a pine green with gold over it.


Nothing too exciting here yet, but at least the sink counters are in progress. We cut the right angled part slightly shorter so I can fit it by the window though my windows and curtains are kind of long. But have to make it fit.


Here's the office/den wall cabinet so far. A few books and binders, and probably some newspapers, to add yet on the top shelf. The painted charms made nice bookends. And I found a tiny metal camera that I painted. Just have to add a tray and some piles of photos! Even found that metal paddleboat at the last minute, which fit the theme! I'm still debating - I'm not too keen on the plain doors so I may find some tiny travel images to put there yet. Not sure. I do have some postcard images that could work. 


That's it for the moment! Getting there... thanks for stopping by again!


April 19, 2021

Half Scale #Dollhouse: Updates 3 #miniatures


 It's time for another showing of the latest updates to the Half Scale Victorian Dollhouse! (FYI: Scroll down for all the latest posts on the house, or you can look in the archive list at left as well. Click photos for full size.)

So, what's this above? I finally found a few of the new DIY Minis line at Michael's. (After two trips, mind you.) It is a mish-mash of scales, some rather cute pieces, some meh, but there also were a few that can be used for half scale. I couldn't resist this little fireplace for the corner of the deck as the colors matched perfectly - and it lights up! I also added a touch of red-orange paint to the flames.  Here's another photo where I covered the flash: 


What else? Most of the trim has been added in the rooms, though photos have a way of showing  things you didn't notice before! I now realize that I need to add a piece of trim wood next to the staircase in the hall! Wish I'd seen that before the lamp was put in. Well, it figures, right? 😁


Here's the wall leading to the attic bedroom. I made the door. It worked best to cut a piece from the flooring since it already had the grooves in it! (Yes, there is a piece of wood trim on that wall since I took this photo! ha!)


If I have to pick a favorite room, it might be the attic (on second floor left next to the fern art room above). Love how the brick and wood looks! The ceiling is one of those blotchy scrapbook papers that has an old look to it.) I may even add some cobwebs in the corners yet. I may make the attic really spooky near Halloween. That'll be fun!


Here's the small second floor bedroom to the right of the art room. The door leads to the deck. There's now a small strip of wood across the top which will be shingled.


Also added a sconce on the kitchen wall below. There will be a work table under it. The kitchen counters will run from the left, with sink under left window, and out to the right. It leaves room to split the cabinets to have the ovens on the back wall on one side and the pantry/fridge on the other side on the right. Unless I change my mind again! I'm thinking of the same vintage white/cream color I've been using. Not sure yet of the paper inserts on the cabinets.


A few things I made recently:

Bookcases from kits by Ani. I added the matching scrapbook paper inside.(Yes, have to touch up a few ends with the stain. I hate to keep retaking photos!)  They'll fit the office/den, next to the window. I want to put a window seat between them, hoping that works.


Plant stand: Made from a couple extra wood boxes from a half scale kit and a wood block. I added brick paper and embossed stickers I found at the Dollar Tree. Haven't decided on what flowers to add yet. Then I'll glue the pots down.


This neat wood carving is going on the peak at the front of the house. I was lucky to have just found these and painted it to match. There are a few others but this one worked best.

A set of cool new animal-themed rugs I found on Ebay to fit the office/den and the art room. There are a few more not shown here. I bought them as I wanted the shaped ones!  I'm going to add large ferns for a tropical look in the art room.

So... that's it for the moment. Shingling is next and then the front. Also have to add the wood trim on all the back wall edges. Thinking of using a brown and white clay square sheet I've had forever to form a front patio plus an area for bushes and a garden. It will have a few steps down and the railings just in front of the door, I think, instead of having the usual big porch. We'll see!

Thanks for stopping by again! Come back soon for more updates!


April 14, 2021

The $1 Million #Dollhouse, Kind Of #miniatures

 The roof is attached Yay! It's actually looking pretty good. (Oh, and wait 'till you see the very pretty wood decoration I just found at Goodwill and painted. Better than just using the usual Victorian-style arch on the top!) 

And then we realized something...


Oh, no! Who the heck really wants to glue hundreds of these tiny 1/2" high shingles on one-by-one??? What a lousy *&^#### project! Sure, wood looks nice, but... Big but!

Well... looked around and don't know why I didn't realize there also are strips of the asphalt roofing in half scale size. Yes! So more $$$$. ha! Hey, my "small" contribution to the economy, right? So we bought these:


So, waiting on that.

Working on it being the $1 million house. ha! Not quite, but.... it seems every time we turn around, there's something else to buy. It adds up. And no, I'm not keeping track though I do have some receipts saved. 

Guess that's why people do the self-contained Chinese-made house kits. You get everything though the quality isn't always there and the scale can sometimes be off.  I have several of those, too. I bought a small one recently from Hobby Lobby just to make some of the items for the girl's bedroom and maybe the deck if they fit right... Or they can be used in the playroom. Either way... 

With most projects, it starts out with some things and then you need more. It started with lights, needed more. Then it was kits. Oh, there are never enough kits! (Coming today. I'm looking forward to doing that kitchen, though I'm also dreading it once I see all those pieces!)

I also have other furniture kits saved,  probably using some once I see if they fit or not. After this.... is there an after? Yes! Do I start on the sea captain and mermaid house, or do the Haunted House? I have two house kits set aside and  I've been saving-saving-saving things for both.... I have some different decorating ideas for both of those! Hmmm, decisions, decisions.  Stay tuned! And thanks again, for stopping by!

April 12, 2021

April Showers & Spring Flowers! #dollhouse #miniatures

 A quick update as I was pretty happy about the latest mini-make.


Thought I'd add a fun little spooky touch to the deck on the Half Scale Victorian House. As I mentioned in the previous post on the latest updates, the deck will have the "wrought iron" fencing around it with  some flower boxes. 

I wanted to do something different, so these are larger than the smaller window boxes to fit on or in front of the fences. The boxes are cut from 7/16" wide channel molding for 1" scale railings. I cut a small piece of wood to close in the gap on the ends, painted, and then filled it with Model Magic clay with moss glued on top. 

The "flowers" are actually tiny clear plastic flower beads I've been saving. Simply dab the end of florist wire into Tacky glue and then yellow paint to form the center. Once dry, dot glue underneath the blob and slide on bead. Put more glue underneath and slide on a 1/8" green circle. Press up to bottom of bead for better hold. I thought they turned out real cute!

 I decided the box needed some kind of decoration so I came across this package of teensy Halloween-shaped brads. Broke off the ends and the moon shape works perfect! I'll have to make other boxes so I can use the tiny bat, pumpkin and other designs when I do another Haunted House!

More to come! Trim being finished and the roof will be going on soon. Then the hard part - cutting a roof and *&^! shingling. Don't like that part! 

Thanks for stopping by again! 

April 09, 2021

Half Scale #Dollhouse: Next Challenge #miniatures

 Moving right along on the Half Scale Dollhouse. Getting more lights installed.


Speaking of lights, we ordered several standing lights. First time I ordered these and I have to say I'm impressed. The lights are well made; nice colors on the beads on the pole, bright bulb and the shade even screws on and off! It has those plug-in pin bulbs so you can replace the bulb. (Good luck on that as it's so-tiny.) But the lamp is even nicer looking than the photo. I'll add some lace to the shades on a couple for some variety.

Also ordered some furniture kits from Sdk Miniatures. (Yes, yes, it turns into the $1 million dollhouse. haa! (HINT: Never add everything up or keep a running total. Trust me on this. ha!) 

I've ordered furniture and flower kits there before so I know how they are - nicely made and go together well.

Next: The Kitchen -Kind Of

While I had a manufactured kitchen kit and a couple other loose kits, I still didn't have a good idea what to do in the kitchen.  (I do have this full set and the modern stove magnet, too, shown here on Emily's blog.) The kitchen sets the tone of the house, so decorators and real estate ads tell you... I also have those HS magnets - a black Victorian stove and an older '30s-ish white stove, as well a metal Tootsie Toy monitor-top fridge, but... this is a newer house and the people really like their conveniences. So... what to do? 

Then I saw someone's modern kitchen on FB and thought, that would be different. For me. My other kitchen in my HS Country House is kind of vintage-looking. Another small kitchen I made (and since took that cabinet-type house apart) is also older looking. 

Well, I bit the bullet. I almost decided to build it myself, but considering how much I like measuring (Not!!!), I decided to buy a kitchen kit. I like kits and the price is always better than the finished product plus you can customize it how you want. So, other kitchen pieces I have will go to the planned Raggedy Ann house and whatever else I come up with. 

I'm not a big fan of modern contemporary stuff but this really is a nice kitchen kit (photo below) at Sdk Miniatures. So I ordered it.  Obviously I can customize it how I want, so I'll have to think on design and colors. Wish me luck. haa! I'll probably do a follow-along blog to share the pain and any tips I come up with. Stay tuned!


April 07, 2021

Half Scale #Dollhouse Update 2 #miniatures


As I mentioned in the previous post, I've been making some great progress on the Half Scale House.

Getting quite a few things done. It's amazing as this house sat for oh, some 20 years, I think. Being home with the pandemic and over winter, it seemed like a good project to work on to give us something to do. So it's amazing now to actually see all the rooms wallpapered! It wouldn't be as far, of course, without hubby as the contractor. He does the electric, construction and papering, though I have helped with the soldering.

There's still some trimming, small fixes and touch-ups to do, (so please ignore little paint blotches, etc.) but it's come a long way! I wasn't too thrilled at first, I admit, as the house seemed so plain. But it's the different little changes that I think are making it pretty cool! 

Top photo: This was a big change. That was at first one big room on the end, with the octagon shape going to be a tower that connected to the bedroom. Ho hum. Thought about it and decided I really wanted a rooftop deck.  So... the room was split with the brick wall on the outside and the print tile floor. I have to cover the sides of the light posts yet (taken from one of those Christmas village sets). There also will be the plastic wrought iron fences along the top edge with flower window boxes.

I decided it really needed some decoration so I painted a decorative wood strip to go under the top wood trim. Here's the window boxes installed so far, too! I like color as you can tell. Ha! There will be dark green and gold decorative pieces above the windows, with mustard yellow edging along the seam lines. The other front windows will have the sage green shutters. Yes, a lot of these are last minute decisions, but that seems to be the way this house is going! 😊


The other side of the deck will be a small girl's bedroom. I like the look of the brick walls. There'll also be a wood floor in here. The two side walls will have this scrapbook paper, as I like the vintage look and the slightly larger pattern.  I also have to add a fake door on the left wall to "connect" the craft room on the left side. I think it goes well with the bed I'd dressed previously.


Other rooms: again ignore any little mistakes as they're still in progress and I haven't done all the touch-up's yet.


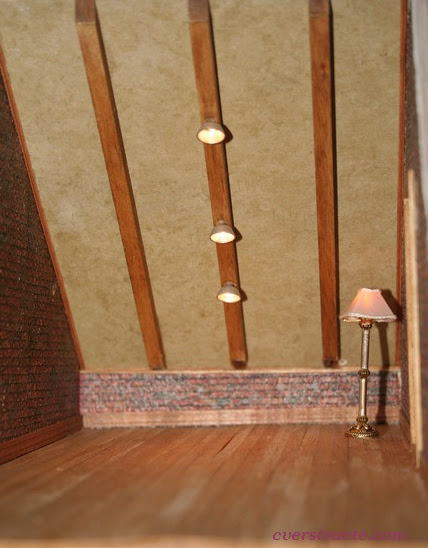
Left side attic room on second floor above the main bedroom. It will have a wood floor and ceiling, with silver industrial-looking lights hanging down. There's a brick wall there next to the right side wood floor. See craft room below.


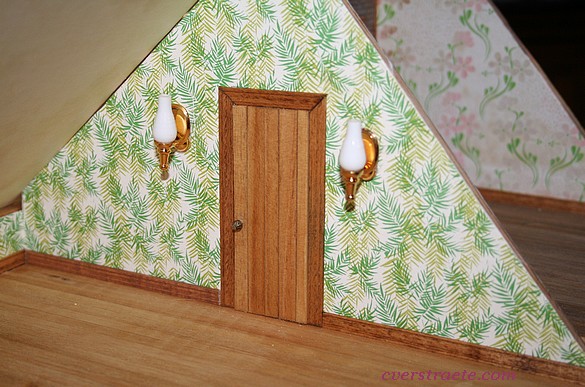
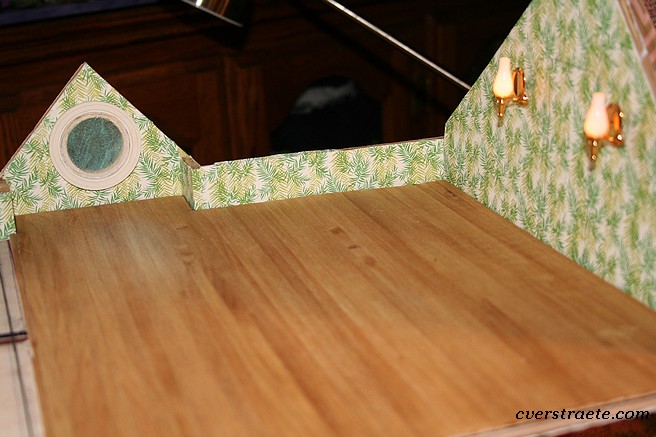
Crafts/art and sitting room on right side next to the attic. The wall will continue the wallpaper on this side, with brick on the attic side and a centered door.  There also is a fake door on the right wall between the sconces (girl's bedroom on other side with deck.) The circle window has full spokes on the outside. That's mustard yellow. I have to add some kind of stone pattern around the window on that top outside section.

Other additions:

Decided I didn't like the plain first floor hall so I'm adding some vintage tropical wall panels for color. The "stained" picture is for the attic. I'll add the small tropical art in the craft room, too, I think. Waiting on some floor lamps, too. (Yes, more lights, ha!) Realized the hall is dark so will add a light behind the stairs with a bookcase.


Made an Easter basket and a small vintage flower basket from vintage Hallmark basket patterns. It's hard to tell here but the green basket has that shredded yellow basket filling in it. 


I think I forgot to share these small animal and insect charms I found at Hobby Lobby. They'll go on the den/office walls. 

That's it for the moment. More to come! Thanks again for stopping by!


April 05, 2021

Plants! #dollhouse #miniatures


It's Spring so time to get some things planted! 

 Made great progress on the Half Scale House. The rooms are all lit and we decided to split the end room on the second floor by the tower. It'll now have  a small girl's bedroom and a rooftop deck on the other side! Yes, that door will be locked so the girl doesn't sneak out to look at the stars at night! ha!

 I like that the bedroom will have a brick wall and I found some interesting vintage-look wallpaper with pink flowers for the two walls. The design is a bit larger, but sometimes I think that works. It goes well with the bed set I had dressed earlier. More photos coming! 

In the meantime, I thought I'd share what I decided to do in the window boxes. I painted them a mustard yellow and decided the shutters will stay a dark sage green. Have to decide on the color for the decorative pieces above the windows yet.

The planter boxes are tiny but I wanted some big flowers to add interest. If you haven't looked, I found these plastic plants for fish tanks at Meier. They'll make nice small bushes outside, too. I painted the daisy-like flowers and added black flocking in the center. The boxes also have moss on the bottom and I added some tiny impatiens flower punches for more color. I'll paint some of the other bushes, too, to take away the plastic look.

Spring makes me want to make dollhouse plants, too, so I'll  be making lots of plants for the house inside, too. Plus I have to dig out plants I got from past swaps in the Half Scale Group. I'll share photos of those soon, too.