January 13, 2024

Half-Scale Park Ave. Mansion Kits & Fridges

The Mansion Roof lit up. (Click to view photos full size; see last post - exterior, and archives in left column for more.)

 Yes, I've been working on a few kits in-between celebrating a new story release which I'm really excited about in:  ((I Just) Died in Your Arms: Crime Fiction Inspired by One-Hit Wonders - some cool music-inspired fiction in here. My story is based on the song "Wildfire," see post).

(I know, not a real inspired photo, but trim really does finish off a project.) The fireplace is in, too, so finishing that side up.

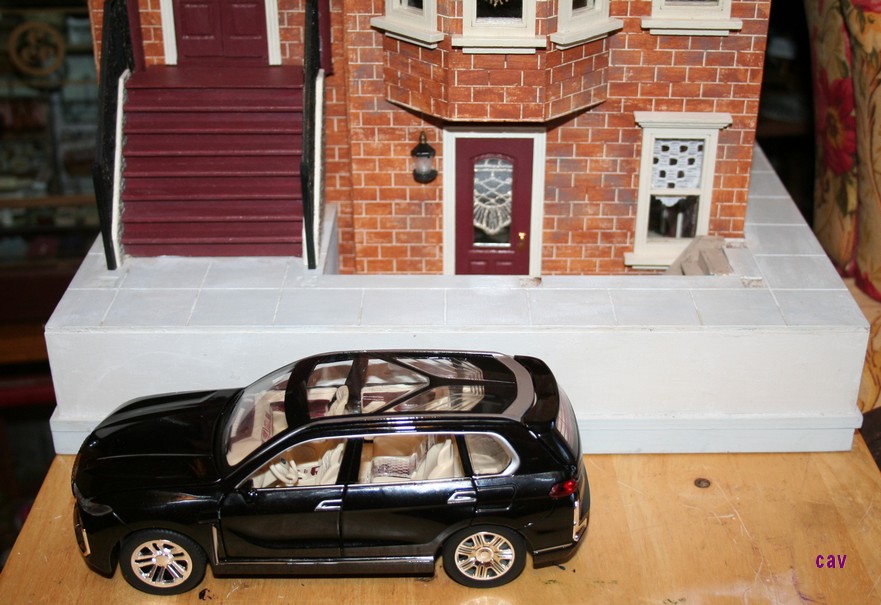
Still working on the Mansion - I got the back trim done on the outside, which does make it look better, more "finished," and I also decided to add some white LED lights to the bushes on the roof. (See top photo.) After all, if you were sitting out there at night, it would look pretty cool. Still deciding on what furnishings to add, though I kind of like the small planters for decoration. Here's the "night view": ha!

Now it comes to planning the inside. Working on what to fit in but I got inspired to make a few kitchen kits. I'm leaning toward two kitchens - one with the first floor diner and a small "efficiency" kitchen in the chef's third floor room; I have to decide what to use and what will fit. And if you wonder, the older lady on the second floor doesn't cook. She goes downstairs or the chef brings her meals. Why cook when you have a chef - and a diner - on the premises! I may give her a microwave, though, and maybe a tiny fridge to heat up snacks or leftovers. Not sure yet.

Some kitchen cabinet pieces from MiniEtchers.com. Deciding which to use where. I could use the center cabinet for the lady's microwave and "pretend" it's refrigerated. I might do that. (Yeah, I should've turned the doors around on the left cabinet so the "knobs" would be on top. ha! I'll fix that.)

The counter I'm figuring out for the diner is an L-shape in two pieces, cut on an angle to fit two walls. Then I'll add a customer eating counter, too, with chairs. The "efficiency" kitchen upstairs may be one small straight counter, using parts of this kit from Ron Chase, D-Tales Miniatures (he makes all those fancy filigree-carved clocks.)  


Here's one cabinet and a new fridge I got:


For comparison, the cabinet is 1 1/2" square. I found this cute plastic fridge on eBay. Very detailed and only $5. That it was my favorite color yellow, and that it has shelves and a pull-out bin, got my attention. It's a little smaller but it could still work, I think. I can always add a small base under it, too. I saw one of those tinier and thinner real-life fridges like this at Menard's and they are much smaller than a regular fridge.


As many learn, 1/24 or half-scale furnishings come in many sizes. Most will work, depending on your setting and what you use with them.

The yellow fridge is just under 2" high and is 1 7/8" wide. 

Below: 

The plastic vintage fridge (non-opening) is 2 1/4" high and about 1  3/16" wide. I might use the older fridge in the diner, not sure yet. 


The third wood fridge kit, unfinished, is from a Greenleaf punch-out kit. 

The wood fridge kit is a bit bigger at 3 1/4" h and 1 1/4" w. (The top door is only taped on.) They all vary but could work, so we'll see what I decide on. I kind of wanted to see what I could make to fill one - but holy cow! It would be very tiny items for the yellow one. ha! But I am leaning toward the old fridge and the yellow one since the Mansion isn't super big. The wood fridge could fit in the log cabin I'll do eventually or even the Raggedy Ann house. We'll see.

So that's the update for the moment. I did finish my swaps for the Half-Scale group and mailed the box. Yay! I went for a useful, "older" item this time. I'll share the contents when it's mailed back in March. And despite several inches of snow outside right now, spring really is around the corner. Thinking of April and the dollhouse shows! Can't wait!  (** Update: Haa! I'm optimistic since we got like 8" of snow and it's now -8 below zero right now on Sunday!)

Thanks again for visiting! I'll share what I get finished -  soon, I hope!


January 09, 2024

Releases Today! Crime Fiction Inspired by One-Hit Wonders!


Releases Today! The unique anthology, (I Just) Died in Your Arms: Crime Fiction Inspired by One-Hit Wonders is now available!

Based on 12 somewhat familiar songs, including my haunting tale, "Wildfire," inspired by the sad song  of the same name.

* *** Limited time - Special SALE! Buy the paperback - ($10) -get the ebook free HERE. ** 


Get it here! (If any problems, use main link here.) Paperback only $10! 

*Another option - paperback only $12 at IngramSpark.

 * Also available on Kindle and at Barnes & NobleSmashwordsKobo - UK, Kobo - US 

* Just saw it on the Japanese Kobo site  * a German site - and Australia 

(Note: affiliate link may earn some commissions.)

                                   ***********


Authors and Stories: (links are to YouTube videos)

* Vinnie Hansen: 96 Tears

Song: 96 Tears, ? and the Mysterians (1966) - Listen 

Jeanne DuBois: Na Na Hey Hey Kiss Him Goodbye

Song: Na Na Hey Hey Kiss Him Goodbye by Steam (1969) - Listen

* Josh Pachter: The Rapper

Song: The Rapper by The Jaggerz (1970) - Listen

* J. M. Taylor: It’s Hard to Die

Song: Seasons in the Sun by Terry Jacks (1974) - Listen

Christine Verstraete: Wildfire

 Song: Wildfire by Michael Martin Murphey (1975) - Listen

* Sandra Murphy: Pigeon Talk

Song: 867-5309/Jenny) by Tommy Tutone (1981) - Listen

 * Joseph S. Walker: Come On Eileen

Song: Come On Eileen by Dexys Midnight Runners (1982) - Listen

* Wendy Harrison: It’s Raining Men

Song: It’s Raining Men by The Weather Girls (1983) - Listen

* Bev Vincent: Somebody’s Watching

Song: Somebody’s Watching Me by Rockwell (1984) - Listen

* Leone Ciporin: Life in a Northern Town

 Song: Life in a Northern Town by Dream Academy (1985) - Listen

 * Adam Gorgoni: Bitch

* Song: Bitch by Meredith Brooks (1997) - Listen

* Barb Goffman: Teenage Dirtbag

 Song: Teenage Dirtbag by Wheatus (2000) - Listen 

January 04, 2024

Half Scale Mansion Trim & Exterior Update


Remember the plain jane - not-quite-finished exterior?

Ah.... it's undergone quite the transformation with all the necessary trimmings in place!

(Be sure to click photos to see full size!! *See last post.)

Keep reading below.... πŸ‘‡πŸ‘‡πŸ‘‡

I just LOVE πŸ’— how the extras and the different details I used really add to the design!

I don't like plain or drab, so I'm always thinking up different elements to use. But first....

Something Fun! If you didn't see my previous toys post, my friend Gigi found a car which looks good with the house! I'll have to fit dogs and lots of boxes in here for moving-in day!


And now... The results so far:

TA-DAH!!!!


The Roof:


I just love it!! πŸ’—This turned out pretty cool. I hadn't even thought of a rooftop garden until Joanne mentioned she was doing one. (Yeah, copycat I am! See her "modern" house on a previous post.) (Ignore all the bare edges as I have to cut and glue trim yet.)

 I cut 1" scale stairway railing into pieces for planters to fit around the top edges on the roof. I drilled holes in the center and filled them with a somewhat sparkly fake fern I found at Christmas as I wanted something kind of bushy with some shimmer to it. Can't have the people falling off the roof. ha! I'm thinking of adding a string of tiny white mini lights but I seem to only have multi-color, so will keep searching.

 I really like the plants as, to me, it looked too plain without them. And yes, that is a Gargoyle on top to "protect" the building. Maybe later I'll add smaller ones at each corner. (I realize I have lots of skulls in the stash but need more gargoyles!) I glued fake grass on top and put a fake doorway that leads to the "stairs" going down. Yeah, there are lots of "fake," I mean  "faux" elements. haa!

The Front:

It takes me sooo long to finish things as I'm never happy with doing a kit or any project as-is. I always have to change things!

One thing always leads to another and another: I used the staircase railing pieces for the front posts since I had to change the portico as I forgot to make room for the light I'd already added. I also added a "metal" sticker design (Dollar Tree) to fill that empty space in the center. 

So, the light got moved over a "smidge"(technical term πŸ˜†), then new posts were cut which led to adjusting the staircase railings. And I didn't think the larger brick posts looked right at the ends of the railings, so I cut smaller wood posts. Those look much better!

I then had to move the brick post over slightly to the right and cut the fence a tiny bit to fit. Whew! Still with me?

 πŸŒ· Now it's pretty much done, except I still have to add some tiny window boxes I made and make flowers 🌸 for them. Not sure whether I'll use them only on the tower windows or in all of them. Will have to see what looks best. What do you think? 

πŸ‘€ And... I keep eyeing those flat bare spots on top of the brick posts, which seem to be calling out for some kind of round planter pots. See what I mean? Will have to hunt in my beads; I know I had some small bowl-type beads... or it'll be back to the craft store. Again. Besides, I like flowers. They're like books (mini and real.) Can't have too many. 😊

Inside:

Third floor doorway:


I put in a couple "beams" to cover that slot I cut in the ceiling.

My idea for the faux doors leading to the "hallways" worked out great - after I had to redo some things--of course! haa! Luckily I only covered up one tape run and the paper pulled up so I could pull out the light, move it up, and re-solder it since it didn't quite reach the hole. I moved a second light also. I drilled a hole in the wall and in the small box, which was then covered with a printed transparency. And it worked! (I had to re-solder quite a few times and believe me, I hold my breath every time that it'll work!)

Second floor: Got the rest of the trim done. Just have to glue the fireplace in (right side, below). I want shelves but I may just add one or two across the whole wall as ugh! all the measuring to make them fit, I'm tired of measuring (or with me, measure once, cut three or more times. haa!) We'll see what I end up with. (I might have to adjust the bottom of the door a bit I see.)

I like the ceiling molding which has scribed lines at the bottom that I touched with the gold paint  to match the wallpaper (scrapbook paper.) I really liked the shiny gold accents in the paper. I also changed the brick inside the fireplace to match the white brick paper I used on this floor. 

First floor: 

It's hard to tell here, but the ceiling trim in the diner area has a scalloped edge on the bottom which gives it a fun, "circus" feel to go with the striped paper.

Next: Working on some furnishings and kits, and I need to configure the diner counter, cooking grill, etc. to see what will fit and what goes where. Got another of those ideas in my head - burgers sizzling on the griddle - so it'll be fun to see how I can get that idea to work and look right. 

So far, so good! I'm pretty happy with how this is turning out. Stay tuned for more updates!

Thanks for visiting again and following along on my projects! Hope you have lots of mini fun in  the new year!


January 01, 2024

Dollhouse Miniatures Gifts & Toys

Halloween all the time. Isn't this cool?

 HAPPY NEW YEAR! I got some pretty cool new miniatures, mostly from my good friend, Gigi. We love getting together to work on kits when we can and also enjoy celebrating a Merry "Mini" Christmas so figured I'd share the latest toys.

We also enjoy finding things that can be used for minis, even if it's not the item's actual purpose. Oh, and there's no "crime" in re-using things to make into something mini! ha! It's like the mini charm bracelets I have. Someday I may take them apart, but right now I still enjoy wearing them. I pick them up cheap at thrift stores or yard sales. (Click photos for full size.)

* Raven and skull. Just love this!!

* This is a cute little house kit (the blue one.) I saw some people showing this online. It'll be fun to do even if it's tiny. ha! But I already have a "theme" idea in mind... Yeah, I can't do things as they are. ha! I'll share the progress once I start it.


* Speaking of little houses, my friend made and finished up this tiny kit for me. It is awfully cute. I fell in love with that mini fridge! Yes, it is that small! (4.25" tall)

* Another real cute house! This one had a bunch of round chocolates in it. We like to wrap up lots of little minis, so we'll have our own Advent calendars next year. Loved watching people open theirs this year and wished I'd bought one!


* She even gave me a mini car for in front of one of the houses. haa! I'm picturing a trunk full of stuff and dogs in the back seat. And it does fit well in front of the mansion! Now I'll have to expand the front and add a brick walk or street.

* It's so fun that miniatures have caught on, with all these places coming out with those plastic balls filled with miniature toys and figures like the Mini Brands Toys, Disney versions, and others.

Recently I found a World's Smallest brand mini kid's three-wheeler trike. Had to have it! I am still looking for the Mini Popper push-toy.

Then I tried something new. There's a new set of Kylie (yes that Kylie) Bratz mini dolls which are actually kind of cute (but pricey as you only get 2 items for $9. The doll on right; the other item was a fake phone (not shown.)) I also got a couple of the mini Bratz dolls which are neat. I never got into Bratz dolls but I like the tiny ones. Now they need some Monster High mini versions! I do have a few of the regular size dolls. And I got a few more of the Mini Brands toys. (This is over time, mind you! It gets expensive. ha!)

 So, until I make an actual doll shop, these will all go in the toy store though I am thinking of saving the kid's trike for the Raggedy Ann house. I do have another roombox with shelves in it that was going to be a shoe store. Maybe I should redo that for all dolls. That's a thought...

Been tempted by the Mini Brands Foods but haven't tried that one yet as they seem to be more Barbie scale. But the kitchen items are pretty cool if I ever decided to make a Cher doll roombox, which would be so big that I really don't have room (right now.)  Here's some of the latest from the Mini Brands toys:

Well... that's it for now! Back to mini work. 

I'll be sharing more on the Park Ave. Mansion soon. Have made some good progress on it. Stay tuned! 


Thanks for visiting!