September 26, 2022

#Fairfield #Dollhouse Furniture & Porch

(Chantilly haunted house on left.) Click photos for full  size.

The Porch:

Not done yet, but one of the things I'd been putting off was figuring out the porch railings on the half-scale Fairfield dollhouse. Always worried I'll cut them wrong or something, I guess. I had some flat railing pieces I didn't use from the recently finished half-scale Van Buren haunted house (which I still have to furnish on the inside), but wasn't too keen on them. I thought of using plastic railing, but I didn't want to buy more and the ones I had were too big.

I'd bought these "wrought iron" chipboard fence pieces before from Alpha Stamps. I'd cut the top row off and used it on the balcony of my other Greenleaf Chantilly Haunted House. (See part of the railing in the top house photo at left.) 

I cut the railing pieces to 1" height (they're 2" high) and used half glued into the wood railing channel pieces. I hate to show things unfinished but I was so happy with how these will look. I wanted a more delicate-looking railing so these work out great. You know how it is when you have something in mind and that's the only thing you want? ha! 

The whole railing piece will be painted black, which will go nice with the black trim. I also have to finish painting the porch posts; decided to add the porch floor color on them, too. The railing on the top porch will be slightly different and may use the pieces that are a bit shorter, but they'll look about the same as the other wood rails are a bit thicker. I want to  use what I have and it all will look similar enough. That floor will be a different color anyway. Leaning toward the worn wood look so far, but I may change my mind, of course!

Playing Around: 

 Got the Tootsietoy furniture pieces I bought so was doing some positioning. I think these will work well in the rooms once they are re-painted. The other pieces should fit in the front hall and maybe upstairs and in the dining room, too  (See previous house update here.) 

I like using this table instead of a nightstand in the main bedroom, I think. We'll see how it all fits in.

Also wanted to share this cute fabric I just found at WalMart. I'll have to use it somewhere. Loved the dog print! I just might use part of the dog print in the girl's room. 


That's it for the moment! I'll share more once the porch pieces are painted and installed. Then I'll be also adding the second floor ceiling/third floor and working on those rooms next.  Onward!

Thanks again for visiting!

September 23, 2022

#Fairfield #Dollhouse Rooms: Update!

Exterior: Starting to look like a house! Yes, I have to add siding pieces and trim around the bay section yet. Working on top porch, deciding on color, and what to use for the railings. Have to add black trim on tower plus put in attic windows and stained glass. Deciding on finish for stairs. I'm also thinking of making a few flower boxes for some windows. I think that'll be a nice touch.

(Click photos for full size.)

Still working on the Fairfield Dollhouse, but there's a lot of progress, even if I've been slow posting on it. (See last update.)

Still plenty to do on the outside. That's why this takes so long. ha! I really don't like the trim work. I like the decorating and picking the colors, etc. but it has to be done.

Inside: I already showed the first floor on the previous post. (Link above.) Once I do a final adjustment in the kitchen I'll attach the kitchen alcove and the first floor will be finished. Now the second floor:


Hall and tower room: I have to add the small back wall (leans on the roof) on the tower once the third floor/second floor ceiling is added. The tower uses scrapbook paper with handwriting on it. I left out the third floor there to make a tall ceiling room. The ceilings for this floor are papered; I just have to glue on the ceiling light fixtures. It took some fitting and cutting to get that room to fit next to the window!

The staircase rail enclosure was made using pieces cut from those wooden Chinese fans. I've used those in all three of my houses since they always turn out nice. Once the floor is in, I'll finish painting the spiral staircase and install that next to the small light on the right wall. 


Hall: The bath is just large enough to fit the ceramic tub and toilet (set originally from Hobby Lobby), and an old Mattel Littles pedestal sink. I lost the toilet seat so made a new one from Model Magic clay and painted a piece of wood for the cover. I added a small scrap of wood painted silver for a handle. The mirror (from a past Half Scale Group swap) was a perfect color to use here. Only the tub and maybe the sink will show once you peek inside the doorway but I still have to make it all look right. (Sliding door, previous MiniEtchers stock.)


 The light on the left wall was made using some small glass tube containers I found at Hobby Lobby some time back that look like medieval lights. They have a cap and are held together with a pin but I only needed the bottom piece and tube for this.  This is the small one; there also are larger ones about 1" or so tall.


Bedrooms: The doors in the hall open into the bedrooms. I added brick-papered walls on each side of the center fireplace in each room to divide the rooms. 

Bedroom 1: I found this dragon print paper a while ago and luckily I even found where I'd stashed it. haa! For variety, I'm going to add pieces of trim around the ceiling painted a light blue to match the paper. (Found that in the stash, too, and the color happened to match!)  I put up simple lace valances for now, but will make long pleated curtains on the sides once I decide on the fabric since this room seems to need fancier curtains. I have a padded bed that will fit in front of the windows. It was handmade of foam core that I found among some sale items. I took it apart so I could remake it to match. More on that once I work on it. I really like how this room turned out so far.


Bedroom 2: While the house isn't creepy, I still want to use Halloween decorations and decor here and there. I really liked this scrapbook paper and still want to add some weird circus sideshow art and circus zombies as a theme for the girl's room. Kind of a Wednesday Addams  girl, I think. ha! Maybe I'll dress a half-scale doll or some kind of figure with that idea in mind. That's a thought... The third floor bedroom with the stars theme will be a boy's room, which will be a first as I always seem to do girl rooms. 


Well, that's it for now. I'll have more photos once I get other things finished! 

NOTE: Ooh, I just bought several pieces of vintage 1920s Tootsietoy half-scale pieces on sale, plus the round windows. Love when I find these at a good price as often they're priced so high and out of reach. So I'll have more to add to the house! 


* Check out this interesting vintage ad and history on Tootsietoy pieces. I got a single metal bed (not shown) and the chest/dresser above which I hope will work in the girl's bedroom. I'll probably do some sprucing up since they're painted anyway. It's fun mixing the vintage items in with other stuff. That gold table may work in the dining room. We'll see. Fun stuff!

Thanks again for visiting! I'm also planning a short Halloween in Miniature event and may do more photo Halloween posts next month so keep that in mind! Stop back soon! 


September 15, 2022

The Latest Fairfield #Dollhouse Updates #miniatures


For fun: testing out the lights for pumpkins on the porch. Photos: (c) C. Verstraete (Click photos for full size.) * Added stained glass info and photos in middle.

Yes! There is real progress on the half-scale Fairfield dollhouse! I still remember taking this out of the box - twice  - and putting it back. Never really thought I'd get to this point. I did almost give up on this house a few times but I liked the style and wanted to do it. I'm mostly glad now that I didn't quit! 

I've been steadily working on finishing walls and trim, though I did put it aside sometimes when I get aggravated with the endless (it seems) trimming, but there is progress now. Yay!

One of those I'm-gonna-quit-moments - the light trauma: I originally had a light on that left wall next to the door below. Then I shorted it out (along with my oldest big transformer). Luckily the other light still worked so I put it on the right wall. Then I realized the floor light was too close to the edge as I forgot I needed to fit the porch post in so I had to move that over...  Sigh.


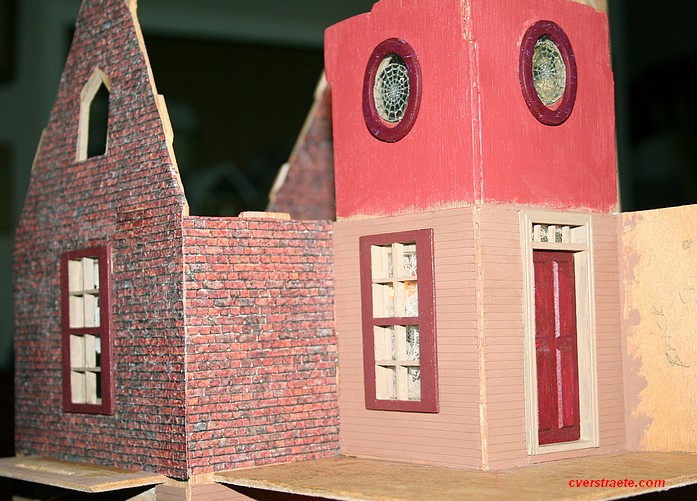
(Another view. I still have to finish the corner trimming and add the window alcove on the left for the kitchen, which is all done. Just wanted to make sure everything was finished in the kitchen first as it won't be as easy to reach in then.)

Exterior: To start - the front porch above. I decided to do a contrasting color that I also used on the top of the tower below to add in another tone. I do like it! Besides this being a paint sample from Target that I came across; real house paint with a nice, smooth texture. The other colors are regular acrylic paint - the siding is Cocoa Bean; the side of the door and all inner windows is Country Tan. The darker doors are Black Cherry while the front door and the other trim (round windows and all window exterior frames) are Rookwood Red. Still deciding on the rails though it'll likely be two-toned with accent colors though I keep leaning toward a wrought-iron style fencing if I can find some cheap enough. Or I might use the railing I had from the Van Buren house that I didn't use and fancy it up. We'll see. 

Also finished adding the brick paper to this side of the exterior walls next to the tower. The lower level exterior is sided. I'm thinking of doing a reddish-pebbled tile paper for the top porch floor here. We'll see. Yes,  I put plastic clear spider web stickers in the round windows for something different. The tower will also have black accent trim.


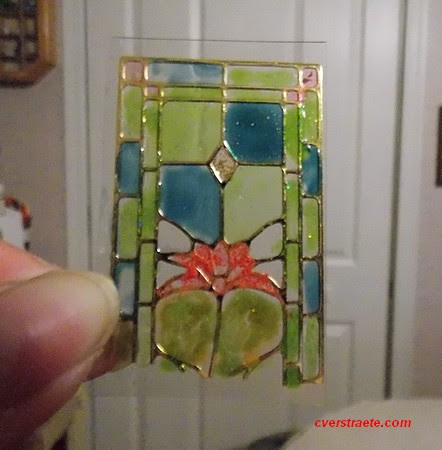
For fun, I decided to make stained glass for the three top attic windows. While the bottom round part on the stained glass won't show once it's in, the funny thing is I'd originally used a pretty peach color. Yikes! When I looked at it again, I had to change the color as it looked like a big butt! haaa! The gold outlines are a sticker.

At first, I wasn't sure which side to put to the inside, but solved that problem as I found I had enough pieces to add the gold outline to the other side as well.


* Added - an FYI:  Emily (who has a great Fairfield and half-scale house blog, and also does cross-stich designs) asked about the stickers and it didn't dawn on me to share a before pic. They are scrapbook stickers, which often come out at Christmas (or used to). They come in silver, gold, shapes, lines, and designed lines. Not sure if the window style are around anymore, though. The straight lines (not shown) could be used to outline too though it would be more work. I figured the floral shapes could be used alone and filled in with stained glass paint, too. Will try that at some point.


First Floor:

About all that trimming... I finally got all the assorted corner, floor and ceiling moldings done in the kitchen. It was a trial fitting my hand in the hall past the stairs to trim the ceiling by the front door (not shown here; but if you're doing this house, trim the ceiling before installation) but I managed.  It's a royal pain to do all that cutting to trim all these corners, walls, etc. but I admit it gives a nice finished effect when done.


The parlor is to the left through the front hall doorway. Here's my favorite room, the parlor below, with the front hall papered.  I liked the "wild" look of the large botanical print scrapbook paper for something different.


Here's the front hall all trimmed. 


I'm fighting a sudden cold/coughing (hope it's not Covid) so I wanted to get a few photos up for now. I'll put some more room photos up next week. 

The second floor - hall and bathroom, plus the two bedrooms  - are done except for ceiling trim which will be added when I attach the third floor and ceiling. I have to paper that first and see if there's any hard-to-reach spots to trim. I'm really looking forward to start doing some picture hanging, more curtains and decorating but I want to get all the structural things done first. 

I do want to make one room on the third floor an attic room and maybe a reading nook. Then there'll be another bedroom using this blue star fabric (ignore the angels as I don't think they'll work) and a Cassidy Creations campaign bed set painted to match that I bought a looong time ago. I think I have some kind of blue star scrapbook paper around too for part of the walls though the side walls are brick paper like the outside and the ceilings might be wood like the attic. Not sure yet. I also have a cool blue/white round bead with star cutouts that I always thought would make a nice ceiling light cover. I also plan on putting several of those fun mini dinosaur skeletons  in here. 


I still have to put in the windows and figure out curtains for the second floor bedroom also, so lots of planning yet. I then have quite a few kits to make as I was saving them to do. So... that's it for now!

See you next time. Thanks for visiting again!


September 12, 2022

Remembering Queen Elizabeth II #miniatures


Above: One of the Corgis standing alone. In real life, the queen's last four dogs are supposed to be taken in by Prince Andrew and Sarah Ferguson now. Photos  - (c) C. Verstraete


I see I haven't posted in couple months. I have been busy working on the Fairfield dollhouse and will show some progress later, but first I wanted to share my condolences and deep sadness at the death of England's Queen Elizabeth II. 

I'm a big anglophile and have admired the Queen for years after also visiting the UK twice. Oh, I so wish I was there now to remember her in person! Someday I hope again to be able to go there and visit where she and Prince Philip are buried, as well as see Princess Diana's resting place.

But for now, here again are some of my favorite miniatures from my 1/12th scale Tudor Tea Shoppe in remembrance of Queen Elizabeth II. Here are a few other photos and the full room here. and a newer post here.


Tea setting. Portrait of the Queen and Prince Philip.


I was so glad to have found this tea set with the British Union Jack. I bought a second set also and am thinking of doing a British sitting room.


Queen and Jubilee pillows from LadybirdandPenguin on Etsy.


* Come back in a couple days for dollhouse updates!