December 19, 2023

Making Progress: Half Scale Mansion 2

  
Finally! I am making progress even if it doesn't feel like it.

(See last post or see other links in left column archives. Click photos for full size.)

A preview: So far, it looks pretty good, doesn't it? There is a goof as when I put the light in I totally forgot about the top piece over the door and the side pillars! It looks fine without it but I like it so luckily, it looks like the insides only have to be sanded down a bit to fit. Bad when you read the directions, then go ahead and forget a piece! I've had to make many adjustments because of that kind of thing.

The stairs aren't in yet as I had to wait for glue to dry and wanted to keep them square. I have to add the top treads yet and the rails, too. All the doors and the stairs are painted Rookwood Red, which I also used on the Fairfield. Thought it added a good contrast.


For some contrast, I decided to put the white brick paper on the outside of the front staircase, which required tracing the shape since the sides came in one piece. Then I had to cut out a paper pattern and then trace that to the brick. But I thought it looked better than just painting it. In case you're wondering, those square holes are for brick pillars and the "iron" rail fences, which all have to be painted yet.

After getting all the lights in last week (oh, don't ask!) I took a break... Getting the top floor in took some doing as was dealing with warping so had to weight (and wait!)  Finally did mange to get the top on and the front center tower on... This house requires lots of sanding of tabs that don't want to fit otherwise. Glad we have a giant electric belt sander which has been very handy! Large life-size clamps are also a must!


Here's the back of the roof. Will touch up the brown paint (the brick) and then put some green flock or velvet paper down for "grass" to make a rooftop garden. I'm thinking of putting large planters around the top edge so no one falls off. ha! I found some "Christmasy" fake ferns that are kind of snowy/glittery looking but they're pretty so I hope they work out.

The third floor so far:
I decided later to take out that wall on the left so I have to cover the ceiling slot. The false wall, with a brown door, still has to go on the left side. The larger room will be the bedroom/sitting room where the diner owner lives. Have to add the brown door in the divider wall, too. 


Right side room will probably be a kitchen. Since the diner owner/chef lives here maybe I should make a messy kitchen for a change where he "experiments" so he doesn't poison the patrons. ha! 

I decided to give this a worn look with old brick and added some color with the turquoise blue paper and curtains. Matched pretty well with the blue tile floor from Melvin's Miniatures. I also used their black/white tile in the second floor of the Witch's cottage. All floors are from MM except the first floor. First time I decided to use all tile and not wood in a house but it's a nice change. Have to put in all the trim moldings yet.

Second floor:


Decided instead that this is where the rich widow/building owner lives, Have to paper the right wall yet where I'm putting a fireplace and maybe some shelves. Also have to add the false wall on the left side. Each floor has a different color door to match better, so this floor has a white door. The hanging light was an older kit that I shortened and wrapped with gold cord. I'll get a better photo later. Still have to put in all the trim.

First floor:


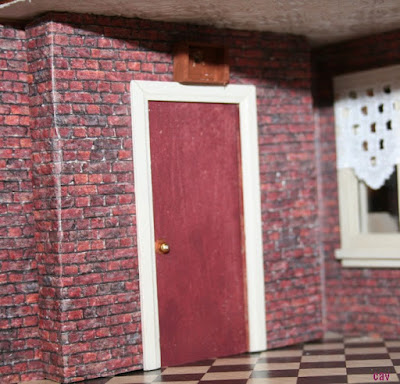
I decided to use the red brick here as it went better with the rest of the room. The diner will be on the right. The hanging lights were made using textured "crystal" globes from LED Christmas lights. Replacement bulbs are cheap (a package of 4 is $1 and change.) You just have to pull the plastic balls off and drill the hole slightly larger if needed. The false wall also has to be added on the left side. I'm happy with how the door and doorknob came out. Cut new trim and used a straight pin, bead, and sequin for the knob. I'll pull the light through the box and have to glue a transparency sign in. (Already printed out.)


So... a preview as the house is all together but trim is not done, etc. Lots more painting yet. Not my favorite thing to do either, ha! But I can put on some sappy Christmas romance movie and just paint! 😁

 Next, I'll have to get back to making this year's Half Scale group swap items. Got some done. The theme was Pot Luck, meaning make what you want. Last year's theme was Kitschy. Here's a previous Antiques swap and a previous toy swap, which also was fun. The group members are always very creative!

That's it for the moment.

Thanks for visiting and stay tuned for more updates! I'll be doing a year-end wrap-up, too. And there's the annual Christmas miniatures story re-post coming up!

December 15, 2023

Music Crime Fiction Cover Reveal!


As I mentioned, I have a new story coming out soon in the anthology, (I Just) Died in Your Arms, Crime Fiction Inspired by One-Hit Wonders.

My story, "Wildfire," is inspired by that 1970s hit of the same name. It's a sad song and as I'm a horse lover, it's a favorite, too, so I'm super excited about this!

So... ta-dah! The cover!

It's sharp and classy. Some may object to the gun on the cover, but that is a common element in crime fiction (and crimes). That said, it's definitely attention-getting, which is what you want!

Pre-order here! (If any problems, use main link here.) Paperback only $10! (Note: the link may change so I'll indicate if it has.) * Pre-order now available on Kindle and Barnes & Noble.

(Note: affiliate link may earn some commissions.)

Here are the authors and stories in the anthology, though I'm not sure of the final order they'll appear in. I've put them in order here according to year, from the oldest to more recent.

Do you know the songs? If you're not familiar with them, I listed YouTube links to each one. Have fun listening, (most are pretty familiar), and reading the stories! I know I can't wait to read them all, too! 

Authors and Stories:

* Vinnie Hansen: 96 Tears

Song: 96 Tears, ? and the Mysterians (1966) - Listen 

Jeanne DuBois: Na Na Hey Hey Kiss Him Goodbye

Song: Na Na Hey Hey Kiss Him Goodbye by Steam (1969) - Listen

* Josh Pachter: The Rapper

Song: The Rapper by The Jaggerz (1970) - Listen

* J. M. Taylor: It’s Hard to Die

Song: Seasons in the Sun by Terry Jacks (1974) - Listen

* Christine Verstraete: Wildfire

 Song: Wildfire by Michael Martin Murphey (1975) - Listen

* Sandra Murphy: Pigeon Talk

Song: 867-5309/Jenny) by Tommy Tutone (1981) - Listen

 * Joseph S. Walker: Come On Eileen

Song: Come On Eileen by Dexys Midnight Runners (1982) - Listen

* Wendy Harrison: It’s Raining Men

Song: It’s Raining Men by The Weather Girls (1983) - Listen

* Bev Vincent: Somebody’s Watching

Song: Somebody’s Watching Me by Rockwell (1984) - Listen

* Leone Ciporin: Life in a Northern Town

 Song: Life in a Northern Town by Dream Academy (1985) - Listen

 * Adam Gorgoni: Bitch

* Song: Bitch by Meredith Brooks (1997) - Listen

* Barb Goffman: Teenage Dirtbag

 Song: Teenage Dirtbag by Wheatus (2000) - Listen 


December 08, 2023

Progress: Half Scale Mansion Dollhouse


It's a start!

Yes, the Park Ave. Mansion is moving along. I guess I need to post more often. ha!

Well, I hate those stages of dollhouse building where you have an idea in mind, not sure what'll look right, and don't like how it looks at the moment. (See last post; see other posts in left column archives list. Click photos for full size.)

But... I've moved beyond that now and have made some progress I'm happy with!

I decided to put two outside lights, one by each door, top and bottom. I used the tops I took off those smaller Christmas village light poles and attached them to small wood ovals I cut in half and painted for bases. They work well for outside lights on the cheap. I also cut some 1" scale railing pieces to make window boxes (not shown). Then I just had to glue small pieces on each side to make the box. I'll paint them to match the trim and am thinking of putting in red flowers and greenery. 

Here's the top door: (minus the stairs yet to be built and painted.) Stairs: Hmm, just saw a TV commercial with a similar (real) house. It had a green door. What caught my eye was the stairs were painted the same color. The reddish color stairs could look interesting instead of the white? Will think on that as I think the white is ok in small spots, but would be too blinding in  a large item. 


Initially I thought I'd stain the doors, but they weren't dark enough. I wanted a reddish color so I decided to paint them the Americana Rookwood Red, which I also used partly on my Fairfield house. I think the reddish-brown gives a nice contrast. I have to finish painting the doors (and find some doorknobs!) with another coat and do the trim. Painted the trim the same Vintage white as the windows too. That hole at the right is where the center tower goes. I'll show the finished doors in the next post.

First floor: 

 Yes, it is going to be a diner and a small gift shop. I saw someone had used the same color scheme and I liked it as I had the same thing in mind. I got several bar stools (image from site) from MiniEtchers. Just wondering if they'll look right painted silver, or if I'll do them in wood? 

I'll make two small counters against the back and right side wall (which isn't attached yet), one for cooking and one for eating. I want to put a couple cafe tables, too. The fun will be making some food and figuring out things like a griddle, French fry maker, etc. I'll have one or two cafe tables as well.

The center globes were an idea that worked out well after other disasters with two other light fixtures each having bulbs go out. I found round LED Christmas replacement lights (cheap, 4 for $1 something.) Took them apart and drilled the hole in the plastic globe slightly larger and sanded it. They have a kind of textured design on them.

The back wall was touchy getting the wall fixtures on as I had to put a hole in the paper, solder the lights, and then glue the paper and then the lights, A balancing act for sure!

Left side faux walls:

To save space, I decided to  forgo all the stairs and instead make fake doorways leading to the unseen hallways. See the brick wall on left side of photo above. I'll have brick on that back wall, too. That leads to the boxes below:


Of course some ideas sound good and then you have to figure out how to make them, ha! So these tiny boxes (about 3/4" wide) will cover the holes drilled on top of each fake side wall for an exit  sign. I have lights attached on each floor to pull into the boxes and hope to print out the word EXIT on transparencies. The boxes are primed white and I painted them brown to blend into the brick more. Yeah, these gave me fits to put together! To make it a "little" easier, I glued wood corner angles together around a wood base inside and then cut pieces for the sides. I have to drill holes inside the boxes yet so hoping that works!

Second floor:

I decided to put a fireplace on the right side for the sitting room as I liked how Jeanne did hers in her house (see previous post.) Well, I have another one which I couldn't find, so I had to use this one and modify it by adding some depth to the back. I glued cardboard over the sides and brick to the inside supports and painted it all white, I also made a bottom brick piece and will have brick on the back. I made a new top mantle and glued on some shiny marbled paper. I think it turned out well!


Yes, I'm going for a different look here with the gold-striped paper and will also put in some vintage white wainscoting. I wanted a "richer," more dramatic look but make it look a bit more updated. 

So far, so good! I've made a few other changes, too, that I'll show later.  Getting there!

I'm gluing scrapbook paper in as I write this. I like the designing, the papering, not so much, ha! Made some curtains for the second floor also. Vintage looking. Will show those next time. Hey, gotta leave some surprises! ha!

That's it for the moment! Thanks for visiting again and taking a peek.

** It's also that time of year that I started on what to make for the annual half scale group swap. Something useful, even if it only gets stuck in an attic. ha! That's all I can say for now! This year's theme was "Pot Luck" meaning anything. The themes are only suggestions as you can make what you want. (Here's a past toy swap and last year's Kitschy swap.) 

Come back soon for more updates!


December 07, 2023

Happy Birthday!

 It's my birthday today! So I'm celebrating with some minis, Egg Nog, and maybe a custard donut! No cake, just in mini! 😉

Oh I have plenty of half-scale cakes in my bakery! See more pix here.


I'm working on some neat updates on the half-scale Park Ave. Mansion and do have a post scheduled so stay tuned. The doors are painted and of course, I had to go get some new lace for the door windows but I think it'll look good. Made some curtains for the second floor window, too, which look pretty good. Hint, hint...

My real-life crafting space (above) should look so neat! (From my yellow half-scale Victorian house.) See video on website; scroll past blog on top on the page.)


What else? I'll meet virtually with friends in my writing group... My "office" should look so good... I type at the kitchen table or move the laptop to a small table in the other room. Just easier. (Room shown is also in my half-scale yellow Victorian. I love that chair as it's so different - and it swivels, too! It's from the discontinued Monticello collection, and I wish I would've bought more than one.) 

After that, I think I'll have some Brit-style fish and chips. (It's frozen but I can't get to England so it'll do. ha!) And more Egg Nog. 'Tis the season. Boy, I miss those Egg Nog shakes from McDonald's. Worst decision they ever made getting rid of them. Saves me some calories, though. haa!

Scene from my Christmas house...

Thanks for visiting! Come back soon for another post. 


December 04, 2023

What I'm Reading: Jean Rabe's Dead of Sled Run Mystery

 If you read anything this year, The Dead of Sled Run, book six in USA Today Bestselling Author Jean Rabe's Piper Maxwell mystery series is a must for your TBR list!

The book opens with a bang, literally, as longtime Deputy Oren Rosenberg's house goes up in flames....

About the Book:

Two weeks before Christmas yards glow with twinkling lights. Carolers serenade neighborhoods. All is merry and bright.

But more than chestnuts are roasting. A raging fire sweeps through the holiday landscape of Sled Run, destroying the home of Chief Detective Oren Rosenberg and killing two.  Could this be an accident? Or did anti-semitic hate fuel the flames?

Sheriff Piper Blackwell and Detective Basil Meredith believe Oren Rosenberg was targeted. How did the arsonist get into a secure, gated subdivision?
With scant clues and a festive but ill-timed snowfall, will they be able to find the culprit? Or will the brightness of the season take on a deadly glow as a murderer walks free to strike again? 

Excerpt, Chapter One:

11 p.m. Friday, December 11th

The keening wail of a smoke detector shredded his dreams. Oren Rosenberg jumped out of bed and slammed into his slippers. Acrid burning scents attacked his nose and throat, making him coughFaint light showing through the window hit the rolling haze hugging the ceiling.
   The wail continued, joined by another, and another, until all the detectors in the house screamed a cacophonous chorus that terrified him.
   Shaking, he scooped up Cipin, the bonus gray tabby who always slept with him. Next came Razzleberry, another bonus cat, a tuxedo who had been curled on the bedside rug. Cursing for leaving his cell phone on the charger in the kitchen, he looked for the other two cats along the way.
   “Freya! Buttons!”
   A section of the house had been rewired a handful of days ago after a few shorts and an electrician’s warning that things needed updating. Had shoddy work caused this?
“Freya!” he shouted, voice competing with the alarms’ dissonance. “Buttons! Freya!”
   The smoke was thicker in the hall. He held his breath and fumbled through the space, hearing the sizzles, pops, and spitting, finding Buttons, a Hemmingway—his third bonus cat—hissing under the kitchen table. He fumbled for their carrier sitting by the wall, somehow persuading all three squirming bodies into the mesh and canvas enclosure meant for twoignoring the claws raking his hands and arms. He closed the zipper and stood, the carrier tight in one fist.
   Everything looked blindingly bright, flames reflecting in the stainless steel of the refrigerator, licking up the walls, racing across the ceiling like yellow-orange flowing water. Sweltering, Oren felt like he was roasting.
   Something fiery dropped on his shoulder. He brushed it aside with his free hand, a piece of wood trim from the ceiling, burning his fingers. The fire moved fast, growing in all directions, its crackling competing with the wails. He smelled something plastic burning, melting, sickly sweet. Everything blazed.
   Oren ripped the cell phone from the charger by the sink, punching in numbers, fighting down horror and struggling to find air amid all the smoke while still managing to hold the cat carrier’s handle.
   So damn hot. He was solid sweat.
   “9-1-1. What is the nature of your emergency?” Candace, the new hire for the 11 to 7 shift, the one who dressed like she was about to have a photo shoot for some fancy woman’s magazine, perfect hair, manicured nails.
   Oren tried to talk.
   “Say again. What is the nature of your—”
   He worked up enough saliva and shouted: “This is Oren! Oren Rosenberg.”
   “Yes, Chief Deputy Rosen—”
   “My house is on fire. Sled Run in Santa Claus.” He squeezed the cat carrier tighter and started hacking so loud he couldn’t hear if she said anything in return. The phone slipped from his sweaty fingers, lost in the smoke swirling on the floor.

Review: This is a gripping new entry to an engaging series. As the series continues, the characters' lives have changed and matured, especially Piper as she grows into her job as sheriff. But this time the crimes hit home, and then become even more personal.  Great series with characters you love, descriptive writing, and everything you want in a mystery, with lots of explosive action - literally! 

You're sure to enjoy this latest in the series! 🌟🌟🌟🌟🌟

** Get it at: B&N - Bookshop.Org - Goodreads  - Kindle/KU

About the Author:

USA Today bestseller Jean Rabe's impressive writing career spans decades, starting as a newspaper reporter and bureau chief. From there she went on to become the director of RPGA, a co-editor with Martin H. Greenberg for DAW books.  

Rabe is an award-winning author of more than forty science fiction/fantasy and murder mystery thrillers. When she's not writing, she's tossing tennis balls to her beloved dogs. Weather permitting.

November 22, 2023

In Memoriam: Mourning in Miniature

A peek in the window.

 It may be past Halloween, but I decided to keep working here and there on the miniature Funeral Parlor. And... it's finished! (Click photos for full size.)

 I have to admit, I had to laugh seeing it done. Yes, it's a bit weird and death isn't funny, but there's enough terrible and sad things going on in the world, so hope you get a chuckle out of this. 

This idea started with the gag coffin hubby found at Goodwill. A great find as it's the right size and I'll never find something like this again! It actually is a stop smoking gag gift and has a button you push for corny sayings. But it fit my purposes!

Someone remembered her with roses....

In my project stash, I had this Arched Roombox kit I bought a super long time ago. Since I lost the top front arch piece (of course!), I had to figure out what to use instead. 

I decided to decorate the building front using a plastic brick sheet. I painted part of the top and edged the windows with hat straw I also painted. I wanted to make it look like a reclaimed old store so I added light lace curtains in front and added an old-looking General Store sign. I like the two-tone brick.

You can see a slight edge on the sides from the plastic corner edge moldings (from Menards in the wallpaper section) we glued to the sides and bottom of the box with Quick Grip. It worked perfect to hold the front in place and also let me slide it out if needed.

We also cut a top cover for the roombox from plastic out of a large poster frame (Hobby Lobby 40% off sale) and glued that to the corner edge moldings to fit over the sides of the roombox. These glue well using JB Weld Plastic Bonder. (We use the tan formula which leaves a slight opaqueness but holds super strong.) 

(FYI: the poster frame plastic and the corner moldings also can be used to make a more reasonably priced dollhouse case. I cover my houses so I don't have to dust them and to avoid the dog hair! We made a cover for the Witch Cottage this way (since the hardware store wanted to double their acrylic prices!) and also glued in reinforcements along the inner bottom of the case from thicker 1" acrylic strips we cut. A lot of steps with measure, cut, glue, but it ended up not as pricey and a decent case.)

Initially I'd thought of making this roombox into some kind of store, with green paper on the bottom of the walls. Then I put it away and decided to use wood wainscoting instead. I like the old-fashioned wallpaper as it gave it a vintage parlor look. 

I think the door was a great addition. I used doors I took from another dollhouse kit and made a fake entrance. There's a garden calendar scene behind the lace to make it look like it goes somewhere. I added vintage landscape art on the walls to fit the look of the room. The pillars are plastic cake decorating pillars that we painted gold and part-gold.

Right side of the room:

I used a couple vintage furniture pieces - one of those black and gold Chinese lacquer tables from part of a set, and a gold Petite Princess chair which fit the decor here perfectly. Funny how you end up saving furniture pieces for a long time (years!) and then finally, they fit just right into a certain project! ha!

The mourners and the "deceased" are of course those strings of plastic skeletons from the Dollar Tree. (I keep stashing them as they keep getting scarcer  (remember when you got 12 on a string??) and somewhat cheaper made (if that's possible? ha!) I painted them white and made eyeballs from Crayola Model Magic air-dry clay. I also made their clothes and wigged them. Even skellies like to be fashionable, you know. 💀😀 But they're fun to dress and just make me smile. We can all use that. 

The Exterior:


On the sides, I decided to continue the painted brick on top with some stucco-like paper painted the same shade on the bottom. Since I didn't want plain walls, I added a mortuary sign on one side and "ghost" brick signs on the other side to give it some interest. The back is covered with the painted stucco-like paper, too.


The full room: (I didn't turn the lights back on.)


So for now, this is how the room will look. I may add a sign-in register and desk, and a few more chairs and mourners yet. I'm going to leave it this way for a while, I think. I have the other roombox that I like to decorate as a Christmas scene with my vintage mini dolls. I'll set that up next.

Hope you enjoyed seeing something a bit different! I'll be back working on the Park Ave. Mansion next. The ceilings are papered, I'll attach the lights and then we can glue the floors in. Hope to show some progress on that soon.

Thanks again for visiting! Be sure to come back to see what's next!


November 19, 2023

New Mystery-Crime Story Coming!


(Photo: Pixabay.com)

Happy to say my story, "Wildfire," will be in the anthology, (I Just) Died In Your Arms: Crime Fiction Inspired by One-Hit Wonders, Volume I. Should be coming out in December.

Always loved this sad song, so I tried to give it justice. Thrilled about this. (And if you've never heard it... (what?) here's a link on YouTube.

The stories included will be a treat to read and are fun, too! Definitely some memorable choices. (I love It's Raining Men! and The Rapper always makes me think of a certain time period. I like 96 Tears, too.)

Included are: 

Christine Verstraete: Wildfire

Song: “Wildfire” by Michael Martin Murphey (1975)


Barb Goffman: Teenage Dirtbag

Song: Teenage Dirtbag by Wheatus (2000)


Leone Ciporin: Life in a Northern Town

Song: Life in a Northern Town by Dream Academy (1985)


Adam Gorgoni: Bitch

Song: Bitch by Meredith Brooks (1997)


Bev Vincent: Somebody’s Watching

Song: Somebody’s Watching Me by Rockwell (1984)


Wendy Harrison: It’s Raining Men

Song: It’s Raining Men by The Weather Girls (1983)


Josh Pachter: The Rapper

Song: The Rapper by The Jaggerz (1970)


Sandra Murphy: Pigeon Talk

Song: 867-5309/Jenny) by Tommy Tutone (1981)


Joseph S. Walker: Come On Eileen

Song: Come On Eileen by Dexys Midnight Runners (1982)


Jeanne DuBois: Na Na Hey Hey Kiss Him Goodbye

Song: Na Na Hey Hey Kiss Him Goodbye by Steam (1969)


Vinnie Hansen: 96 Tears

Song: 96 Tears by Question Mark and the Mysterians (1966)


J. M. Taylor: It’s Hard to Die

Song: Seasons in the Sun by Terry Jacks (1974)

November 15, 2023

Half Scale Dollhouse Mansion 2: Brick & Colors

Brick, brick!!

As I mentioned in the last post, I started working on the Half Scale Park Ave. Mansion

I wasn't real sure how I wanted to do the exterior, but I knew I wanted the grout lines to show as the outside is etched like large bricks. Every house I've seen so far has been one color and beige or tan. (Click photos for full size; more posts in left column archives.)

Well, as everyone knows, I'm a color person! Now I really wanted to wait for more of this to be built before I shared, but I'm impatient! So... I tried a few different shades and it turns out that the Americana Milk Chocolate paint is a nice rusty-brownish color! Brushing it on lightly, as I didn't want to do heavy coats, it also lets some white background show through, which gives it more of a worn look. I added some patches of gray paint also for aging. I like the results. Whew! Glad that's decided!

Papers, papers...


(Oops! I'll fix that top corner edge now that I see it! ha!)

Next, it's one of those think-in-stages things - or you'll be sorry! Part electric tape in, but!! Choose papers as the center tower has to be papered and the windows installed before that is glued on. This is what I'm deciding on - the third floor is the only one I'll use the walls to make three rooms - hall on left and two sitting/sleeping rooms for boarders. The diner owner will live in the right side room, which will be brick walls. I decided on the tree print scrapbook paper in the top center tower. 

It's Curtains! Well, some...

I kept thinking the lace should be switched on each floor because of the colors, but I wanted the lady owner to have the golden-color lace since she's moved to the center floor now. So I found this brown fabric which actually has a leaf print though it's really not visible once I folded/glued the fabric. But it made a cute little valance to match the third floor paper. I edged it with Bunka. I'll make longer curtains, too, if needed. I may add some kind of valance over the gold lace yet if I find something that looks right and goes with the fabrics. We'll see.

Added: I kept thinking it needed... something. But? Saw someone else's curtains and thought this would work better - just cut another piece of the lace for the top. Now it looks more "finished."


 ** Idea! Maybe I'll make wood valances again from the wood fans as I did in my Victorian dollhouse bedroom! Hmm....Nah.... see what I did above. I'll keep the wood frames as original to that other house. The bottom wall is textured brick paper from Starboc2 on Etsy. 

The tower has to be glued in yet, but this is how it looks so far. I decided on the same sand color for the windows as I used for the grout lines.

My other idea is to make faux walls to fit in the space to the left of the windows inside to give the illusion of exits to the hallway stairs. I'm thinking of only using stairs on the first floor. I want to try adding lighted exit signs on each wall. We'll see if the idea works. I have to try making small boxes and print out transparencies with the word EXIT on them. One of those ideas I've got in my head, so it better look right! haa!

( Forgot to add the front photo so far to give an idea how it looks. I really like the color.)

Second floor...

I had changed my mind (of course!) and am putting the elderly owner on the second floor instead as I wanted her to have the fancy entrance door. As Jeanne did in her building (see last post), I'm going to make a sitting area with a fancy fireplace at that side. I am thinking of adding some bookcases and elements from Brooke Tucker's Golden Christmas book. 

I have a pair of lamps someone made based on the book that I'd bought in my half scale group some time ago. I was sooo lucky to find the book online last year at the incredible price of... $5! This book sells for $$$. I'd searched for years to find it. I also had previously bought the Miniature White House book online super reasonable. (There's a couple of the White House books online now for under $5. I usually have good luck at ThriftBooks.) 

Next?

Compared to the other houses I've recently done, especially The Fairfield, this house really isn't as big or complicated. Pretty straight-forward building wise. Just have to keep at it. Simple rooms. What will take longer are the pieces I want to make. I still have that diner in mind and have a few ideas how to do that floor. I'm again going to use my favorite black/white tile scrapbook paper floor and going to see if the bold red/white stripe paper I found will work on the walls with lots of Coca Cola signs, etc. Stay tuned!

Not a big update, but wanted to share some progress!

Thanks again for visiting. Come back soon for more updates!


November 06, 2023

Next Project: The Half-Scale Mansion

 I'm on a book-high at the moment, having just finished reading Stephen King's latest, Holly. (Marvelous!!) So my mind is kind of caught up in that wonderful feeling when you read a good, satisfying book! 

I have been working a bit on the temporary funeral parlor - lights are in and working, trim and wood wainscoting panels are done, and I have a few things to do next. But, as I tend to do, I set it aside for a bit to actually start the Park Ave. Mansion. The completed photos are only the kit: I'm not that far yet. (Kit images, LaserDollhouseDesigns.)

As usually happens with these projects, at least for me, it's hard to start until you have your color choices figured out. Had to paint the sidewalk a light gray first. Then I decided on Sandstone for the basement stairs, which look pretty cool, but I have to say, did not go in as easily as I'd thought they would. But I finally got it.

This is another house you have to think of the building in steps so you don't mess it up. So I figured at least the bottom of the house's front walls have to be painted first since they butt up to the sidewalk. But... what color to do the brick? Do I fill in the grout lines, and what color for that, too?

Of course, I chose a color I liked, and in the back of my mind, knew maybe I shouldn't since I had... one bottle. Ceramcoat Raw Linen. And I couldn't find any more locally, so had to find a similar color as I want the grout lines to stand out. I ended up with DecoArt Americana Bleached Sand, which may or may not have more of the slight greenish tone rather than too white or gray or yellowish. So we'll see. Have to repaint the small parts I did. 

No biggie. The idea I had was to pounce or stipple the bricks themselves with maybe a red-tone paint or maybe tan with red accents. I saw a photo of a reddish-brick rowhouse and I liked that rather than just tan. Still deciding... I know, boring stuff. Well, bear with me. 

Modern Or?

I am not looking forward to painting all those windows. I am thinking of the same light sand color as I am going to attempt a more modern interior, which I've admired in dollhouses but have never done. For inspiration, here's a great modern interior done by Jeanne H. shared on the FB HalfScaleMinis group. (Used with permission.)

She only used one hallway wall as they really take up a lot of space otherwise. (I love the flooring; opposite of the floor I used in the Witch Cottage second-floor bedroom.)  I was thinking of deleting the walls mostly, too. When I checked, the bottom floor ended up with really small rooms if you follow how it was designed. Not sure about all the stairs, too, as they take up space. Then only have the halls with doors? Faux doors? Not sure yet. I'll have a better idea when I see the front and side walls glued.


 We'll see how that turns out. It may be more modern only on the top floor where the rich older homeowner lives. She has renters on the other floors, an antiques store or diner on the first floor (haven't decided), and a shabby-but-neat sleeping-living room or two on the second floor. Not sure yet.

Diner?

 I am leaning toward having a diner on the bottom basement floor which could have a small counter (wanted to do a back cooking counter but not a full kitchen), and some store items. Remember the old Woolworth's counter and booths within steps of the store shelves? (They had great grilled cheese!)

 Or maybe just a small back counter (with griddle, sink, fryer, fridge, etc.) and a smallish counter to sit at with stools. Just a few seats...?  I think I still have copies of that old Joann Swanson Nutshell News project to make a 1" scale diner/cafe... will have to hunt for it. (* Here's an index of Swanson's projects on her blog. * Her Thanksgiving how-to could be useful. * Ideas  - diner project on YouTube.)

It's been a while since I made Fimo food....I made these in 1" scale  for my rooftop BBQ in a wall-hanging cabinet.

 It would be fun to figure out how to make the items needed and the food, I think. And it would be something different (and much smaller!) in half-scale. I keep picturing the burgers frying on the grill! (Check out this vintage Woolworth's Diner on FB. Apparently the last one around in CA and last story I saw said it was going to be restored and re-open?) I'd have to get a stainless steel-look spray paint for the cooking counter to look right, I think. (See images of counter and old Woolworth's at Atomic Redhead.)

We'll see; this is brainstorming yet... as you know I change my mind - a lot! haa!

Decisions, decisions!

Added note: Admitting I wasn't real keen on what to do here... but!! The colors decided it. I picked a different color (and yay! the grout lines stayed whitish!) so I got the outside painted and really like it!! I'll show pix soon!

So, that's where it stands for the moment... This will take a bit to get to more of a showable stage, so stay tuned!

Thanks again for visiting and be sure to check back for what's next! 


November 01, 2023

October Update: Halloween & More


Scene from my Haunted House.

Thought I'd add a best-of-the month and show highlights for October.

Halloween in Miniature went well, though it did seem long (well, to me, since I was scheduling things! ha!)

The month's best post:

Besides the first post, everyone must like witches! 

The witchy post for Day 2 got nearly 100 views and counting as of this writing. 

Next popular was the first skeleton post on Day 3. 

Also popular was Linda's cool ghostly parlor on Day 6 and JP Sligh's Witch's Kitchen, with my companion short story on Day 8. 

This month's projects:

I finished the half-scale Witch Cottage, of course. Check out the videos. 

I got the skeleton funeral parlor long-set-aside roombox out and made some updates. Added some faux doors to the side, which I thought turned out well. I'll share more as I get it done. 

Don't worry, this'll be over. ha! I'm done with Halloween, too, (except for my cottage). It'll likely be changed then to a store. I don't decorate much for Christmas except in miniature so I'll probably change this to a Christmas store for now and then a doll shop, I think. I have quite a few mini-mini dolls here and there so maybe it's time to put them in one place.

I'll also be working on the half-scale Park Ave. Mansion. Stay tuned for updates! 

 Thanks again for visiting!