August 20, 2021

#Halloween is Coming! New #Dollhouse Build!


What is this???

Well.... I couldn't resist. haa! Wondered what to do next and I'm in a HALLOWEEN mood!! So.... out came a kit I bought a while ago for this purpose! (And yes, the photo box room is still ongoing!) 

I'm building the Greenleaf Half Scale Van Buren dollhouse, which I'd bought some time back (for much cheaper than that price!) with a Haunted House in mind... or a Haunted Mansion.... So this is the start...

So far.... the middle and top roof parts aren't glued in yet, nor is the second floor. I lost the pattern instructions somehow, so muddling along, but it's going okay. Have to figure how to run electric tape first as I do want some lights in it. Will use scrapbook paper on the walls as I usually do.


Here's the full house front and back from the Greenleaf site. I may keep out some inner walls, still deciding....  I like the design so probably won't change much on the outside. 


I just liked the style of this and it's got some nice rooms without being a huge house as my Victorian House is... It's light, too. 

I'm thinking of doing brick on the outside. I just ordered more textured brick papers from  seller starboc1 from Greece on eBay. Her papers are great and reasonable ($25) for 16 sheets. I had used her other brick on the foundation, the chimney and in the attic of the Victorian house. I'm trying a different style brick this time (below)  for an older look. I'm thinking lots of soot, moss, vines and black window frames and trim. Plus, lots of gargoyles of course! We'll see what I decide. 

This will be fun! I'll start sharing some of the furnishings I made before and I also am getting some ideas for this year's Halloween in Miniature blogs. Stay tuned!


August 16, 2021

More #Dollhouse #Miniature Projects


A few other half scale kits I finished for the Victorian-flavored dollhouse. (Scroll down for past photos or look in archives list in left column.) 

The shelf kits I think I got a while back from Sdk miniatures. The painting easel and stool (plus the paint tray on the shelf) are from MiniEtchers.  The small paint cans, wool skeins, radio, sewing basket, Candyland game and painting are from past Half Scale Groups io swaps. I made most of the other items. 

Another project:

Yeah, I know, I flit from project to project. As the big dollhouse is pretty much done now, what is next? (I do have to put up kitchen cabinets and share pix of the kitchen counter, which is about all that is left now.)

I am getting in the mood to do Halloween stuff though I do and don't want to do another house. I have lots of things saved and plan to make more. It would be fun to do a full house (this is all in half scale) but....? I do have to set up my Halloween display first, of course.

For now, I'm working on this box....


WHAT is it??

This is actually a photo box I found at Goodwill. It had smaller glass windows on both sides along with glass on the top.

So far:

The front windows were cut to have one full window. I lined the inside with a bamboo mat I stained and brick paper on one side and the back of the front wall. I'm putting stained wood strips over the threads on the back wall. The floor is stained MDF wood flooring. I'll add wood on the outside for the window holes and add some printed posters.

The top will have three battery-run lights in the ceiling. I'm leaving the bars and putting paper in for the ceiling I think. So you see, you don't always need a house or regular room box to work in miniature. 

What is it going to be? I could decorate it for different holidays, but I also have an attic in mind. Stay tuned! 


August 11, 2021

Latest #Dollhouse #Miniature Finds and Rooms


 I was lucky today! Went to Goodwill and found a good assortment of  punched flower and leaf petals. I was getting low on these tinier petals which are used for Impatiens, so thrilled to find them! Plus Geranium leaves and an oval type leaf, plus yellow "foam" for flower centers. Only $1.99! Also found a whole big bag of sticky-back rhinestones which I use for potion bottle tops and other things. There also was some green quilling paper that may be useful.

And I found these little figures which are kind of interesting. They're a bit chunky but about 2 1/2" high, so may work in some half scale rooms with slightly larger furniture. They're kind of cute and could work in certain scenes.  Maybe I can use some by the eventual beach house.

* House Updates:

Changes on the Half Scale Victorian-flavored House continue. (See archives in left column or scroll down for past posts.) 

I changed the parlor to add another chair in and added pillows on the couch and chair, plus a small ottoman. (It doesn't show behind the coffee table. The ottoman, btw, is simply one of those round foam sheet layered "beads" from the dollar store that I covered with fabric.) The left chair is vintage plastic, which I usually cover with cloth but decided this time to leave it as is. The right chair I made from a pattern from Terri Shuping Correll in the Half Scale Miniatures group on FB. She sends the pattern free by request.

This was fun. All the craft items are from various swaps from the Half Scale Miniatures group at groups.io.  The craft table was a 2019 Name Day project.  (Scroll down photos on page.) This goes in the top floor craft room.  (The green fern wallpapered room.)The table also has tiny bins added on one side. Cubby bins kit from S&S Furniture Co.


This was the best change. I forgot I had several other pieces stashed away that I'd bought when the half scale Jefferson Monticello dollhouse furnishings were marked down and discontinued. This "leather" chair really does fit the den better. It's a neat chair as it is rather unusual looking. The top and bottom are two pieces and it actually swivels.

I also added a red chair (above) from the Monticello collection to the hall as it adds some extra color against the tropical art on the wall. I also have one of the blue chairs similar to it in the dining room.

The Monticello dollhouse, a 1/24 scale replica of Thomas Jefferson's historic home,  was actually a pretty interesting house, but I think it had a limited audience as my guess is you almost felt confined to follow the historical style and time period. See photos of the house kit here. 

That's it for now! See you next time!


August 04, 2021

TV in #Miniature

 My latest mini finds at Goodwill. How could I pass that up?


And speaking of TV's....

Awhile back I'd found this cool site where you could buy a kit to make a mini TV that showed TV show clips.... See TinyCircuits. But that's rather pricey at $75... It also must be a new trend as do a Google search and you'll find all kinds of links for mini TVs.

Well! They must've licensed their technology as - this is so cool! It probably was a matter of time that this would be mass produced. Already working mini TV's will be sold soon at Walmart. So far the price is $25.  (They're not in yet.) 


The mini TVs called
Tiny TV Classics from Basic Fun will feature show clips from different eras. So far they're featuring four shows and TV styles - Batman, Friends, South Park and Back to the Future. More shows are supposed to come. I hope they come out with The Munsters and The Addams Family in the vintage cabinet TV styles... Won't that be neat in a mini haunted house???

The page has links to buy them at Walmart, though they aren't in and some pages don't show up yet. But it's something cool to look out for! Hopefully the supply chain problems they've been talking about on TV won't delay shipping too long.  


July 21, 2021

Mystery Item #miniatures


Today's Mystery Item:

Can you guess what this is?? It's cast in resin, the top is a solid piece, so it's pretty heavy, too.

Funny story on this - I can't even remember when I bought it... years ago. A real long time ago.

I'd seen it online I think and liked it. Bought it, then during one of my "reorganizing" stints, I guess, I stuck it in a drawer. Forgot about it. Totally. haa! 

Wow! Something new to work on. haa! (Like I don't have enough projects?! Oh, and I have another project idea to show you next, too.)

So, I guess I'll have to work on it now since it's out  and won't take a lot of work. Miraculously it wasn't broken and all the pieces are here. (Cool, I see it even has a light bulb but I'll switch it to LED I think so I can use a battery box.) 

I think it'll be a perfect Halloween addition to my house and Halloween scene.... I put most of the stuff away so when I bring it out towards October again I can enjoy the redecorating and changing stuff around. The house sits out, but it gets boring leaving everything else out. 

Here's what this should look like: 

Stay tuned for progress pix. --Chris


July 20, 2021

More #HalfScale #Dollhouse Rooms & Finds


Took a few more photos of the interior of the Victorian-flavored half scale dollhouse. (See other photos at archives in left column or scroll down. Click photos to enlarge.) Plus I did forget a couple photos from the dollhouse show. See other photos here.

Show items:

Love these Egyptian items (above), always get one or two when I see them at William Chabron's table (WCD Miniatures). I'll get to doing that Egyptian room one of these days. ha! I know not everyone likes dolls in rooms, but I have a beautiful kit I got some years ago that I want to include, simply because the decorating will be fun as the glitzier the better for a Cleopatra!

Also got this cool Indian figure from J&J Dollhouse Miniatures at the show. Thought it would fit perfect in the second floor hall. (No more room in the travel-room den!) The Egyptian statue got put in the room, though. 


Another Find:

Wanted to share this beautiful little cabinet (10" h, 9" w) I just found at Goodwill. It's so pretty that I thought it would be perfect to put more of my Ladies Shoppe items inside. (Here's photos of the first cabinet I did.)  The sides are etched glass. It even has a nice wood back inside that will make a good display wall. Couldn't pass it up. I also got a photo box which may work as I wanted to make a half-scale attic inside if we can get the inside insert out. It has glass "windows" so that would work well. 


What's New in the Dollhouse:

Some recent items I added in the dollhouse:

Dining room: Buffet, which includes some items from the last Half Scale group swap, and a tiny mirror on wall from a set found at Hobby Lobby. I made the set of books. The buffet is actually the bottom of a dresser; I removed the mirror. The table and chairs are in the center of the room. I got that handmade fruit years ago on eBay.


Front hall: I didn't show the art too well before. I had added gold accents on it, too.


Kitchen: I'll get a better photo once I add things to the counter. But the teapot border is on the wall and I found this chef to add though if I remove that base he'll be too short. ha! I'll have to make the rug and cover the base so it blends in more. The curtains do look better shortened just as valances.


The hall: Added this gold charm to the wall and put some tiny colored balls  on it. I love the fancy shelf unit. Got it in the last half scale swap. It's from Ron Chase (D-Tales) who makes those amazing filigree clocks I saw at the recent dollhouse show. The shelves go perfect with my carved entrance wall. 


Living Room: I liked the colors in this art. Have to add some flowers on the coffee table yet. I'll have to try to match the art. Maybe some colorful daisies.


Also added this little guy by the fireplace. The dog bed kit is from MiniEtchers.


Flowers for the front: The flowers for the front walk. I used several punches and regular colored typing paper to make them. They're layered kind of like roses. I did the same flowers in the trellis in front, which you can see better.


Can you guess what's my favorite color? haaa!


That's it for the moment! Thanks for stopping by again! --Chris

July 16, 2021

Yay! A Real Life #Dollhouse #Miniatures Show!


(Photo: Me and Hubby talking about my purchases. Or, what happens when you spend a lot of $.  haa! From All About Miniatures. See more below.)

Oh, the wonder of actually getting out after over 1 1/2 years to see a real life dollhouse show!!

Just got back from the Chicago Spring Showcase dollhouse show at the Wyndham Garden Hotel in Schaumburg, Ill. This used to be run by Three Blind Mice and was previously held in April, though everything got pushed back later because of Covid.

So fun to look around again and pick up stuff and see what's new! 

Want to see what I got? Oh, sure you do!! (Click photos for full size.)

So... Love when I come across some new kits I haven't seen before, especially in half scale. I also got a few odds and ends not shown here like a couple teensy black plastic cats that I'll flock and paint, and some metal miniatures to paint.

Found quite a few interesting half scale kits from All About Miniatures. Greg, the owner, also said he plans to add more HS kits as he had quite a few different styles in quarter and 1" scale. (Update: He'll have a website up in a week or so, so be sure to check http://allaboutminiatures.com.  I'll check back to make sure I have the address right.)

I was glad to find this longer table kit (comes in maple and walnut) as I needed something to put in front of the balcony in the second floor hall in the Victorian-flavored HS dollhouse. (Scroll down or see archives list in left column for other posts and photos.) The chair kits were also kind of neat to add a 50's-60's flair to a room. 

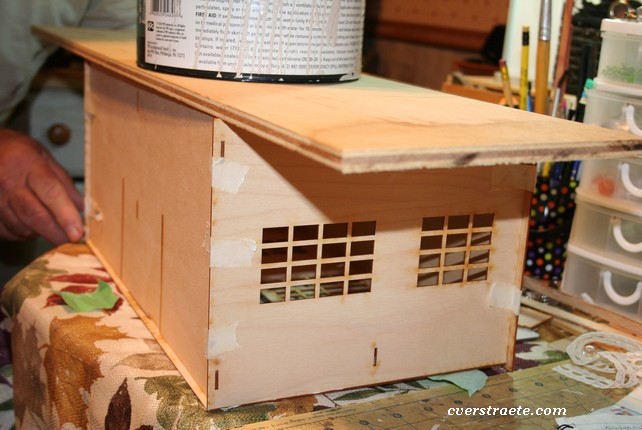
And I couldn't pass up this unique kitchen cupboard kit (above) from Ron Chase at D-Tales Miniatures just for the different components. I'm sure I'll need cabinets in some project... I especially was interested in the dish drainer in the kit as I need one for the dollhouse kitchen! 

His filigree carved clocks are so incredible! Wish I'd taken some photos. Here's one of his clocks on top the shelving unit at the Miniature Whims blog. (See this carved wall clock on Otterine's blog, photos 1 and 2. I'll probably kick myself for not buying one. (I see he'll be at the Bishop Show in April so I'll plan on that!) Here's a couple of his carved items on another site.)  But we did get this really neat old-fashioned radio from his table. 


Also from All About Miniatures: I'll use the palm tree carving for my half scale beach house wall because sometimes I like using larger items for effect. It might even work as some kind of wall/room divider. The spooky cameo will work as a dollhouse wall plaque, too. The carved zebra was just kind of cool and different. Here's what the actual carvings look like, too.


And about the Skellie couple at the top of the blog... He also had a fun selection of dressed skeletons. Just love 'em! These are my titles:  :)

Gossip Girls:

The Three Stooges:


Before...


And After....


Thanks for stopping by again! Be sure to come back for other updates. You can also subscribe to the blog via the box in the left column or at the bottom of my website

Until next time!! --Chris


July 13, 2021

#HalfScale #Dollhouse Update: Furnishings & Rooms


Above: The house all lit up. Yes, it has lots of lights. (46 lights inside.)

I've been busy decorating here and there. I'm trying to get some good shots of the rooms, which is hard because of the smaller size and trying to figure out the right camera settings. I'll get it yet. (Scroll down to see previous posts or look in archives list on left. Click photos to enlarge.)

For now, thought I'd share some more things I've finished and other stuff I'm working on.

Attic: I'm hoping to get a deeper, full photo yet but this gives you an idea of the assortment of stuff in there so far. Fun finding things to put in. Yes, even that wringer washer back there. ha! (Which is a fridge magnet.) I love this space. I may do another attic in both scales as a way to store stuff instead of sticking things in boxes. It makes clutter fun! ha!


Front foyer: This is the inside of the tower space next to the sitting room/parlor. I wanted it to be a simple garden-like place with plants. I may add a few more plants yet, I think.


The front hall... just a glimpse. I added the dropleaf table (from the Mount Vernon collection) and the phone, plus a small picture. Seemed the perfect place to gab on the phone! The housemaid is cleaning up a spill.


Dining room: Decorated this hutch for one side of the dining room.


Kitchen: I'm working on tile strips for above the counter. (There are three strips to cover part of the side wall and two on the back wall.) It will go behind the sink on the wall to fill in the gap. I like how the counter turned out. It'll look even better once it's filled with canisters, dishes, food, baked cakes, etc. 

The fridge/panty cabinet: The microwave is a perfect photo I found in a Grand Appliances flyer! (attached to a square of wood) The kitchen kits are from SDK Miniatures. The 'bumpy' surface on the background is a textured scrapbook paper. I cut the counter down to fit my space and decided to use a regular stove instead of the cooktop. She did include a microwave and cooktop printies, but the quality isn't there as they were laser printed instead of photo printed, so you couldn't coat them either and they were blurry. I did use a few of the supplied food box printies. The tall wood faucet and sprayer is from MiniEtchers

The tile strips: I found a printie strip with teapot art I liked a while back and shrunk it down to fit half-scale size. TIP: I glued it to cardboard, which I then glued to a piece of mat board. I painted the edges to match the top red borders and all was coated with Ceramcoat Waterbased Varnish. I did the same process making the deck floor, but that has indents made by pressing in the lines with a ball stylus and ruler, I decided I'm not going to do that on the kitchen counter tiles, though, as I don't want to detract from the art. 


This is the cutest stove kit, also from MiniEtchers. It went together really well. I didn't like the cabinet-stove that came with the full kitchen kit above and decided the magnet stove I had wouldn't fit. This stove kit fits perfect in the space and is pretty cute, too! I added in a tin sheet with a few cookies "cooking" to have something in there. I may add a pot and spoon on the stove yet. TIP: I edged the inside of the stove window with black Sharpie and glued a piece of plastic inside for a window. You can't really see (it would look cool lit but I didn't do that this time) I also painted the inside a navy blue and dotted it with gray paint by rubbing the paint off  toothbrush bristles to get tiny dots.


I had to change the lace kitchen curtains above, which covered the bottom of the window as they didn't look right hanging behind the stove and counter. It bugged me every time I looked at them. So I cut them off and instead glued part of the lace hanging underneath the top valances which worked better. I'll show them later when I get the counter and tiles in. This isn't the first set I've changed after they were in, ha! I added some lace in the dining room as I didn't like having a bare window, but that works okay in the kitchen.

Also decided I'm going to make a square floor mat for in front of the kitchen counters with a coordinating color striped fabric. That's why it takes so long - the decorating and deciding what to put in, and then changing my mind. ha!

So, that's it for the moment, but there are other things being worked on and more photos to come. Thanks for stopping by again! --Chris