Above: The house all lit up. Yes, it has lots of lights. (46 lights inside.)
I've been busy decorating here and there. I'm trying to get some good shots of the rooms, which is hard because of the smaller size and trying to figure out the right camera settings. I'll get it yet. (Scroll down to see previous posts or look in archives list on left. Click photos to enlarge.)
For now, thought I'd share some more things I've finished and other stuff I'm working on.
Attic: I'm hoping to get a deeper, full photo yet but this gives you an idea of the assortment of stuff in there so far. Fun finding things to put in. Yes, even that wringer washer back there. ha! (Which is a fridge magnet.) I love this space. I may do another attic in both scales as a way to store stuff instead of sticking things in boxes. It makes clutter fun! ha!
Front foyer: This is the inside of the tower space next to the sitting room/parlor. I wanted it to be a simple garden-like place with plants. I may add a few more plants yet, I think.
The front hall... just a glimpse. I added the dropleaf table (from the Mount Vernon collection) and the phone, plus a small picture. Seemed the perfect place to gab on the phone! The housemaid is cleaning up a spill.
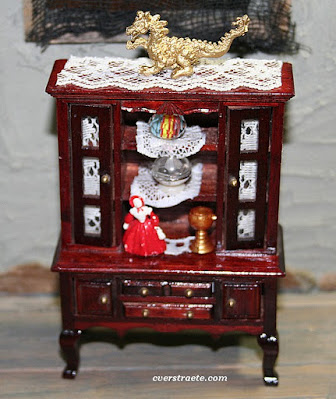
Dining room: Decorated this hutch for one side of the dining room.
Kitchen: I'm working on tile strips for above the counter. (There are three strips to cover part of the side wall and two on the back wall.) It will go behind the sink on the wall to fill in the gap. I like how the counter turned out. It'll look even better once it's filled with canisters, dishes, food, baked cakes, etc.
The fridge/panty cabinet: The microwave is a perfect photo I found in a Grand Appliances flyer! (attached to a square of wood) The kitchen kits are from SDK Miniatures. The 'bumpy' surface on the background is a textured scrapbook paper. I cut the counter down to fit my space and decided to use a regular stove instead of the cooktop. She did include a microwave and cooktop printies, but the quality isn't there as they were laser printed instead of photo printed, so you couldn't coat them either and they were blurry. I did use a few of the supplied food box printies. The tall wood faucet and sprayer is from MiniEtchers.
The tile strips: I found a printie strip with teapot art I liked a while back and shrunk it down to fit half-scale size. TIP: I glued it to cardboard, which I then glued to a piece of mat board. I painted the edges to match the top red borders and all was coated with Ceramcoat Waterbased Varnish. I did the same process making the deck floor, but that has indents made by pressing in the lines with a ball stylus and ruler, I decided I'm not going to do that on the kitchen counter tiles, though, as I don't want to detract from the art.
This is the cutest stove kit, also from MiniEtchers. It went together really well. I didn't like the cabinet-stove that came with the full kitchen kit above and decided the magnet stove I had wouldn't fit. This stove kit fits perfect in the space and is pretty cute, too! I added in a tin sheet with a few cookies "cooking" to have something in there. I may add a pot and spoon on the stove yet. TIP: I edged the inside of the stove window with black Sharpie and glued a piece of plastic inside for a window. You can't really see (it would look cool lit but I didn't do that this time) I also painted the inside a navy blue and dotted it with gray paint by rubbing the paint off toothbrush bristles to get tiny dots.
I had to change the lace kitchen curtains above, which covered the bottom of the window as they didn't look right hanging behind the stove and counter. It bugged me every time I looked at them. So I cut them off and instead glued part of the lace hanging underneath the top valances which worked better. I'll show them later when I get the counter and tiles in. This isn't the first set I've changed after they were in, ha! I added some lace in the dining room as I didn't like having a bare window, but that works okay in the kitchen.
Also decided I'm going to make a square floor mat for in front of the kitchen counters with a coordinating color striped fabric. That's why it takes so long - the decorating and deciding what to put in, and then changing my mind. ha!
So, that's it for the moment, but there are other things being worked on and more photos to come. Thanks for stopping by again! --Chris


