October 21, 2019

Update: #Halloween Projects


I didn't realize it's been a bit since I posted. Gigi has been busy with school and her job, but she is making progress on the Paris Miniature Project. Hopefully we'll have some "small" updates soon! 

In the meantime, I've been working on - what else? - Halloween projects. ha!

Some updates: New photos of this year's Halloween set-up. I've been trying to get photos of the whole thing or a video. The fun thing is I added flashing lights to the inside of the gray-purple Victorian house. Fun as it makes it look like it's haunted but - it's hard to photograph. haa!

Here are some recent pix I took. I'll try to get more photos yet. I also have a new small project that I'm saving to reveal. (Click photos for full size.)

Take a walk in the cemetery.. Just added this cemetery wall set (above and below) from Lemax. It has gargoyles on the back and sides and is nice to section the area off.


Another new addition since we had some rebate coupons. The Witch's Tower. It's pretty cool as the small witches on top spin around.  


The Victorian Half Scale Haunted house...


It's hard to tell here, but those are the lights flashing inside... It's a purple - yellow - green strand. 

It's best not to wander too far as you never know who you'll run into...

Added the green trees too, which are really for outside but they're kind of cool added to the display.


So... just a few scenes to get you in the Halloween mood. Don't forget to come back on OCT. 26 for HALLOWEEN IN MINIATURE!!


August 28, 2019

The Latest: #Miniature Record Store

You remember I was working on a miniature record store in the corner shop of the Houseworks' Street of Shops? (See previous post.)

Well, progress! Kind of....


I fitted it together as I got the outside painted and the windows in - finally. (That was after breaking a couple and scratching one. A HINT: Got a large poster frame with acrylic at Hobby Lobby. Cuts easy. With coupon was $7.) . 

I love the results, especially the pink - fuchsia -  door, but LOTS of painting. That top blank space above the door is going to have a fun accent and I have some more decorative paper to put below the windows.

And then... I couldn't get it to fit right.... ARGGH!!! I painted one of the walls wrong. Turned it on the wrong sidem so I have to repaint it. At least it's only one wall!!! But getting there...

Feel free to share your best goofs. Make me feel better. 😆


August 21, 2019

New #Halloween Minis! #Halloween in #Miniature 2019 is Coming!

I love Halloween and miniatures, so combining the two is always fun. I look forward to finding new items, setting up my mini displays, and sharing the amazing work of others.

Wow, I've been lax! I didn't realize I haven't done a Halloween series post since 2015, so I'm overdue to have a Halloween in Miniatures week! (See the top tab here on the blog for previous links.) 

I've been on a great Halloween group on FB, the Haunted Orchid Dollhouse Club, so I've been inspired by a lot of the work I've seen there. Many of the creators agreed to let me share their work, so my big thanks to them! So... 


Look for it Halloween Week!

 Animation: https://www.fg-a.com/halloween.shtml

In the meantime.... to get in the Halloween mood,  I thought I'd  share a few of the fun minis I just found at Michael's. The new items were so cute, I got a big kick out of them! Glad I got others from the Lemax line in previous years as they never repeat them - and they really didn't have much this year! No furnishings, barely any figures! They still have the tombstones and coffins, though.

The Tiny Treasures line are really cute and this year they had some great ones!
Aren't these neat?!! Love the candle!


The pumpkins are stackable and flat from the Tim Holtz line.


I also got the skeleton clown figure from the Tiny Treasures minis. The grim reaper statue holding the skulls behind him at left (which light up!!) is also new and is from Lemax. (Lucky I got it half off as they were gone already!)  The costumed dogs are from Lemax from the summer beach line. (Costumed dogs contest.)


I wanted to share this despite the poor photo - this is with the Halloween picks and greenery decorations - pretty cool copper colored skeleton beads. I also got one with silver beads. They're different sizes. I thought they'd make good vases or for other mini decorating.


I also got some more lenticular (changing image) pictures from Recollections. (Looks like they shrunk the amount of pictures this year and only ones I saw.)


August 07, 2019

July-Aug #Miniature #Dollhouse Projects Progress

A little late, but an update on what I've gotten done this past month. Sometimes you feel like you're not getting anywhere so it's nice to see photos of what you actually have gotten done! (Click photos for full size.)

I know I already posted about the Half Scale Haunted House. I decided to add some plants on the balcony and some decorations in the front yard. Ghosts can water them, you know! ha! (Ignore that white shelf on the lawn. Poltergeists left it there!)


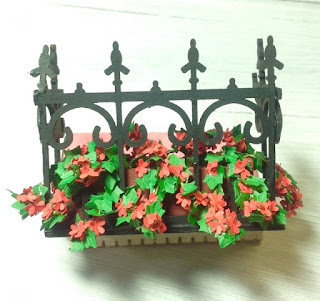
I also got some plants made - Made this half scale planter box kit, which were named Black Eyed Susans but I decided on painting them an orange color - from SDK Miniatures.  I'm making other flowers, so I'll show those next time. 


For fun, I changed the stained glass room. I had these things in a glass case but I think this looks better.


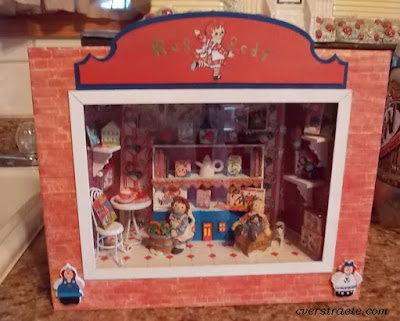
Also I finally put the front on the Raggedy Ann room box.


And... here is the latest progress from the Record Store exterior. I like how the colors came out. It look forever to decide on the combination! I also painted some bookcases and a wall trellis for display items. This is going to be VERY colorful! 

TIP: If you didn't know... use a feather to make your marbling lines in a contrasting color of acrylic paint. I've been finding a lot of crow feathers outside lately...  

For a change of pace, I decided to make the pillars dark purple with gray lines this time instead of black as I did on my other building. Think I'll use the purple on the other two buildings, too, which will be Halloween-related. (I can't resist!)


August 02, 2019

#Paris #Miniature Project 22 - It's Curtains & More!


Hello Everyone! Progress and Happy August! (Already??!)

 As the gold curtains are finished (see previous update #20), the second floor is now together! 

It's getting exciting as the ‘zillion’ little things I've been working on are now coming together. At the time it doesn't seem like anything is going on!

I also finished the third floor curtains and soon the third floor will be glued after another unplanned modification. (Click photos for full size.) (Fantastic! Love the curtains!!--Chris)


First, let me talk about the curtains. I found this delicate lacy material which is soft and thin, and they have now become curtains. I individually sewed on the gold rings that came with the expandable rod (highlandminis on Etsy). The curtains have a hem. I used transparent thread, which is like a fishing line, but much thinner. The side windows are lacy as well, but not as fancy as the curtains over the doors. I wanted something that I can open and close, so the reason for sewing the rings on. After all this is a bedroom, and privacy is necessary!  

Each curtain has a tieback with blue tassels (also from highlandminis). So, I can unhook the gold rings from the hook on each side and they close. I am so tickled with the results. It allows me to “play” with the scene as the doors will lead out to a balcony. The photo shows the table and chairs with the doors open (without the curtains).


Now on to the modification for the third floor. The kit is a little wider and narrower (in depth) than the floors below. Originally, I was going to add a small balcony to the width of the third floor, but now my DH will be cutting out a new “floor” that is the width and desired length. The balcony will still run the length of the third floor but it will be 4 inches wide hanging about 1 ½ to 2 inches over the second floor. This way there will be more room to have fun with the balcony. 


As I mentioned in Monday's post #21, I finished two of the geranium kits that I ordered from TheMiniatureGarden (UK) on Etsy. This is one of the mini balconies (below) that will be in front of the second floor windows. I just have to make two more flower kits for the second balcony.


Well, that's all for today! Probably next week, I'll be able to talk about another modification on how to get from the second floor to the third floor.

Until next time... Happy Creating!--Gigi


****************************************


The planning continues for the Paris Miniature Project which is my friend Gigi's  Serendipity Shed renovation for the HBS 2019 Creatin’ Contest. 
(Click photo in left column to go to Day 1 or here - Day 1  - See last entry Day 21.)
 * Don't forget you can put your email in the subscribe to updates box under the Paris photo in left column also to let you know when a new post goes up.


July 30, 2019

#Paris #Miniature Project 21 - Flowers!

Welcome back!

Remember Gigi shared in last week's post about her floral plans for the balconies???

Well. here are two of the finished samples. LOVE them! Love the color and how they cascade over the window box. These will really look good at the upper floor windows....  Love the fullness, too. (Ivy and Geranium flower kits from TheMiniatureGarden (UK) on Etsy. She really has nice kits in 1/12th and 1/24th scale.)
     Great job!--Chris 

*** And on Friday's Update - Yes, there will be one! Wait'll you see the curtains and.. some construction! 

****************************************


The planning continues for the Paris Miniature Project which is my friend Gigi's  Serendipity Shed renovation for the HBS 2019 Creatin’ Contest. 
(Click photo in left column to go to Day 1 or here - Day 1  - See last entry Day 20.)
 * Don't forget you can put your email in the subscribe to updates box under the Paris photo in left column also to let you know when a new post goes up.

Until next time… Happy Creating!--Gigi

July 23, 2019

#Paris #Miniature Project #20: A Month Later!

Ta-Da! Yes, it's a new Paris Miniature Project Update!!


It has almost been a month since I last provided an update, yikes!  It’s been the summer laziness that has gotten to me. I manage to do the schoolwork that I need to do, then just read or binge watch shows on Netflix. I need to get motivated as I will also soon be a teacher’s aide in the English department at my son's school. I'll be working 20 hours a week so I will have to definitely prioritize my days. But, enough of that and on to what (little) I have accomplished.


I ordered four kits from TheMiniatureGarden on Etsy of the Ivy leaf and red Geranium Paper Flower for the two balconies on the second floor. The photo (above) is from the seller on Etsy showing the finished products available. As you can see, they trail longer than the typical geranium flower. Most likely I will have two kits per flower box. I made the flower boxes below from scratch to fit on the balconies. 


I did finish working with the curtains. From the picture it may seem one is longer than the other, but that's not the case. They are long and will be “puddle” curtains that sitt on the floor. I have attached little golden tassels to each side. These are also on Etsy (highlandminis) along with the expandable curtain rod that I'll use for the third floor windows (which are all painted and glued into place. So, a wee bit more progress!

Next step is to finish the second floor which will be a beautiful deep maroon wall-to-wall carpet, then the second floor can be glued together. I am getting so excited for all three floors to be put together. I really like the inside rooms, but it's the outside I'll have the most fun with!

Thank you all for being so patient with me on this journey. I do hope you're enjoying seeing the pictures. Please do leave a comment and even suggestions. I appreciate hearing from you!


The planning continues for the Paris Miniature Project which is my friend Gigi's  Serendipity Shed renovation for the HBS 2019 Creatin’ Contest. 
(Click photo in left column to go to Day 1 or here - Day 1  - See last entry Day 19.)
 * Don't forget you can put your email in the subscribe to updates box under the Paris photo in left column also to let you know when a new post goes up.

Until next time… Happy Creating!--Gigi


July 22, 2019

Update: Miniature Record Store

I thought of two other roomboxes before I decided the corner kit from the Houseworks Street of Shops would be perfect for the miniature record store.


The hardest part after that? Painting! Ugh. I hate painting. It seems like it took forever to figure out the colors on this. Still doing finishing touches and of course I see more places to touch up. ha!

The other two shops will be Halloween (fortune teller shop and a Halloween store) so I figured I'd tie them all together with purple. I like the dark purple marble effect instead of black for a change.

One of three or four record tables in progress, too! I have A-LOT of records to make. haa!

July 19, 2019

Update: HS haunted House + Easy Fence Tutorial

I finally got back to finishing some details on the Half Scale Haunted House. (See some exterior photos here, the gardens and the beginning and inside.) (Click photos for full size.)

The house is a Greenleaf kit I've had for ages and finally decided to work on as I knew it had to be a spooky house! 

I think putting on front window boxes and the fun purple moss definitely added a nice touch of color! I also added green moss to the roof (which helped cover some things) and thin dowels on the top peak edges, which don't show here. There's a puff of smoke coming out of the chimney, too! Next is adding in the LED lights and decorating inside - that's the fun part! But other than the hard time measuring wallpaper and roof pieces to fit since the house was pre-assembled, I did enjoy working on this house. I just wish the rooms were bigger

The roof porch has a piece of trim along the top edge but it looked too plain as it was. I knew it needed some kind of fencing, but what? Here's an easy, inexpensive way to add a fence to your project:

Easy Roof Trim Tutorial

This is an easy way to add decorative trim to a project. All you need are scissors, tacky glue, paint and your preferred varnish or Mod Podge. I used Ceramcoat satin water-based varnish. The fence is the 2.5" tall wrought iron fence from AlphaStamps. Do a search and you'll find lots of nice fencing and gates to use here.


The fence is chipboard, a kind of pressed cardboard which makes it easy to cut and paint. What's nice is it's also flexible and bendable, so it's easy to work with but it will be sturdy once glued in place.

 I chose this design as it has two sections. I thought it would look best for this project to use the part without the points, so I cut off the bottom design with scissors. You might need a little light sanding to smooth down the slight bumps on the top edge.


Measure size to fit space as needed. I tried to match it up so each end would mostly have a bar to make it sturdier. Paint both sides with black acrylic, then seal with a varnish or Mod Podge. 

Glue in place along front section if needed and at edges and bottom. That's it. Very easy!  I'm sure there are tons of other uses for this, too. Have fun!


(I know this doesn't show too well with the black against dark purple. I'll try to get outside shots once it gets a bit cooler.)


July 16, 2019

Update: Miniature Window Room

Updates will be coming soon on Gigi's Serendipity Shed. I've seen it in person - looking good!! She's doing a great job and adding some neat little touches.

In the meantime,  I wanted to share the progress of the interior of the miniature window room box I first shared here. I love how it turned out!  I'm just going to glue down the table and chair as I won't be taking it out. I also do have a couple tiny doll figures that - of course - I can't find at the moment. So I'll have to add them later or put them in another project.  Ignore the blank spaces as those are covered by the front. I'm working on adding the frame and acrylic to the box front at the moment.  (click photo for full image.)

The boxes on the floor, book covers and cabinet are from Dragonfly International. I found a couple Raggedy Ann doll boxes online and made the other boxes, signs, album and game printie myself.


And well, here I am trying to make a "nice" project, right? 

Look what I found at this fairy garden site: haaaa! Cracked me up. They're 2" tall. (They also have some cute Halloween figures and sets.)