July 16, 2022

H Lobby #miniatures sale & Good News/Bad News!


Can't resist a sale! I'm mostly doing half scale these days so thought this little kit could come in handy if the size is close enough. The kit was $7.99; electric tape $16 down to $3.99; LED lite was $3.24. Just a few things I bought. Yeah, I got a few more electric things, the splices and lead wires, and a second light. Won't see that price again! 🙂

Good news is I got a few more things done on The Fairfield: Not much picture-wise but the 2nd floor fireplace is papered now. Cutting pieces to make the wood mantles next. I think this floor will be more wood as also have wood flooring cut. I might do some faux wainscoting and some fake ceiling beams since the left room here has a dragon print orange paper. Thought the wood could be a nice contrast and give it a warmer look.


Also got the 1st and 2nd floor porch wood cut; light is in on front porch; 2 floor lights in for the pumpkins, too! (What's a porch without lit pumpkins?) Added another light in kitchen. In-order process: had to get a couple pieces of siding cut and painted, then measure and glue on one piece to get the exterior light on...

Oh, and speaking of that! UGH! Must've taken the lights off an old house and didn't realize the one was a bare wire. Well.... a piece of wire stuck out and shorted.... had to take it apart and have the dollhouse electrician install the second light - after I coated the wire with nail polish to be safe!

BAD news -- shorted out 2 transformers!!! My BIG Mistake!!! Worse was my very large big transformer I've had for years! UGH!!! Those are very expensive now!!!! Should've left it on the big house. Should've, should've. Live and learn....

Well, hopefully will have better news next time! See you then!

July 06, 2022

New #Miniatures Find: Mystery Medieval-Tudor Box


I just had to share!

While I am doing mostly half-scale dollhouses these days, once I saw this box, I knew I had to take it home. It's so different! I just fell in love with it; very excited!!! (Click images for full size.) No matter what, I'll find a place to display it. The box has a lacquer-painted surface. The size is 15" h, 14" w, 7" d.

What do you think it is???

I just thought it was so cool and unique. I immediately pictured setting it up as the Tudor/Medieval scene I'd set aside for ages. I have a queen doll and I think a couple others (or I'll dress them). I'd also made a clay meal, complete with boar's head, a loooong time ago, and I'd gotten some other food items from a previous swap some years back.

The images look to be a mixture of medieval, maybe Crusades-Middle East, maybe colonial even? haa! So it really doesn't matter what I mix, it seems. 😀

Right side:


Left side: Middle East? Crusades? Who knows?

Top:

Colonial? (How this fits with the others I don't know! haa!)


Did you guess what it is yet????

I should leave you hanging but....


Ta-dah! It's a cd case holder. Just have to figure how to get the inside wall out. The sides can be covered. I think I'll make egg carton stone, like a castle interior. 

This will be fun! Stay tuned, it may be a while until I get to it. (Project #999. haaaa!) 

July 05, 2022

Let there be Light! #Fairfield HS #Dollhouse


Yes, it's been a little while since the last post, but... I've been kind of busy!

Actually got a few lights in, and in case you wonder what takes so long, well.... it took most of yesterday to figure out this light for the living room/parlor. An old Illinois Hobbycraft kit, it  contains quite a few pewter pieces, plastic sconces and a small metal tube. A too small tube I learned after trying to fit in four wires from two lights.

The lamp originally called for three lights, so I omitted one (and glad I did.) Cut the tube as it was too long, then realized it was also too small. And then realized after I got a slightly bigger tube that it would be too low so just scrapped it. Yeah, after all that. haa! I like the final look of it; added a rhinestone on the bottom.  I really love this room!


On to the dining room light, with more problems, of course!  I got this light with fake candles a while back I think from the Ionos Half Scale Group swap. I painted it black, put chains on, and added the green leaves around it. Then... oh had to match up which wires went together to each of the three candle lights after I struggled to pull them through the ceiling hole. haa! Lucky, hubby  is the electronics whiz with his tester and such. But I think it works well with the room, don't you?

I love the black/white themes in these two rooms but I will be adding color in the bedrooms. One is an orange dragon theme wallpaper I've also had for a while. The other will be red stripe as I've had this zombie-clown-circus theme in my head for a bit since I have some small resin figures to use. Yes, it sounds weird but I think it'll be cool!


Bathroom: For weeks, I had the small wall (which butts up on the left) put aside, all papered and ready and now... of course, I couldn't find it! So had to take another unused piece of wood, cut a new wall and paper it. (Not shown here.) Then I had to paper the inside walls. The back wall had to be glued halfway, put a hole through the paper, attach inside bath wall light, then solder it in back before folding paper over and gluing it. 

I have to add another light above the stair opening across the hall and will probably add another light on the ceiling near the window here since the spiral stairs will on the right. I'll add a small corner molding  since despite creasing it, the corner paper split. The bumps from the wires won't be as noticeable once everything's in place as you really only get a glimpse of the light through the bathroom barn door.

Kitchen: Yes, ceiling lights are up. I used the metal bead caps and metal findings again like in the other Haunted House as I think they have a vintage look that goes good with the kitchen.  (I have to add  piece of molding on the top back of the stairs yet.)  I decided to put an older piece of ivory textured paper on the ceiling and also used it for the tower ceiling.

More doors and windows are painted and I have to glue in the bay window on right next. Want to get the moldings in before I do that. Also have to add the inner trim on the bay inside edges. I glued a painted piece of cardboard on the inner top which works well.

I know, not many photos and it may not seem like much, but this was a lot of work getting to this point. haa!


That's it for now! I wanted to get more done today, but between all the looking around and then doing lights, I've done enough for now! So, until next time! 
Thanks again for looking and stopping by! Stay tuned for the next updates!

June 30, 2022

#Romance #Mystery Perfectly Arranged Blog Tour

Perfectly Arranged, (Hopeful Hearts Book 1), Liana George

Short on clients and money, professional organizer Nicki Mayfield is hanging up her label maker. That is until the eccentric socialite Katherine O’Connor offers Nicki one last job.

Working together, the pair discovers an unusual business card among Ms. O’Connor’s family belongings that leads them on a journey to China. There the women embark on an adventure of faith and self-discovery as they uncover secrets, truths, and ultimately, God’s perfectly arranged plans.

 * Be sure to enter the giveaway below and follow the blog schedule on Instagram!


BUY: Amazon - Barnes & Noble - Goodreads


REVIEW: Good mystery, though the socialite can be a bit too snotty and over-the-top at times. Good story with a nice twist which isn't overwhelmed by the faith part of the story. Looking forward to seeing how Nicki's life changes in book two. 3.5 stars.


Coming July 5: 

 Perfectly Placed (Hopeful Hearts Book 2) 

Nicki’s tasked with making New Hope the perfect place for orphaned children. So why has everything gone wrong?

Six weeks after leaving China, Nicki Mayfield returns to complete two critical tasks: restore order at New Hope Orphanage and re-connect with Lei Ming, the little girl who stole her heart. However, a stonewalling supervisor, missing documents, and personal tragedy ensure Nicki faces challenges at every turn. Is she the best person to bring order – and longevity – to the place these children call home?

Then, with the help of an unexpected ally, Nicki makes a life-altering decision. One that has the potential to upend her well-planned life and the lives of those around her. Will she lose it all, or has she found a way to save what matters most?


BUY: Amazon - Goodreads 


About the Author: 


 Before pursuing a career in writing, Liana George was a professional organizer and former owner of an organizing business. Her debut novel, Perfectly Arranged, was inspired by one of her eccentric clients and Liana's love for China, where she lived for two and a half years. When she's not putting things in order or scribbling away, you can find her reading, traveling, or playing tennis. * Find her on Instagram - Facebook  - YouTube, Organizing videos


Perfectly Arranged 


 *


June 08, 2022

#Fairfield #Dollhouse: More Progress


I've been steadily (ok slowly) getting a few things done on the Half Scale Fairfield Dollhouse. (Photo: Yeah, it's taking so long, it's looking like a desert around here full of dried bones. haa!)

But, so far, so good! (* Update: 7/1  - yes, still working on things. Will have a new post soon! Hope to get some lights installed next and top floor glued in.)

Remember I showed the cool gothicy parlor fireplace in the last post? Now I'm figuring out the opposite fireplace in what will be the dining room, right next to the parlor. (Click photos for full size.)

I had this skull piece I bought from a previous Michael's Halloween sale, and have been saving it... (surprised I found it!) though I wasn't sure what to do with it. I thought it might be a doorway mantel, but I think this will work for the second fireplace. 

Dining room fireplace pieces:

This is just a test so it's not straight yet, but I think it looks kind of cool. The pieces are positioned below but not glued yet. The oval shapes are the bottom pieces cut off the face beads on the front of the parlor fireplace. I painted them a light coat of white so they'd match the skull piece better.

 Another thought: I wanted to use the bead pieces to coordinate with the other fireplace but I'm thinking this might look better without them. I could use the pieces then in the upper bedroom fireplace as I'd thought of perching small skull heads on top of them, which might look better. You can't have too many skulls around, you know. heh-heh.


Almost forgot! In keeping with the skull theme, I painted this metal deer skull I found at Hobby Lobby (Timeless Treasures). I think it will look cool above the fireplace. 

The Kitchen:

Back to the kitchen (next to the parlor.) I didn't like how the inner doorway looked since it had three layers -the wall and two doorframes, so I cut some wood to fit. I cut and painted a top inner piece from mat board since the wood didn't want to bend enough. It looked best to paint the edges to match the rooms on each side though the door jamb/floor piece looked best black.

Dining room side:

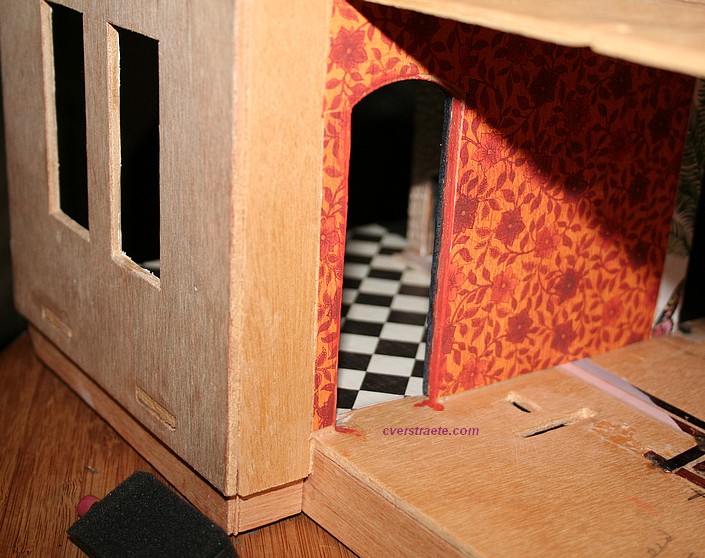
Kitchen side doorway: The floral paper by the right doorway goes into the front tower/front hall. As the large doorway into the kitchen is open, I extended the floor to match. Wall trim is next and the ceiling before I can glue the alcove to the right side kitchen wall (not shown.) Also have to add the kitchen door and trim in before I close it up. 


The stairs go along that wall so have to figure that out, too, and trim those. I eliminated the outer wall that enclosed the stairs as I think it looks better to have the stairs open. I'll put one of the kitchen pieces in the space under the back of the stairs, maybe the Tootsietoy metal  fridge. Love how it looks against the paper!


Also got the two walls enclosing the second floor bathroom done. Haven't glued them in yet as it's kind of tricky to line up and the ceilings have to be marked first. (So many things you have to pre-plan in this house!) 

Decided to use the sliding barn door (originally from MiniEtchers.com) on the front side of the wall. The wall butts up to the second floor window, leaving space at the end of the hall (so far) for the spiral stairs, unless I think of a better place to put them. The bath will use the faded blue Victorian-style scrapbook paper so I painted the door to bring out the blue though only a portion of the inside will be visible. I tend to re-use the same scrapbook papers in different houses since they look good and I like them, so why not? (Yes, the hall paper below is also in the sitting room in the other more haunted house.)


More doors:


I'd decided to have the  second floor window in the tower cut out for a door instead so I can use the small roof as a second porch instead. I also changed the main door (again) since the door I had didn't open. I like this one better. I also filled that small hole on top of the door with wood since it seemed silly as it didn't really do much. I put a tiny black sequin (cut off some decorated fabric) behind the main doorknob for some contrast. The doorway will be filled in with wood strips and I'll piece the interior paper on the other side and trim it. The colors so far, and I'll be adding other colors for contrast. I decided to do a different color scheme. There will be brick and part siding plus other trim on the exterior.

Testing 1, 2:

I'm also testing out making a mold of the skull piece since it'll never be found in the stores again. Hoping it works. Using Amazing Mold Putty (www.moldputty.com) which I bought a while back. Also trying out PermaStone mix to make the new copy though I  do have a big jar of plaster I can use, too. Will let you know how it works out.  Okay, that's it for now!

Thanks again for visiting. Come back for more updates and projects soon!


May 26, 2022

#Fairfield #dollhouse: Some Progress!

 I've been working on and off, but I am making progress on the Half Scale Fairfield Dollhouse. (See previous post and also search in left column search box for more posts. Click photos for full size.) * Progress after that - post here.

The Parlor:

I'm pretty happy with a few things I got done. Especially this: the fireplace in the black/white parlor. Parlor on left; dining room on right.


Now for the front of the fireplace: I just love how this came out!

The sides were those beads I found at a Ren Faire some time back. I knew someday I'd use them for this. (And luckily they weren't in that "safe place" where I can't find things! haa!) The bottom was cut off and I layered painted wood strips underneath for the surround. The middle gold piece was cut off a broken metal bench and painted. I was testing to see what picture will fit there though I kind of like the larger frame.

Here's a picture showing the ceiling decoration. I also trimmed around the fireplace top and bottom edges, plus put flat pieces to divide the two floors. I added trim pieces on the doorway inner edges too as the line bugged me.  I wish the flash didn't wash out the colors but I didn't feel like reflecting the flash.


The Kitchen, so far:

The kitchen, which is the room next to the dining room, (enter by the dining room door), is also going to be interesting. I fell in love with this orange floral scrapbook paper and figured it'd be perfect for a Hall0ween-flavored house. It's not going creepy or worn like the other house but will have both Halloween and "normal" furnishings. The "better" relatives will live here. (Like the Munsters except this would be Marilyn's house! Haa!) The walls here are papered, but I have to add door trim and frames yet.


Here's the kitchen window alcove with the curtain/shades done. Isn't that cool paper? 


Steps: 

As this house has to be thought out in steps, the inner alcoves had to be finished. I had wanted to attach the alcoves but... I realized I  have to do the floor and ceilings before I glue the alcove on so I can get my hand in there. ha! Then I have to add trim on the outside of the alcove, which I decided will also have some brick paper with trim to contrast with the red-painted windows.

This is the kitchen floor pattern, which also extends into the front hall. The front hall walls are a large botanic print scrapbook paper. I'll show that later. (The colors are darker and brighter then shown here since the flash bleached it out.)


Yes, it's busy, but I like busy. Adding to that, so far I have a pebble print paper that I painted a light orange for the ceiling. The floor print gives an old-fashioned feel since I want to add older appliances. I have a metal Tootsietoy icebox, and am using the stove and sink kit from TMC/Teresa's Miniature Creations. (Stove/sink photo from Terri Shuping Correll, FB Half Scale Miniatures group.)


And.... yay! I got my sink kit! I figured why reinvent the wheel and make one when she did the work already? So I ordered one and she shipped it to me. 


Also in the Works:

Pictured: the third floor and 2nd floor hall with staircase opening - stairs coming from the first floor kitchen. The roof pieces are only placed to see how they go.


The idea:

I keep looking at the second floor, deciding what to do. There is a wall that fits there with a door at the end nearest to the edge facing you, but it makes this a very narrow space for the bathroom. I am thinking of using part of the wall, cutting it off by the window, and maybe having the door on the side facing the stairs or maybe facing outward. That would leave me a space at the end (again facing you) to put a spiral staircase to go upstairs.

 I could forgo the stairs as I usually do, but I'm enamored with these spiral stairs.  ha! I could put the stairs in the back of the hall in that right corner but then if I add a bathroom you won't see them - and they'll be pretty. Only about half is done here in the picture. Will decide once I have a better idea of how it'll look since the ceiling/floor has to be cut out then.


I'm assembling the half scale spiral staircase kit from Alpha Stamps. Once I finally figured out how this works, they go together nicely. I'm deciding on a black and copper finish, or a dark brown with gold, not sure. Still have to decide on a rail, though. One of their design team used spindles and wood connectors on the 1"  scale staircase here. I'll have to do some other searches. I didn't want to get so complicated but there may not be much choice on this. We'll see how it goes.

Inspiration and Staircase Rail Ideas - Stairs made from wood fans

Bentley House Minis staircase, YouTube

Emily Morganti used spindles and a suede necklace cord for a HS staircase.

Thanks again for visiting. Stay tuned for more to come!


May 19, 2022

New #Mystery The Dead of Autumn


If you like reading mysteries as I do, then check out the blog tour post today on my other blog for the new fifth book in the Piper Maxwell mystery series, The Dead of Autumn, by USA Today Bestselling Author Jean Rabe.           


 About the book:

A teenager dressed as Tinker Bell never made it to the Halloween party.

Her murders sends a ripple of fear through Piper Blackwell's rural jurisdiction.

Investigating the crime, the young sheriff and her detective are drawn into an underworld they didn't know existed.

 Can the pair survive the trip into the dark heart of once idyllic Spencer County? Can they find the killer before more lives are are destroyed and he strikes again?

BUY: The Dead of Autumn on Amazon: mybook.to/DeadofAutmn

BUY: The Dead of Autumn on Amazon: mybook.to/DeadofAutmn
Dead of Winter on Amazon: mybook.to/DeadofWinterAudio
The Piper Blackwell Series on Amazon: http://mybook.to/PiperBlackwellSeries

May 13, 2022

May Flowers!

 Or in this case, nature's flowers. Yes, they're real!


I  couldn't resist. The lilacs are blooming! Sadly, they won't last long in this heat. 

May 12, 2022

Fairfield #Dollhouse Progress Update!


 I know, it's been awhile, but it takes a lot of planning doing this house and lots of trimming. So much wood to paint and cut! Here's the side I'm working on. Don't be too disappointed; I've only got stuff done on the bottom two rooms though the tower and hall on other side is papered; what will be the kitchen is part papered and I'll be working on that soon. (click photos for full size.)

I found with this house that to do one thing you have to do a bunch of other things first. First electric, then wallpapers, then floor, then put in door trim before adding wainscot trim. The parlor alcove inner roof had to be painted and the inside papered, and all windows done before it's attached. That's next. 

Then...  I painted the outer windows on the alcove sections a lighter purple and... I didn't like it.  

Nothing harder/worse than repainting windows already attached but at least it was doable. (Ignore any sloppy parts that have to be touched up and there will be strip trim added top and bottom also.) The lower wall is beige/tan mixed with some sand. The inner windows are all the same color. The outside parts of the windows are now a cherry red.  The window in the second floor tower on the other side got cut out for a door, too, so that's the door color as well. It's not looking too Halloween at this point, but the decor will be. Well, you  have to go with what feels right and I've done enough purple and orange already on other projects. Time for a color change.

The inside is the fun part - the designing. The worse is all the awful trimming and wood to cut. Then I lose pieces and have to re-cut and repaint. ha!

I had these scrapbook papers saved and really liked the blackboard effect of the floral print. Plus the floor has circle designs with a part shiny surface. So black and white is the theme in these two rooms. The dining room floor is the black/white tile paper I seem to use in every house. I wanted to do matching papers since the two rooms join. The dining room on the right has to have trim and windows put in. There's also a strip on the wall dividing the two rooms.


The ceiling is a textured paper I had a few pieces of. It gives it a kind of old-fashioned Victorian feel. 

I love the alcove. I have trim for the bottom of the wall once it's attached. 


I used a pearly stone paper on the front and side panel of the fireplace on the first floor between the rooms. I'll put a thin white wood trim around the top. I decided to cover a piece of mat board also with the stone paper for the hearth instead of using the thicker wood pieces from the kit.

The front of the fireplace will be kind of different. I found these beads ages ago at a shop at the Renaissance Faire and saved them for a project. They got cut in half, so I can use the bottom designs on the other side. I'll paint all the wood pieces and the shaped trim black.


Ceiling in dining room. That split wall on left will be divided from the striped wall with a painted wood strip between the rooms.

It's know it's not a lot done, but it's taken a while to get to this point. Feeling better about this project as I go on.

The kitchen next to the tower on the other side will have an orange floral paper and a orange/green tile print floor paper. Since it has an old-fashioned look, I wasn't sure what style the kitchen would be. The stairs are made but once I saw this stove and sink set from Teresa's Miniature Creations at the last dollhouse show, I knew I had to have an old-fashioned kitchen. I'll be using the vintage Tootsietoy metal refrigerator that I have instead of the one shown here and have to order the sink since she ran out of that kit at the show. (Thanks to Terri Shuping Correll of the FB Half Scale group for the photo.)


So, slow progress but getting there. Hopefully I'll have more details to show soon. Thanks for stopping by!