I've been working on and off, but I am making progress on the Half Scale Fairfield Dollhouse. (See previous post and also search in left column search box for more posts. Click photos for full size.) * Progress after that - post here.
The Parlor:
I'm pretty happy with a few things I got done. Especially this: the fireplace in the black/white parlor. Parlor on left; dining room on right.

Now for the front of the fireplace: I just love how this came out!

The sides were those beads I found at a Ren Faire some time back. I knew someday I'd use them for this. (And luckily they weren't in that "safe place" where I can't find things! haa!) The bottom was cut off and I layered painted wood strips underneath for the surround. The middle gold piece was cut off a broken metal bench and painted. I was testing to see what picture will fit there though I kind of like the larger frame.
Here's a picture showing the ceiling decoration. I also trimmed around the fireplace top and bottom edges, plus put flat pieces to divide the two floors. I added trim pieces on the doorway inner edges too as the line bugged me. I wish the flash didn't wash out the colors but I didn't feel like reflecting the flash.

The Kitchen, so far:
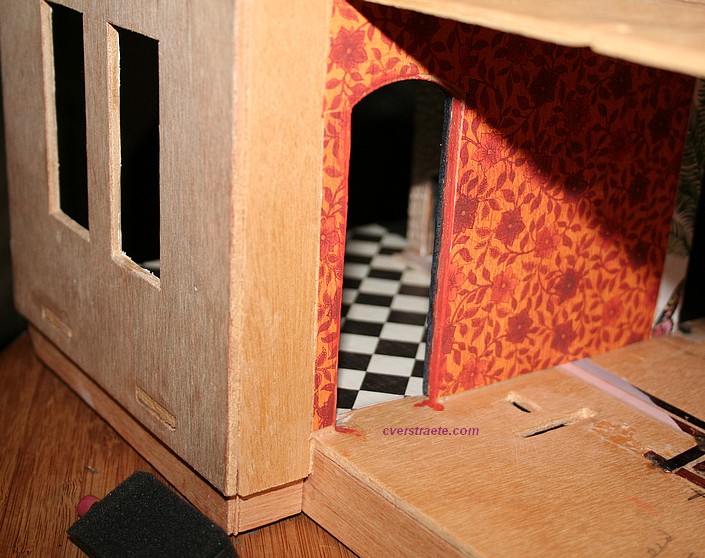
The kitchen, which is the room next to the dining room, (enter by the dining room door), is also going to be interesting. I fell in love with this orange floral scrapbook paper and figured it'd be perfect for a Hall0ween-flavored house. It's not going creepy or worn like the other house but will have both Halloween and "normal" furnishings. The "better" relatives will live here. (Like the Munsters except this would be Marilyn's house! Haa!) The walls here are papered, but I have to add door trim and frames yet.
Here's the kitchen window alcove with the curtain/shades done. Isn't that cool paper?

Steps:
As this house has to be thought out in steps, the inner alcoves had to be finished. I had wanted to attach the alcoves but... I realized I have to do the floor and ceilings before I glue the alcove on so I can get my hand in there. ha! Then I have to add trim on the outside of the alcove, which I decided will also have some brick paper with trim to contrast with the red-painted windows.
This is the kitchen floor pattern, which also extends into the front hall. The front hall walls are a large botanic print scrapbook paper. I'll show that later. (The colors are darker and brighter then shown here since the flash bleached it out.)

Yes, it's busy, but I like busy. Adding to that, so far I have a pebble print paper that I painted a light orange for the ceiling. The floor print gives an old-fashioned feel since I want to add older appliances. I have a metal Tootsietoy icebox, and am using the stove and sink kit from TMC/Teresa's Miniature Creations. (Stove/sink photo from Terri Shuping Correll, FB Half Scale Miniatures group.)


Also in the Works:

