February 27, 2023

Fairfield Dollhouse: Looking Back and Ahead: Dining Rm, Living Rm Art


First planning photo

 It's hard to believe that my  Fairfield Dollhouse adventure (or horrors? ha!) began waaaay back in November, 2021 - the box was opened and the foundation was built as seen in the very first post I did on Nov. 29, 2021!!!!  I can't believe it's been that long, but I still remember that it took three times to open the box and look inside before the project actually got started! 

The fun thing of having this blog is I can look back and have a record of what I did when. Otherwise, who remembers? haa! 

In December 2021, I was also still working here and there on the Van Buren Halloween house at the same time, too. At least I was trying to finish that. So it wasn't until May 12, 2022 that some actual construction of the Fairfield got underway.  Now it's almost a full year that the house has been actually underway and...

Ta-dah! For the record:  Yesterday, Sunday Feb. 26,2023, I finally finished the exterior of the house! Some small trim still has to be added under the roof eaves and rooms are still being decorated, but the main exterior trim is all done!

After all this time, I admit feeling a little disappointed that it's almost over! haa! Now bear with me.... Before I share the final look, I'm going to cheat and stretch this out a little. So I'll show you a few more additions/changes I made to the inside: (click photos for full size; see past posts archives list and sign up for headline updates in the left column.)


The windowboxes... but all that trim is finished now. I'll show you next time...

Dining Room: I'm adding art yet and am finishing up the dining room table spread shown in the previous post, but I did switch a couple things here. I decided to change the front screen on the bottom of the fireplace and used another ivory-colored resin piece. Thought it went better with the two side pieces I also bought from All Dolled Up TDS at the dollhouse show last year.


I decided to use this carved frame with an eerie building scene as it matched the colors better. I thought it would be cool to get it to glow in the dark, but no matter which paint I tried, (and I have three kinds!) they all glow great in a big blob or in the bottle, but not on the picture. Sigh. Still trying to figure how to get that to work. Anyone know any secrets or a brand/type that'll work in small quantities or just used for outlining, please let me know.


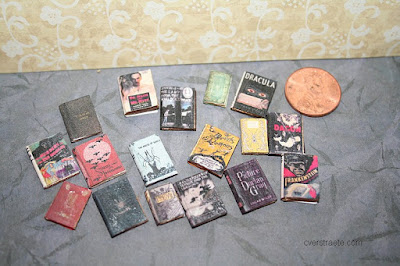
I switched out the single bookcase for the double bookcase model as it fits the wall better. I've added more gold accents since this photo. I love these Gothic furniture kits from SDK Miniatures. The cool spooky books are a Horror Book Covers set from Jupitermoon3 on Etsy. The tea chest on the bottom shelf is part of a downloadable printies Tea caddy set from Zena's Miniatures on Etsy. I should add a bead-knob on the top yet.

Some of the books from the set. Nice front and back printing and clear images.


Living Room: I also switched the art and the fireplace screen in the parlor/living room. I cut a piece of gold metal filigree and attached it to a small wood strip.


I thought this picture of a Paris street scene fit the room colors better. I added glitter to the tree for a past half scale group swap. The frame is plastic that I painted.
 

That's it for the moment! Next time, I'll show the exterior and am still setting up the girl's bedroom. Then I can show you how both bedrooms turned out.

Thanks for visiting again and following along on my dollhouse journeys!

Yes, there's more to come and... guess what???? There's going to be another house to work on before I get out the next big project, the Park Avenue Mansion! Stay tuned for details. It seemed like a good idea to work on something smaller before I jump on that though it still takes me just as long I think to get all the details done.

Come back soon for more Fairfield reveals!


February 21, 2023

FYI: Season 2 Minis TV Show Canada


I was disappointed in not being able to finish watching Season 1 of Best in Miniature, airing on CBC Gem in Canada a while ago....  (See the show FB page.) Now there is a season 2 that just started on Feb. 19. (See list of episodes at the link, but hold off on clicking further.)

It looks worth watching as Preston Poling, known as The Bearded Miniaturist,  is a US contestant on the show this season. (Follow him on Facebook and new website.)  ** Check out the story about him using the TinyCircuits TinyTV in his project. 

If you'll recall, he is the creator of the amazing Frasier Show miniature set, The Frasier Project, which I saw and took photos of at the dollhouse show in Schaumburg, Ill. last year. See my photos here

So... according to Poling, there is a way to watch the show, and the CBC site also has the first season episodes online as well. If you're not in Canada, the CBC site will show a pop-up saying  you are not in the viewing service area.  ** But... watch his video on YouTube. Basically, if you sign up for a VPN service, you can then go to the CBC site, make an account, and then connect to Canada from there... The service he suggests is not cheap ($83 or so a year; may be short-term prices). 

Here's another suggestion I'm going to try and hope it works: I've been using Avast Free Antivirus for a long time, which has been good and always reliable. They also have a paid VPN -- which is free for 60 days....  so I'm going to wait until all or most of the episodes are on and then binge watch those and the last few shows I didn't see the first season. I don't know how many episodes they'll have but Season 1 had 10 episodes. I've tried other Avast services and they notify you when to cancel or buy the service. Hopefully I'll be able to hook up to the show with no problem. 

Let me know if this works for you. The nice thing, too, is being able to hook the computer up to the TV via a HDMI cable and watch  it that way. Actually I had liked this show better as contestants worked on their own house projects instead of a group making items for each of the rooms in one house as on the UK show, The Great Big Tiny Design Challenge. But I did enjoy that show too when I found them (and they also have episodes online if you haven't seen it, so maybe the VPN will work there, too.) 

February 19, 2023

Fairfield Dollhouse: Assorted Art, Furniture


Yum! Who's hungry?

While I'm working on finishing up rooms, (and that blasted trim. Can't you tell I'm not inspired to finish that? ha!), thought I'd share some furnishings I'm working on. Sometimes you have to step away from the construction part and do some kits! (Previous post: attic sitting room.)

I love making kits, so this is a fun, abbreviated tour of what else is going on in the Fairfield. I'll show the items and finished rooms in the house soon. (Click photos for full size.)

Assorted Art: Printed out some eerie (and a bit creepy!) art for the girl's bedroom. Still deciding what to use. The top coffee sign may go in the kitchen, but I have to see what'll fit on the walls.


Dining Room: I really like this Gothic furniture set (SDK Miniatures), so I decided to use the double bookcase here (to be filled with books and things yet) and switch it out with the haunted single bookcase in October. 


I wanted a larger table for the room, so I took the haunted tablecloth off the Gothic table for now and decorated it for a nice lunch menu. Still deciding on the set-up yet. Yes, have to add tea cups and silverware, too. Some "healthy" things but the kids like peanut butter and pizza - if they have some fruit and veggie sticks! 😏  I'd like to change the food offerings later for other holidays, especially Halloween!


Also painted and stained the chairs from the set. If I had to pick my favorite furniture and kits, then this is it. I like this kit so much I'll probably buy more pieces when I go to the shows in April in case it ever gets discontinued. (Hopefully not!) Eventually I'm thinking of making a library in a book box. There's also a double bench that goes with it, which I have set aside. 
(She'll be at the Spring Miniatures Show,  April 27-29, Wyndham Gardens Hotel, Schaumburg, IL.  I'm also planning to go to the Bishop Int'l. Show, April 29-30, Chicago Marriott O'Hare.)

I liked this washstand kit (also SDK Miniatures) and thought it made a good buffet.

Girl's Bedroom: The desk is a vintage Tootsietoy piece I painted. Bottles, faux lamp and basket from a past swap. I printed out some sketch notebooks for the basket and painted the scissors from some older Polly Pocket accessories I had. Luckily, I saved these and also have a bunch of teensy cute shoes, too. And I noticed they don't seem to make this stuff anymore, at least that I could find. 


On second glance, I thought the bed needed more pillows, and I also added a teensy toy dog. Also covered the resin chair (vintage resin couch-chair set (Georgia Matuschak kit 1995) with fabric from a vintage tie as I loved the shiny color. The couch is in the attic sitting room.

Kitchen: Still deciding on what accessories and wall art to add... For now, I switched out furniture and painted the farmhouse table kit (Jane Harrop, UK) and two slat chairs (which I think may be older Cassidy Creations kits). Funny that there's a lot of green in this room, not my favorite color, but I do like this Wedgewood green and a sage green also.

I took one of the chairs from the attic sitting room, so have to find another one for there, which I know I have... somewhere... But I'm also thinking of making a matching color slipper chair for the attic table instead. Funny that I have several, but not in the color or pattern I want there. ha! Isn't that the way it always is?


That's it for the moment. Thanks for stopping by again!

 (If you want to see more photos, check out the previous posts in the archives in the left column and also sign up for headline updates.)


February 06, 2023

The #Fairfield Attic Sitting Room, Kitchen Pieces

I have been working slowly on some things. Took a break, too, as I really didn't feel like doing more trim yet, as you'll notice. ha! (Yeah, ignore that untrimmed roof edge! 😏)

(Previous post: trimmed tower, attic bath, a few kits.  * See archives list for more posts and sign up for email updates in the left column. Click photos for full size.)

Instead, I got some furniture finished and decided to work on the attic sitting room, which is next to the boy's room. This was fun as it ended up with a kind of retro feel to it. 

There's a lot of fun stuff in this room. I had to add a bookcase, of course, with assorted books and some newspapers about the Queen's death. The small paint jars on top are from a past HS group swap. My favorite: I found this unpainted metal phone in my "buy it and I'll use it someday" stash and had to add it for a touch of realism. The phone cord is thin coated wire I cut off a tiny light bulb and painted. I also have a wall phone I painted for the kitchen. I made the vintage-flavored Eiffel Tower glitter picture for a past swap. I made the clock on the wall from a printie, rhinestone and a medium jump ring. 

 The reading chairs are '50s style MCM chairs from All About Miniatures. I decided to contrast the chairs by color with the blue floral fabric and the matching/contrasting pink print. The coffee table is from one of those Woodcraft punch-out kits of assorted furniture.

I did decide to cut off the top of the fake brick wall on a slant as it looks better since the back of the house is open. Luckily I glue things to hold but not that I can't pull it off with (hopefully) minimal damage. (There was none.) The textured red brick paper is from Starboc 2 in Greece on Etsy. Love her brick.

I am thinking of trying some white brick on the inner front walls when I eventually do the Park Ave. Mansion. Still have in mind to do a kind of rooming house, with the wealthy widow/owner living in the top floor penthouse apartment, which I'm leaning toward decorating in a Brooke Tucker style since I  now have the book and two lamps. (And sad to hear she died recently. Another miniatures legend gone.)

The fabric on the vintage resin couch (Georgia Matuschak kit 1995) is kind of busy so you can barely see that I decided to add a couple dirty spots and some stuffing sticking out. The lady of the house says the couch is too comfy to throw out. The kit came with a chair, too, that I'll use in another room. I like when I find these kits as they come out nice simply by gluing fabric on. The bottom section is grooved so you can tuck the fabric in. I made the hassock by covering a foam piece (shaped foam beads I found a while ago at The Dollar Tree) with fabric and bunka thread. 

The writing table (Vesper Narrow Table, Small Scale Living from All About Miniatures) has a typewriter from a past HS group swap and that weird "sculpture" plant whatever from Michael's. I got the chair as a kit at a show. 


The outer wall has an old radio (fun gift from last year's HS group swap.) It just seemed to work well in this corner.


Full view:


Kitchen pieces:

Working on some of the kitchen pieces. The baking table and stove are from TMC, Teresa's Miniature Creations (minitmc@comcast.net). She'll be at the Spring Miniatures Show at the Wyndham Gardens Hotel in Schaumburg, IL, April 27-29 as will SDK Miniatures. I like her Gothic furniture and flower kits. The Bishop International Show is also that weekend, Sat. April 29 and Sunday, April 30 at the Marriott Chicago O'Hare.) 

Before: (finishing up the sink yet.)


After:

I added some plastic confetti pieces, the top shelf and the orange seed beads for handles to the baking table. The pie making set is by Patsy M from a long ago swap. The tarts are Reutter Porzellan. I made the teeny jam jar.

The stove is so cute but ugh!! Those teensy-teensy beads for the handles and top of the stove burners are no-fun! I kept losing them and finally had to cut a couple tiny pieces of the square tube for a couple of the bead  "knobs." I gave up adding the beads to the side of the door and just painted the "hinges" silver. In case you're wondering and aren't familiar with 1/24, half scale sizes: the stove is 2.5" high and 1.75" wide. 

Here's another view for size: the chair is 1.25" wide and just over 1.25" high. Small, but doable. I've tried 1/48 scale which is much smaller. Too small for me. - Chris V. www.cverstraete.com


Thanks again for visiting. More updates coming soon! 


January 30, 2023

Fave January Read: Stephen King's Fairy Tale #fantasy


I like to mention books here occasionally between my mini-making, so I thought I'd share my favorite January read: Stephen King's Fairy Tale. (PS - he also has a new murder mystery, Holly, based on the PI from his Mr. Mercedes trilogy, coming out Sept. 5. There's an excerpt at his website.)

* Amazon - Barnes & Noble - see Goodreads.

I admit having reserved the library book previously, then deciding I wasn't up for a 598-page book. But I saw it again and decided to check it out: glad I did.

This is a fun, imaginative twist on a selection of classic fairy tales we know. Definitely odd in parts, sometimes scary, with some weird monsters but heroic moments. And it has a wonderful German Shepherd, Radar, whom you'll shed a few tears for. Being a longtime GS owner, I just loved the dog in the book and how she's saved. 

Some great monsters and villains here, and some great characters you grow to love. I can't comment much on the surprising or cool parts, as I don't want to give the surprises away. I didn't know anything about the book, so it was fun seeing where it went. Really enjoyed it and not a section of padding that I had to skip over despite the book's massive size. King really is on top of his game.


January 23, 2023

More Mini Collectibles are Coming Out!


Everyone seems to be getting in on the mini-mini trend of collectibles.

The Mini Brands  have come out with Fashion purses and mini food. Besides the Mini Brands Toys, I like the mini Disney and Star Wars figures in the Mini Brands Toys Disney version. I've always loved dolls so the teensy doll figures and princesses are hard to resist. Here's some I put in my mini Haunted Toy Store.

And now....

While I'm not a big Bratz doll fan, I was really surprised to see these mini Mini Bratz dolls at Walmart. (Amazon link.)($10 at Walmart; $7.99 on sale on Amazon at this writing.) I had no idea they were making these! How cute! This Japanese style figure is really cute. 


Then.... I saw an online post about mini Mini Funko Pops (not the mystery figures but tiny versions of the Funko box and figure) coming out soon. 


Haven't collected the full size figures either but I'm sure I'll get a few of the mini ones, too. I wonder who else will be getting on the mini bandwagon? Kind of fun seeing what comes out next.


January 22, 2023

#Fairfield #Dollhouse: Some outside trim, kits, bath done

The tower all trimmed.

 I'm in the process of adding trim (boring stuff) and then have to get the porch railings, posts, etc. installed.  (*Click photos for full size. See past posts in left column archives. Previous post: finishing the attic. * Also sign-up in left column for email headline updates.)

In the meantime, I got a few more things done. 

The attic bathroom: made a faux cabinet for an old metal Cassidy Creations sink; added crystal beads for the hot/cold and used a piece of solder glued on for the faucet. Also made a fake wood tank for the vintage toilet. (I added all the fake walls and door to divide off the boy's bedroom behind it on the left side (not shown.)

Decided to add a partial curtain, which I think makes this little space fit in better. Love the print for the curtain and I think it adds a nice touch of color. I have the same print in a pink and orange I'm going to use on some furniture. Decided to add in the mirror, too (from a Hobby Lobby set.) 

The back roof piece is on now since this photo so you don't see all the top of the wall, which is a shame, but I'll add some art prints above the wall cut-out (entrance to the attic) anyway I think. I also decided to cut the outer edge of the fake brick wall on the left here on a slight diagonal since the roof piece is angled. It didn't look right since it stuck out so much. Luckily I glue things to hold, but at least I can still get them off if needed (without destroying it all). ha!

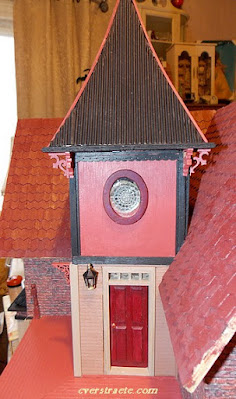
The tower: (top photo) Added the brackets underneath, the trim on the top sides, and decided to add the gingerbread underneath the top strip. The bracket by the door will be used as a plant hanger. I do have another fuchsia plant to make (if I'm brave enough. ha!) Love them, but they are a difficult plant to make.

I recently got a set of metal weathervanes (vintage set, Karen's Miniatures) from a seller. The round cap was made by cutting off part of a plastic chess piece, painting it (used ivory multi-surface paint as a primer), and drilling a hole on the top. There were several different styles; they're cute but such thin metal and very dainty so they bend too easy.

Kits: In-between, I decided to work on some kits. These are really nice and are coming together pretty well. For a change of pace, I decided to paint the table (Vesper Narrow Table, Small Scale Living from All About Miniatures.) to match the curtain, which turned out pretty cute. Nice kit. Tired of all stained furniture. The MCM chair is also from them. The chair is a bit daintier to build (I broke the chair leg tips and had to reglue) but it'll look fine once painted.

Other kits in progress: vintage sink, baking table, and stove from TMC, Teresa's Miniature Creations (minitmc@comcast.net). (Wish she had a website; she does occasional shows.) Love her kits. I saw these pieces and had to get them! I added the small shelf on the top edge of the table. Beads, handles, burners, etc. on all pieces will be added once I paint them.

The teensy side table is from a couple who also sell small kits among their other items at shows (and I can't think of their name right now.) The small round Dining Table is an older MiniEtchers kit. I think I'm going to paint all these, too. She has some fantastic 1/2" scale kitchen furnishings and some cool Victorian and unique Edwardian furniture. I'll share the furnishings once I get them all painted and decorated.


That's it for the moment! More to come soon. Thanks for stopping by again!


January 16, 2023

#Fairfield Dollhouse: Attic floor completed!


Favorite pic of the week: lamp by the attic window.

It's hard to believe, but this week I finished the attic trim, which means the third floor is done! So now all the floors are done, meaning they are papered and trimmed. After a year, it doesn't seem real! (Check archives in left column for previous posts. Also see end of year recap.) *Click photos for full size.

Fitting the bath pieces. The door at left goes into the boy's bedroom.


Here's the bath niche unfinished and a view of both attic spaces. I added the false wall and door on the left side which goes to the boy's bedroom. I had to cut angled pieces of mat board which were glued together in a double layer and then papered. I love that mustard yellow paper. Not sure where I got it but it has typed words on it so I'll have to add a small typewriter table for the writer, of course! I'm finishing up the bath pieces to put in there, so that's coming up.

 * Added: As someone asked: the brick is textured paper from  Starboc2 on Etsy. She's in Greece, but has nice products and fast shipping. Used the brick paper on the Van Buren house  interior and exterior also. See finished exterior. 

The right side attic space. Lucky I had enough wood floor pieces left to fit here. Thought it would be fun to add a crate with an uncovered lamp. And what is that peeking out? 

A visitor: A ghost mouse! haa!


For fun, here's the attic with stuff in it, which I took out for now and will change around yet. I'm thinking of putting my extra art on the walls for storage.

I'm not entirely done as I'm still adding edge trim and a few pieces I missed, plus I have to (yes, still) put in the spiral stairs, but the house is really almost finished. Working on the foundation now and have a great idea for front lattice. (More on that later.)

The roof tower section is trimmed. I'll show that once I get my latest find for the tower tip in the mail. 

Other updates:

Side of the house with the stained glass windows, window boxes, and the angled pieces above the lower windows covered with corrugated cardboard.

It's hard to show the colors but the flowers (soft plastic) are nice shades of rose. 


Next up is to decorate all the rooms, which is the fun part. I have to say I don't like all the trimming but I do like coming up with ideas on different ways to do things. I still have some furniture pieces to make too and probably some flowers.

The bare wall was bugging me so I added some art in the second floor bathroom. Yeah, that was fun trying to reach in there. ha! I got it in with tweezers and a glue dot on back which I hope stays on. 😃 I also added that post on the end of the stairs with a "fancy" bead top. I have to trim the top of the walls on both sides and add some artwork.

Girl's bedroom:

I like how the wood grate looks in the fireplace. Here's the Tootsietoy bed I decided to paint brown, with linen colors to go with the maroon wallpaper. I like how the larger bead caps worked for ceiling lights with a gold filigree medallion. I've done more feminine girl's rooms before but I really liked this wallpaper/scrapbook paper and think it turned out well with the brick.

I'll save the finished boy's room photos and show them next time with the finished girl's room. Plus I have to fill both attic spaces.

Then it's on to hanging art, furniture kits, decorating.... and after that?

Well, I may work on a couple smaller projects before I tackle the next big house. Sometimes you have to take a break between large projects. 

The good thing is between this I finished making my items for the annual Half Scale Group swap and mailed them. Can't share what I made yet. Now just have to wait until March for the return box. Always fun to see what other people have made.

So.... stay tuned for more decorating updates.... Thanks for visiting!