April 04, 2024

D - Miniature Dollhouses, A to Z Blog Challenge 24


Today continues the annual A to Z Blog Challenge. 

Today is D for my favorite - Dollhouses!

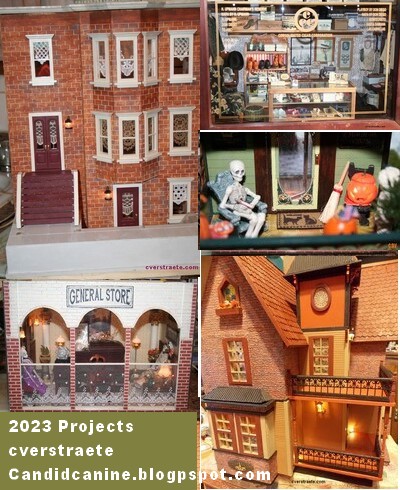
I've completed several projects in the past year: the Fairfield dollhouse; a miniature skellie funeral parlor; the cigar box men's store; the Witch house; and I'm still working on the Half-Scale Mansion, which is almost done. Take a peek at the links for more photos. * See page on top tab for other links.

(* Start at Day 1 - A - Back: C - cigar box)

*Come back tomorrow for more! 


April 03, 2024

C - Cigar Humidor Miniature Room, A to Z Blog Challenge 24

 Today continues the annual A to Z Blog Challenge. 

Today is C for Cigar Humidor!

What is that, you ask? Well, I had bought this box a while ago at a flea market or yard sale. It's actually a box that would set into a wall, probably from a cigar shop. I always thought it would make a cool men's shop and last year I finally finished it. It's become one of my favorite projects. (* Click photos for full size.) * See more close-up photos here.


(* Start at Day 1 - A - Back: B-Bedrooms)

** Next: Day  - D for dollhouses

April 02, 2024

B -Miniature Bedrooms: A to Z Blog Challenge 24

 One of my favorite rooms in the half-scale Fairfield dollhouse. (See  F  on 4/8 for more pix and links.)

Today continues the annual A to Z Blog Challenge. 

Today is B for Miniature Bedrooms, which may "B" the most fun rooms to decorate in miniature!

Here you get indulge in your fantasies, decorate a room how you can't in real life...just make a place you can't wait to kick off your shoes and relax in!

(* Start at Day 1 - A. Next: C - Cigar Humidor Room)

My favorite thing is mixing colors and patterns. It took me a bit to get bold in doing that, but sometimes, the wilder the better! I do love decorating in miniature!

I loved this color scheme and the prints for the Fairfield main bedroom above. (See other room links here.)

The bedroom in the yellow Victorian house was also a favorite. I liked the old-fashioned print drapes, the wood valances, and the painted Victorian headboard:  (See yellow Victorian house video on website page.)


The 1" scale patriotic bed I recently finished:

* Come back for more tomorrow! * 

April 01, 2024

April No Fool's Day, A to Z Blog Challenge 24

#AtoZChallenge 2024 badge A  It's April Fool's Day, but I'll say it's No Fool's Day! 

I decided to sign up for the annual A to Z Blog Challenge. (* Click photos for full size; see more posts in left column archives.) If not, today will be the letter A. * Posts are daily except weekends. I may double up on some days. All links go live the day of the post.*

My theme, of course, is miniatures and dollhouses. But I may throw in an occasional post on a book or movie I enjoyed. Some posts may be older projects I'll share buried in my website as then they'll be saved if I ever move or delete that site.

I'll try to include new photos but some may focus on projects I've recently completed which are always fun to look at again, and will be new to new visitors. So I hope you enjoy them! I'd appreciate comments, too, if you can, as it's nice to hear what people think.

* So today is A for dollhouse ATTICS. See below. * 

NOTE: This post will also serve as the main list for my blog in case you miss a letter.  Some of these themes below may change before the post goes live. Posts are live on the day of.

April 1, Today: Monday: A - Attics   B- Bedrooms    C - Cigar Humidor   D -- Dollhouses   

 4/5, Fri: E - Everything at the Show

 4/8: Mon. -  F - Fairfield dollhouse  4/9 Tues; G - What'd I get at the shows?  

4/10 Weds. - Thurs. 4/11  H-I - Have-to-see Items at the Shows! Displays and more.

 4/12 Fri: J-K - Just a new Kit    4/15-16  Mon.-Tues: L - M: Love my HS Mansion 

4/17-18: Weds/Thurs:  N-O - Noncorporeal Fiction                 4/19   Fri.: P -  Half Scale SwaP

4/22 Mon. Q-R-S -  Quite a Job- Putting the Mansion Rooms Back Together  - Part 1

4/23 Tues: The Mansion Rooms, part 2

4/24-25 -Weds: U-V -   Update: the "tiny house" kit

4/29 Mon. W -  Writing: One Hit Wonders  X-Y-Z: 

***********************

One of the dollhouse attics - Before: 

I love including an attic in a house as that place to stash things you don't know what to do with, or just hide things. It's fun to just pile it in! Yeah, this is a bit empty... This was fun as it was the first attic I decided on. I loved the brick walls and the contrast with the ceiling beams and the wood floor...

Above is an early pic of the attic in my half-scale (1/24th scale) yellow Victorian dollhouse. The final attic below is a bit fuller than this. ha!

The Attic  - After: 


I've done attics in some other houses, too: Here are more photos of the attics in my Fairfield and Van Buren houses.

I really liked adding in a storage attic, sleeping/studying space and even a bathroom in the Fairfield House's attic section: (See Fairfield page for other photos. * See other house links.


Next: B (links live on day of post)


March 22, 2024

HS Miniature Mansion Latest!


On the clock... tick-tick-tick....

Yes, I've been quiet but slowly working on some furnishings and adding a few things. The mansion owner and tenants were getting angry about how long their furniture was taking to get built as they want to move in already! That's what happens when you hire the wrong people. haa! 

(**Click photos for full size and better view; Last post: mansion flowers; diner. See more posts in left column archives list.)

The Diner: 👀

I'm still adding some more items in the diner (where's the plumber? He has to fix that sink already!) But I did put an important item in the diner - a clock! (See top photo.) And the electrician will be putting the phone in next. Something else:


I decided to add a Little Free Library bookcase on the back wall. It needed something and I thought a bookshelf left over from the Sam's Study kit would fit well because of the color. It seemed a good addition as patrons can take a book with them or read while they eat lunch. I just loooove how this room looks! It's not your usual dollhouse room but that was the fun of it! 💋


Movin' on Up: Second floor:


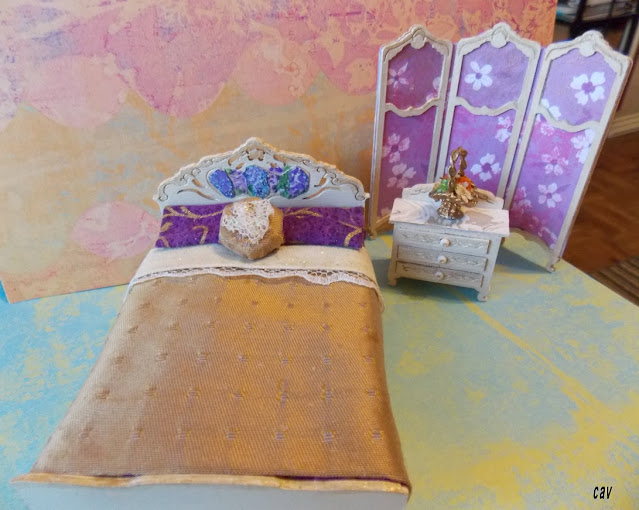
I really like how this bed set came out. (Hart's Desire Minis/Etsy). The set has an armoire and I also have a second set with a vanity and chest but I don't think I'll have room in this house for the other furnishings. Maybe I'll make a small room setting as these are really nice pieces.

I usually pause at painting furniture over staining it, but it really does add something 'extra'  since the widow/building owner on the second floor has all white (actually antique white) and gold in her apartment and I thought it should match. I cut out some flowers and painted in a little background on the headboard. I liked the color combination of purple, gold, and white to coordinate with the art. The gold cover is a piece of upholstery fabric. The screen is glued over scrapbook paper.


I also decided to add a gold floral filigree piece with little "jewels" in the front of the fireplace as it fit better. I added some art on the walls by the door and put another gold/brass vase with matching gold flowers in the corner. I also found a little statue I painted gold for the mantel. Added the clock on the wall, too.


Third floor:


I did make another small, plain bed for the cafe' owner's rooms. I made the frame with a small headboard from mat board. I didn't want anything fancy so it fits in the nice but "useful" decor of the larger sitting room. It may not look like much but it does look good in the room.

Also decorated the table and added another chair. Lunch is served! I made the food plate and chip bag, and all the decorations. The "chips" are Bell Pepper seeds. 😏


The left chair and table (which I adapted a bit) are from the D-Tales half-scale kitchen cupboard kit. The chair on the right is from All About Miniatures/Etsy. I need to get another chair for the smaller bedroom's table.


So, still working on more stuff! 
Thanks for looking! Come back soon for more updates!


March 08, 2024

HS Dollhouse Mansion Flowers & That Bed

 It's sounding like Spring outside with the Cardinals calling and blackbirds whirring, so it's a good time to make miniature flowers, too. (*See last post- planters and diner; see other posts in left column archives. Click photos for best view full size.)

Decided to plant some different pots and planters for the Half-Scale Mansion. See photo above. Yes, that small round "planter" is actually a vintage wood sewing thread spool. I liked the size and painted it with a light coat of chocolate brown.


I thought the small bed of "sunflowers" added something in front. I might change the green pot for the pot of white flowers that's on the deck. Not sure yet. I still have to add another large container on the porch by the door.

Here's the rooftop garden again. I moved that pot over on the table and added a book. Have to find a drink to put there, too.  


Even added in the bunny fountain for Easter. 😊 I'll look for a grill to add here.


The 1" scale bed:

Finished up the bed and I think it came out pretty cool. It's for sale; contact me if interested. (US shipping only.) Both ends are decorated the same. The drawers open and are lined.


Thanks again for visiting! We'll see what I work on next. Furnishings, I think. Oh, I wish the dollhouse shows were here already. ha!


March 06, 2024

Writing Interruption: Ghost Story Accepted!

(Haunted image: pixabay.com)

 Commercial break!

Between making minis, I do still write, you know. haa! 

Yay! New and first acceptance of the year: My ghostly story, "Secrets of the Last Mine," has been accepted for a ghost anthology. A goal I had was to be in an anthology like that --- and get this story out there.

The story behind the story: This story was originally accepted for an anthology, then declined, then I kept reworking, re-editing, re-titling, and re-sending it out. I almost, almost gave up on it, but I still liked the story, so it was just a matter of finding somewhere it would fit.

About the story: It's a ghostly, eerie tale. Nothing gory here.

Jake Simon is haunted by dark memories and the mine disaster that happened in his childhood. Now the mine is finally being shut down - and it's time for him to face the past and the "Secrets of the Last Mine."

I'll include more details soon. 

March 04, 2024

HS Dollhouse Mansion Planters, Beds


 I realize I should label posts better as if I want to find a certain thing (and can't), then I'll have to take a new photo, if possible. ha!

Working on a few odds and ends for the mansion. (*See last post - almost open diner; and fries. More posts in left column archives list. Click photos for full size better view.) 

Planters and flowers:

The planter above was a kit from SDK Miniatures. I tried something different this time. Instead of using punches or pre-cut petals, I cut out different flowers from a sheet of scrapbook paper, "cupped" them with a ball stylus, and glued them onto paint-tipped wire. The flower heads were all different sizes but I liked that they were not the typical kind of plant and not too realistic. I used some plastic spiky leaves for the background. For some variety, I glued shimmery paper and a painted metal finding on the front.

I decided the windows of the Park Ave. Mansion needed some window boxes. Sure, it's fine without them, but as you've seen, I'm a "more is more" person, so I thought they added something.  Here's one of the boxes though I decided not to use the flower decal and took it off.

I took the easy way this time and just used pre-made clay flower slices. The flowers are just clay nail design slices glued to wire and stuck into air dry clay topped with moss. I also made the flower box from 1" scale staircase molding.


I did the tower, but am still finishing up the rest of the windows.


I had made some other window boxes previously on the Fairfield. (Looking for pix with the windows, which I haven't found yet.) The railing window box used pre-made clay leaves I took out of another planter.

Beds:

I admit a preference for nicely made beds in my houses. Here's a Halloween bed I made a while back from one of those punch-out furniture kits. I've also made others with different Halloween fabrics and a set of Christmas beds that I had used in the attic of my Country HS house. Here are the regular beds in that attic. (Hmm, I don't seem to have taken photos of the Christmas beds. Well, the Christmas part of the attic is in the above link. I'll have to redecorate that again.)

I saw a photo of someone else's messy dollhouse bed and thought that would be fun to try for a change. So, the bed in the chef's room (third floor of mansion, turquoise room) had to be messy, like he just left the crumpled up covers to go get ready for work. (The room is still not totally done yet.)

I used some leftover wood pieces from those punch-out furniture kits to make the bed frame with a piece of mat board for the bottom support and doubled foam for the mattress. The secret to this is gluing crumpled foil under the covers and then scrunching it so it lays how you want and then gluing it down. This was a fun experiment I'll have to try again.

1" Scale Bed:


This is a hideously ugly bed that I've been hanging onto as I had an idea in mind for it.

I'll say it was ugly. I'm revamping it - painting, adding paper accents and a red-white-blue nautical color scheme. I'll show it soon and have to say it looks pretty good! 

This and a few other things will be for sale soon (sorry, US shipping only) since I have shows coming up and need to get some more spending $.

Almost finished with it; Stay tuned!

Thanks again for visiting! Come back soon for more updates!


February 28, 2024

Half-Scale Mansion Diner - Almost Open!


Moving right along on the diner project in the lower level of the Half-Scale Mansion. (* See last post - fries; see more posts in left column archive. * Click photos for full size better view!)

Most everything is done but I'll be adding a few things yet so that's why I'm saying it's not open yet! I have to get another table set at the show and still trying to figure out a small gift stand near the door. (It'll have to be a small vertical shelving unit since there really isn't much room left!)

 I know this isn't the usual layout for a "mansion" dollhouse, but I'm glad I decided to do something different as it's been fun trying out new things.

The cooking counter: 

This came out even better than I expected! 


It's fun to see it with all the food signs up! (Yes, I have to add the pipe under the sink yet!)

What I'm really happy with is how the food came out. After I made the food on the grill (air dry clay painted with burnt umber and red with white acrylic paint), I added some "grease" using the Glaze I have. Added some more glaze then with a touch of the burnt umber to make it look like the dirty grease. Perfect!

I glued a couple stove grills I had left to a card painted silver, then scanned it for the cooking area to the right of the griddle. Figured it was the easiest way to do it. The spatula is cut from the inner metal coffee can liner.


The back is the embossed inner coffee can lid glued to matboard, Knew I kept saving those for a reason!


I decided the window looked too bare, so I added a red-check curtain to match the chair seats. I also added another small counter on the right of the eating counter so the cook has another place to set food. There's a crate underneath that I'll add some cola bottles in, I think. But this is not just a counter...

The side counter has a secret... I decided to use the dishwasher kit I had (old MiniEtchers kit) and figured I'd put it under a counter for more space. He doesn't want dishes piling up when it gets busy!

I have to get another cafe table set (SDK Miniatures) at the show in April, so I have one for now that I painted the silver with a red speckled top. I'll need some pots and pans, too.


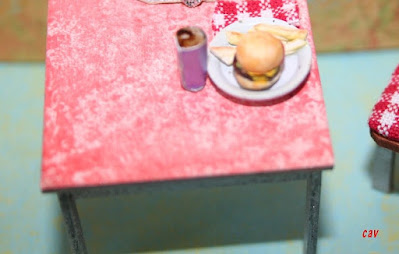
The burger and fries is again air dry clay. The cup is from the past Half Scale group swap. 


I made a short video to give a view of the full diner:  (Or watch on YouTube) Yes, I'll do a better one later. 😏

So, almost there! At least on this floor. There's a lot to do yet: furniture for the other floors, flowers outside.... Stay tuned!

Thanks again for visiting! Come back soon for more updates!


February 19, 2024

Half-Scale Mansion Diner: Fries Anyone?

Fries, anyone???

 I'm on a roll! Or should I say hot dog or hamburger bun? ha!

Well, I'm pretty tickled with the latest results in the Park Ave. Mansion's half-scale diner. (* See last progress post; and other posts in the left column archives. ** Don't forget to click photos for full size to see them better!)

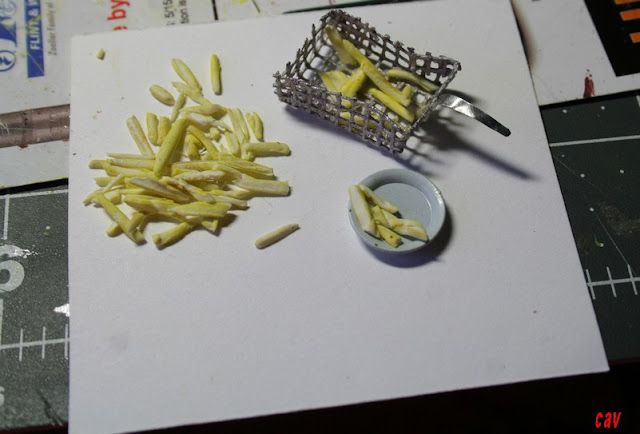
Decided to work on more fries, the diner back counter, and a big part - the fryer. This is the thinking part, but fun when you get to figure out an idea you have in mind - and that it mostly works without a lot of screaming and, er, some swearing! ha!

Now bear with me, if any mistakes show or things are missing yet that I have to fix, add, or fill in, but I was pretty happy with how the fryer came out!


It started with a plain block of wood I had which was cut down slightly. The block is 1" long and just over 1/2" wide and about 1 3/4" or so high. I cut and glued strips on top to make a box, then added two wood strips on the top of the back edge with tiny sequins, seed beads, and straight pins for knobs on the control panel. The front has some painted corrugated cardboard which is a bit smashed to give it a used appearance.


The basket is needlepoint canvas cut to a square shape and folded to form a box. The handle is silver metal cut from an embossed coffee can liner. I also used the embossed pieces for the counter backsplash. I'm very happy with this as I had it in mind and luckily found a piece of canvas in my stash! Hungry, yet? 😋


The fries are still being "cooked," but are simply Crayola Model Magic air dry clay touched up with yellow pastel chalk. I have to add more, then add some rust color pastel to make them look more done. Then I'll seal them with matte Modge Podge and add some gloss varnish to make them look shiny and to have some "grease" in there. 


I'll fiddle around with cutting and arranging the fries more, too, but if I do say so, they do look like fries. They are tiny enough to get away with just giving you the idea of what they are. I just wish I could get the photos better to show that. I'll take more photos later outside in natural light to avoid the flash bleaching things out.


As you can see in this unfinished photo, the fryer goes at the right end of the counter. I'm also using part of the embossed metal from a coffee can liner for the counter backsplash, which I glued to picture framing matboard. (see below.)  I've been saving those for ages, knowing eventually I'd use them. And even better, I even found them when I wanted to use them. haa!

Here's the counter below without the fryer. The backsplash worked out well. The dividers on top of the counter are "splash guards" around the grill area. The left counter will be a prep area. I'll add some food cooking and try to make it look like grease, I hope. The stove burners and knobs will be to the right of the second guard piece.


 I hate showing half-done pix, but I couldn't wait. ha! Next, I'm gonna add the rest of the backsplash, the faucet, burners and knobs, wall shelves, upper fan, and some food signs and art. Plus I want to try making some pots and frying pans from manila folder or card to stack around and under the counter. I also have to stack some dishes and glasses, and fill the sink up! And then there are more tables to add and a gifts shelf/counter besides the front customer counter you saw last time. 

Digging around in my stash, I found some veggies I got from past swaps, and cakes, too. Maybe I'll add a desserts table using the bottom of a hutch though I might have to figure out a plastic cover for that so the place doesn't get shut down by the mini health department (even before it opens!) haaa!

So far, so good! Turning out better than I expected. Stay tuned for more progress!

Thanks again for visiting and come back soon for more!