August 14, 2024

New Halloween Project: Abandoned Room


Hey, it even has a ghost already! haa! (Click photos for full size.)

While I'm working on furniture kits here and there, I've been deciding what larger project to do next.

I am leaning toward starting the half-scale country cabin kit I got awhile ago  - the Alisha Country house kit from Laser Dollhouse Designs. I have an idea of turning it into a more contemporary house, kind of black and white, which would be very different for me. But... I will put touches of color. I can't help it! Eventually, as I have to do some planning first since I want to change some things around in the house and it'll probably be the winter project. 

I'll also start setting up the small Halloween display in the real house. Will be nice to have something up and lit. In the meantime while I work (yes, still!) on decorating and filling the Van Buren dollhouse for Halloween, I thought of doing something smaller as an in-between project.


The box looks better painted gray. (Excuse the light on the glass.) (* See the room update here.)

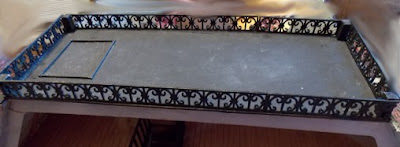
I had another photo box sitting around, (this one is 5 1/2" h, 8 1/2" w, 3" d) that is smaller than the one I used for the Tiki Bar. I buy these things at Goodwill and set them aside until an idea hits. So.... once I saw my friend Gigi's teensy abandoned room, part of the Robin Betterley 2023 calendar club kit project, I realized the photo box would be perfect!

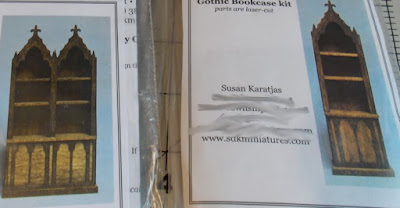
Here's the club kit:

Here's Gigi's teensy abandoned room which is sooo cute!

I like doing haunted houses and that, but I also like the messy, abandoned look which I haven't done yet. Believe it or not, it's really hard to totally mess something up, especially after you put a lot of work into making it!!

So that is the plan here: a fully abandoned half-scale room. I like the idea of building up the floor, too, to have the ground showing underneath as above.

  Some supplies to start:

First, I painted the whole box gray and will add some black over it for aging. I cut a false wall out of mat board and cut window holes in it. I have a couple Grandt Line plastic windows I've had awhile that work well since I'll be wrecking everything. I got them cheap so I won't feel bad messing them up. I put some LED lights behind the wall to light it up, dimly, of course! I also put a magazine landscape on the back wall behind the windows. I put wood sticks behind the wall to provide some space behind the windows.

Here's the wall so far (not glued in and paper not glued yet): Yes those are lights behind the windows. I had a two-light string and battery set on hand. (Evan Designs has all kinds of different sets.) I have to wallpaper the wall, and add some moss around the window and on that tree branch. I'll put the floor in after the wall is done and the paper in. 

The wallpaper (scrapbook paper) is cut in strips like real life, then dirtied, torn, pried up, and whatever else. I'll put up dingy ripped curtain remnants too. Might add some falling plaster and have visible brick patches, too. So far, so good!

Accessories will vary as I see what looks right. I have a plastic Victorian couch that will be perfect to break and wreck. I cut part of that bookmark and dirtied it up. (Gasp!) It'll work here. The other part can be a small rug in another room.

It's been pretty fun working on this! Believe it or not, it's actually harder to make something messy. It's hard to decide to wreck kits or furniture on purpose and decorating-wise you don't want to go too far. Or is there really such a thing as too far in an abandoned room? We shall see!

I know, not a lot to show yet, but I think it's turning out pretty good so far. Sometimes a small project is a nice change,  though it often can take as much time as a larger one, right?

Making a list for myself of things I could add in:

* Mice, gotta have mice! Or rats... either way.

* Spider webbing cobwebs     * Broken lamp and end table

* Old picture frames and pictures   * Forgotten toys?

* A discarded suitcase or crate?    * Broken chair?

* A stack of old books and magazines, some with pages torn out.

Other suggestions are welcome. I'll share more pix as I get things done.

********

* For fun: Get free mini Halloween cross-stitch patterns (black cat, pumpkin, bat, etc.) I use 22 count cloth for smaller results.

Thanks again for visiting! I appreciate you stopping by! Come back soon for more updates.

* PS -  Don't forget, you can sign up for the headline email updates in the left column to let you know when there's a new post.


July 29, 2024

More Halloween Miniatures!


In the Halloween mood! (Even if Hobby Lobby already had - gasp! - Christmas trees & ornaments out! Now that is early, but everything seems to be earlier this year!) (* See last post and previous Halloween house post. Click for full-size photos.)

Finished the two Gothic pieces, the spice cabinet and bookcase (above). (SDK Miniatures.) Now you can really see the colors here. Love how these turned out! I'll definitely make more of these with bright colors. Here's the books in the bookcase and how the side looks:


I went to Michael's again... got this cute little light-up building since it was on sale and I had a $5 voucher to use. Figured why not? Have to paint it. Cute as it lights up green.

Then of course I looked at the Ashland minis again, this time on sale, and got a few others. I'm going to be doing some mold-making  with the bottles and wall sign. 

I may get that small cauldron they had yet, too, and still considering the skeleton leg side tables. Had an idea to make a table out of the cauldron. This really is the best selection of Halloween minis they've ever had! I see a lot of people online mentioning them also.


 I couldn't resist this fun monster plant. Perfect size. I think I'll paint the mouth inside red. It needs more of an accent.

I know I showed a few of these before, but I made a few more eerie "vintage" paintings, too. These are always fun to do.

I have to work on finishing the inside of the Haunted house next, but I also found this cute kit on sale during Amazon Prime days. It's a bit smaller than I hoped but it'll still work. I had an idea for the outside walls and also found these neat wood skeletons at Michael's for wall decorations. The skeletons are 3 in a pack and are about 4" tall.


That's it for now. Will share my mold efforts and whatever else I finish soon. I still have those poison plants to make yet, too! *  Started painting the poison ivy and sumac, and they really look good!

Thanks again for visiting! See you next time. Hopefully I'll make more progress on the haunted house itself.


July 18, 2024

#Halloween Mini Making!


Happy Soon Halloween! The countdown (after July 4) begins, so I changed the head banner already. Why not? (Grr! Michael's has the Halloween minis (see previous post ) now at 40% off, after I went too early of course! I'll have to get in on another sale later.)

Made a few new half-scale kits that I'm really happy with the results! (See the last post. * Back to Halloween dollhouse.) Click photos for full size.) These have to be three of my most favorite kits I've done!

Made the tree bed I bought a while back from Michelle's Miniatures. I decided the bed looked best in brown, with black lines and black tips on the branches. I thought this color combination for the fabrics looked good, using a vintage-looking rose print with a black with various tone spots. I might add another pillow or toy yet. You can see the black print better on that tiny chaise lounge I showed before and finished to match.

The small chair, which I painted black, is actually metal and used for dinner place settings. I made the spider web rug using a net pattern glued on top of the rose print.

 I absolutely love this cute little Wonky Clock from CastleCrafts. I was thrilled when I saw she had this in half-scale at the last spring Bishop Show. I was a challenge, I'll admit, especially having to cut the thin pieces of paper to fit the edges around the center front opening! A lot of cutting and pasting but the end result is just too cute and worth the time!!

Another favorite kit is this Gothic Spice Chest from SDK Miniatures. I made one as a potion cabinet previously in my Witch's Cottage, which came out great. It's such a nicet kit that I had to do another one and really love this look. (My friend Gigi gave me the Raven-skull light at Christmas.)

This time I wanted to do something different and almost painted it black, but once I saw this sparkly pattern in my friend's paper stash, I love colors and sparkle so I decided to give the cabinet a kind of sparkly Moroccan flavor! I painted it beige/tan with gold edges to highlight the red pattern. The front drawer inset is also panted gold with the print underneath. I usually paint the back gold to show through. I put red seed beads touched with gold paint for drawer knobs. I just love the results!

The single Gothic bookcase kit, also from SDK Miniatures, will be painted the same and use the same paper as above. I usually do the brown with gold accents, but this will be fun to try something different. Will share once it's done!


That's it for the moment. Thanks again for visiting. Come back soon for updates!


July 13, 2024

Fun #Halloween Minis and Books!

 Set up a few of the Michael's Halloween minis (see last post) in the roombox I normally use for Christmas. I still have to add some more lights but thought I'd share ahead. (Click photos for full size.)


I just love that typewriter!

* Looking around: there are some other fun Halloween mini toys... 

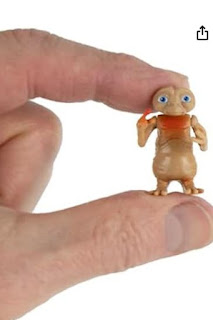
Oh look at this! A tiny ET from the World's Smallest line on Amazon. Now that is cute!!


The mini Funko Bitty Pops of Nightmare Before Christmas are cute. (On Amazon.) I like the Pumpkin guy. 

And... how about some Halloween reading?

Speaking of Halloween, got my copy of the anthology, Noncorporeal II, with some great ghost stories including my eerie (and somewhat touching) story, "Secrets of the Last Mine." See post for links to buy.

And... the Kickstarter is still going on but nearing the end, 14  days to go, so get your goodies!  (getting close to the $2k bonus giveaways!) for the Behind the Shadows II anthology. Includes my creepy, Twilight-zoneish story, "Blink!" I loved writing this one!

Thanks for visiting again! Come back soon for more updates. Working on that neat half-scale tree bed!

July 06, 2024

Halloween Mini Shopping!


 Ok, I know, I know, it's only three items - so far  (hey it adds up $$) - but I went to Michael's to check out the Halloween and LeMax stuff. (Click for full size image; see last post: Halloween house.)

* Update: I went back. haa!  I put X's by the extras I got. 😁

Well, the LeMax stuff is pricey this year; I just couldn't get myself to pay $10-$20 an item, even with a 20% discount. (But the Ashland stuff had a neat larger light up tree that I liked for $15.) Three new mini tombstones were $7 but...then I found the Ashland Miniatures and was much more impressed. Wow, what a cool selection! (See it online.)

So I got these three pieces which will work for half-scale. (The shelf is about 3.25" h; the seated skeleton is about 2.5" h; the busts are about 1 3/4" h.) I'll watch for the sales as they had some other cool items that would fit in a 1" scale library.(Photos from website.) Here's the ones I really liked: -  and I got that typewriter! (Plus the black candelebra with purple candles!

Gonna set up the roombox I usually decorate for Christmas. In a Halloween mood! Pix to come!

X Got the dog.

X got it.
X got it! 

I had to get this typewriter! This is how Is started writing. On an old Royal typewriter. No, that's not my hand. haa! 

There's a neat veiled statue bust, a candelabra and a skellie dog... a pile of skulls, 

X got it!

Just several neat-looking spooky things to choose from. I'll have to take another trip. Fun stuff! 


July 05, 2024

Back to the #Halloween Dollhouse!


Yes, I have been working on other miniatures! Halloween anyone? 
👻 See, I left this dollhouse sit so long, it really is haunted with a ghost from the past. haa! (Click photos for full size. See other links in left column archives list.)

Well, I was wondering what to do next after the Tiki Bar. I did finish the Tiki cup shelf and a stand for one of the Tiki sculpture candles (pix to come).

So, as I've heard stores are already putting out Halloween stuff (which I have to go see for myself!) I decided to do some Halloween decorating. 💀


I got out that other half-scale dollhouse I'd done a while ago and set aside (remember the Greenleaf Van Buren? wow, I was working on it in 2021! Here's a multi-project link from  2022.) The house isn't real big, but I still like the style and design.

Yay! Finally got the top roof trim done, too. I think it turned out pretty good.


 I added some small posts in each corner of the roof and cut off the tips on the fence sections. (Chipboard fence, 2.5" from AlphaStamps since it's smaller and can be cut into two pieces.) And you get all these little points and pieces that can be used for decorations. I used some of the tiny points on the front of my Fairfield house. See oval on the bottom of the house front here. They also sent a small gift bag of those "crystal" plastic pendants.

I finally put the trim on the back edges, which really finishes it off. I also added a bottom trim to the front and sides (see front photo). 

I made a new table kit (I used the other Gothic table in my Fairfield house) and redecorated it with the Miss Haversham-style tablecloth. I'm thinking of making the spooky lady, too, if I find a doll in my stash that I'll want to age and make creepy. More cobwebs will have to be put inside the house, too,

 Also put together this cool Gothic chair, that actually came out better than I'd expected. (All Gothic items from
SDK Miniatures.) The chaise is from Michelle's Miniatures.

I'll do the bookcases next. I also have some poison plant kits to do that I bought at the last show, also from SDK. I want to do some front landscaping and maybe I'll finally make those animal topiaries like in The Shining, too. 

Then I found something pretty neat! I had this Fortune Teller kit, which I'd bought from Michelle's Miniatures a while back when she came to the Chicago shows. I'd totally forgotten I'd tucked two other kits inside the package! A surprise! See, it pays to be forgetful! haa! 

 I thought the tree bed was such a unique kit when I first saw it. She has some really different kits. She has an Adirondack chair with a carved spooky face that I still eventually want to get. And there's a whole section of haunted half-scale items, too! But I see some Christmas shopping to do here, too, I think! 😀🎄

I'll have to do that Fortune Teller box for the house's attic as this little doll will fit in there once I paint and redress her, though she does seem to fit the house well otherwise. I love the scrapbook paper on the walls above. It has skulls and cats.

For fun, I framed more creepy pictures. I like framing old weird art. I really like this one of the creepy old grandfather.

So far, so good! Stay tuned for more Halloween house updates as I start hanging pictures, decorating and getting more kits done. I have to decide on what to do for a kitchen, too. Then I can indulge in making all kinds of creepy food! Not sure of what furnishings to use but it has to be something that I want to make old and run-down.

Thanks again for visiting! Come back soon to see what's next!

July 03, 2024

Writing: Behind the Shadows II Kickstarter Starts!


 * Get in on the BEHIND THE SHADOWS II Kickstarter beginning JULY 3 for special perks, daily posts, and who's who's in the horror lite anthology. Also check the Facebook page for updates.

Includes my eerie, creepy Twilight-Zoneish story, "Blink!" 

I loved writing this story! Tommy wakes to a new world and wonders why no one else "sees" what is going on but him!  A little weird and even funny at times!