September 25, 2023

Witch Cottage: The Roof!


Hard to believe I first started looking at what to do with this project (the half-scale 1/24 Jasmine Victorian Gothic Cottage from Laser Dollhouse Designs) back in April
So that's not too bad; just into the 7th month now.

Right now, most everything is done. I just finished up the small window roof and added the edge trims. Have to just add a pot on top the chimney, I think.  * Last post: see some of the exterior. (Click photos for full size; see other posts in left column archives.)

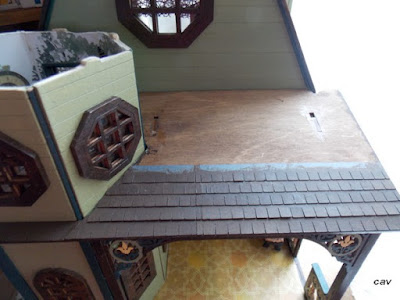
So for today, wanted to show the roof. I'm pretty happy with how it came out. For a change I used cardstock strips instead of individual wood shingles. Here's info on the shingles file  I used and had someone cut for me. It came out pretty well! I only wish the lighter color didn't show through in spots as I thought I'd painted well enough. Just one of those small nitpicky things that bug me though it doesn't show as much in real life as in the photo. 

I decided to add some moss and vines. I like how it looks on the front roof and the front towers (top photo.) Yes, still am finishing the top tower! 

The side and other roof vines actually look better than in the picture. Glad I got most of the exterior, yard, and flowers done in-between. Just have to figure out my final decorating inside and hang more art. But perfect timing! Hoping I'll be ready for a grand tour during the week of Halloween!

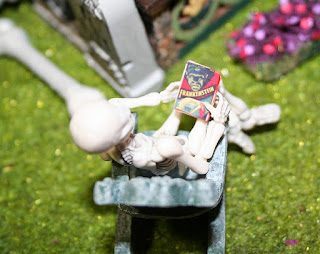
For fun, the tiny skellie decided to sit for a portrait in the yard. Say Cheese!

Oh, but what is he/she reading?? Let's peek over their shoulder...

Of course!  haa!

Here's the table I set up in the corner of the front porch.


The orange poppy-like flowers are set in a fake pumpkin from a floral pick I bought awhile ago with foam "pumpkins" that looked like planters. I just painted them a darker orange.

Remember the small somewhat ugly witch (by Bonnie Glazier) I showed before?? I almost, almost didn't use her, but after dressing her up, she's developed a charm all her own! For now, she took a seat in the front yard, too, but she'll be working on potions inside later.


I made the witch hat from cardstock covered with a taffeta-like fabric. The skirt was made from an older pattern booklet, "Fashionable Ladies in Half Scale" by Loretta Kasza. The top was too hard to make because of how her arms are positioned so I glued on black lace instead. It works.

Then what's next? I'll show more of the house later. For now, well....I came across a cool project on Etsy for the printies and labels for a "macabre market," that had been shared on Alpha Stamps a while back. I got a kick out of it and thought it would be fun to make some items for a Halloween box I have that I wasn't sure what to do with. Stay tuned for details on that! I needed a 'smallish' project to do in-between and before I decide to start on the half-scale Park Ave. Mansion.  First I have to get my Halloween fix!

Thanks again for visiting. Stay tuned for more Halloween posts soon!


September 19, 2023

Playing with the Witch Cottage Exterior


Updated stairs and walkway.

Playing around with some changes to the Half Scale Witch Cottage. Didn't want to post too many photos as Halloween is coming and want to save some reveals for then. A tiny peek at a portion of the flowers I finished. (See last post: gardens; Click photos for full size. See other posts in left column archives.)

But in the meantime...

Finished up the stairs. Also added some moss between the walkway stones, which did make it look better.

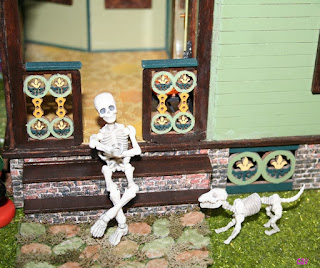
For fun, the tiny Skellie and his/her dog are waiting for Halloween!

I also made a chimney. For a change, I decided to use the same painted egg carton stones instead of brick like on the other houses I did. I made a thinner version (stuck on temporarily) for the side instead of over the top ridge as, of course, I couldn't find the larger chimney that came with the kit. ha!


This new spooky fence from Lemax is cool. I thought it fit this project since it has a witch hat gate and tiny hats on the pillars, plus black cats on the side pillars. But they cheapened it by not putting slots in the sides to slide in the fence pieces. But it's still cute.


Still working on the gardens and adding things so it's not-quite-done. And have to finish the shingling/painting! But having fun with this one.
Stay tuned for more!

Thanks again for visiting. Come back soon!


September 11, 2023

Witch Cottage Garden Plans


Setting up the Fairfield Dollhouse for Halloween and putting the gardens in place.

It's been a couple weeks with no post, but I've been busy! (Click photos for full size; they look better that way!; see other posts in left column archives.)

Actually, I got inspired in the last few days to work on some things for the exterior garden areas of the Witch Cottage between shingling. Yes, still working on the roof; painting and finishing up two small sections but I have to take a break from that. So tedious.

I was setting up some Halloween decorations around the Fairfield dollhouse (more pix to come later) and thought how nice the garden flowers looked, if I do say so myself (see top photo). Well, I didn't really plan on making more, but they're easy enough to do so never-say-never. So I decided to make a few more flower beds to set around the Witch Cottage, too. (See sunflowers now used with the Fairfield dollhouse.) I also moved the bases around. The base for the Witch Cottage was one I made a while ago using foam core board. I made a new wood base covered with green felt for the Fairfield.

So that is in the planning. First was making the flower beds themselves. I tried something different this time. I'd found these odd plastic plants at Walmart a while back and always thought they'd be fun for Halloween.


I'm still figuring out the placement of where the beds will be, but the bed with this orange plant and some spiky yellow plants looks good on this side of the house. I also found a tombstone candy mold at Michael's, so I made a few tombstones from plaster. The flower bed is a double layer of thin foam core board glued together with loose grass mixture and brown railway ballast (stones) glued on top. I'm making another bed with the round yellow ball flowers and some flowers I'll make.

Here are two more flower beds that I'll fill, set temporarily in the front of the house.


Stairs:

The house actually comes with a set of four steps that are rather tiny in size. I didn't like them and thought it really only needs two stairs so I made some new ones cut from 1/2" wide square wood rods. I covered the sides and front with the matching brick paper from the inside, which I also added on the exterior bottom of the house. (Textured brick from Starboc2 on Etsy.)


I used some 1" scale door molding wood to make the top of the steps. I really like how this came out. The steps aren't glued yet; I see that I also have to add another small strip of brick on the wall above the stairs. I added a paved walk made from cardboard, grass, and cut out egg carton stones in front of the steps. I might add some moss between the stones; have to see how that'll look. This isn't glued yet. I'll add more flower pots on the steps. And I want to add pumpkins, of course!


Here's another tiny flower bed I made with one of those Lemax zombie gnomes, I have to add more impatiens petals to it yet. I used purple lichen/moss and green grass mixture. The other smaller beds are made from Crayola Model Magic air-dry clay covered with grass and railroad dirt. I might use these elsewhere and use the larger flower beds on the side instead.


So, that's the plan. Still working on what flowers to make but I'm leaning towards the sunflowers and yellow daisies (see top photo.) I really liked the hollyhock, but that one is more work. ha! We'll see if I feel like it.

One more thing:

Didn't dawn on me at first... but the cut-out design on the bottom of the house makes it perfect to hide some Halloween lights underneath! So I added a dollar store string of purple LED battery lights for fun that I'll glue to the bottom floor. Ignore the blurry pic, but no other way to show it lit up. I thought it made a great accent!


That's it for the moment. Come back soon for more flowers and updates. 
And Halloween is coming so planning some posts for that and some fun on Instagram. (add me there: cwrite12). 

Thanks again for visiting. I appreciate your interest and sharing our fun hobby!


August 27, 2023

Mini Numbers 1: The Fairfield dollhouse


While I'm working on some ideas, thought I'd share some posts in-between.

This time, I'll share some older photos in keeping with the weekly themes we're following in the Half Scale Minis group on FB. (Click photo for full size; see last post: Witch cottage furnishings & other posts in left column archives.)

Theme: posting by numbers. First up - one post for one favorite scene.

Hard to choose but... here's my favorite dining room in my half scale Fairfield dollhouse. (See other photos and posts in the list on the top tab.) Here are some other photos, including a close-up of the table in the dining room.

* Thanks for visiting again. Working on something for Halloween! Come back for some other posts soon!

August 17, 2023

Witch Cottage 2: Furnishings!


Decided to share a few recent furnishings I got done for the half-scale Witch Cottage.  Not a lot, but I'm getting there "little by little!" 💀  (*See new garden plants; latest exterior update. See more posts in left column archives. Click photos for full size.)

Second floor furnishings: 

The bed above assembled, from my favorite Gothic furnishings set (SDK Miniatures.) Most pieces also come in 1" scale. 

The bed dressed, below. I'm still thinking it might need something more like maybe a spooky throw on the end. I'll share again if I add something.


I also finished the Gothic Mule Chest (also from the Gothic set. I glued tiny hinges on top of the chest (without the teensy nails I can never get in!) I may use it at the foot of the bed and was considering filling it with a bunch of medieval manuscripts. I put some crumpled "old" manuscripts inside for padding. 


The pile of "ancient" manuscripts were one of those easy and fun little projects to do. Aged a bunch of papers I found with diluted burnt umber paint, and added burnt spots and burned the edges.


I did decide to use these chairs on the second floor to match the color scheme. I made them awhile back and had been saving them since they didn't seem to match anything though I liked the fabric! I added some small pillows and footstools. The larger footstool is actually two Scrabble tiles glued together. The smaller one is a square foam "bead" from the dollar store. The pillows and footstools are edged with black Bunka. The bottom of the footstools are covered with a black fabric with tiny white polka dots.


I did add a few more lights: at the peak, on the right wall, and on the first floor divider (not shown). Luckily, was able to run extra electric tape over the roof by connecting a piece on an outside edge. (You can see the roof tape and the extra light in the last exterior post.)  Bad planning as I thought it was too dark and then I didn't leave any other way to connect light wires but did get it to work.


There's not a lot left to do except some decorative items and unfinished trim, and the shingles, of course. It's a small house. But I'd like to move the base that's now under the Fairfield and add some Halloween stuff outside. I hope to have a new plywood base cut for the Fairfield big enough for the acrylic case to rest on so I can also use the turntable under it. Then I'll have a larger yard to decorate for that, too. I would like to make some pretty flower gardens and some spooky gardens. Have an idea for some topiaries, too, like in The Shining movie.

Don't forget! 


** Planning early! I'll be looking for Halloween projects to share here on the blog! I'm also thinking of trying something different for this year's Halloween in Miniature like a  themed list for Instagram so friend me on there, too, so you can play along - (cwrite12). I'll be working on the art next. The more the merrier, or rather, spookier!! Stay tuned for details! Just click my photo in the top right column for my website and go to the contact page there to message me and to send pix.

Thanks again for visiting! Come back soon for more minis!


August 14, 2023

Halloween is Coming! Witch Cottage Exterior

I just had to say:  I saw it's 83 Days to Halloween!


I should have some spooky stuff soon (say that fast!) For now, well, it's been super hot and it finally, finally got more reasonable. But a bit humid yet so will have the the AC and doing??? (*See new garden plantslast interior update; more posts in left column archives. Click photos for full size.)


Well, a few things. Bit by bit I'm getting some of the endless (it seems) trimming and exterior stuff done. I started shingling which is another yuck project. This time I wanted to make it a bit easier by using strips and I wanted to try something different. 

Someone else had used a Cricut to cut cardboard and I thought that's a good, economical idea. I got this shingles SVG/DFX download file from Spellbound Miniatures on Etsy to see how that would work.


 FB friend Heather offered to cut them from cardstock on her Brother Scan & Cut machine. I know nothing about any of this stuff, but it worked! The size was reduced to make 1/4" wide shingles. Here's the square shingle strips. I'll alternate with some rounded shingles too once I get to the larger roof sides. I'll maybe use some of the wrought iron style as an accent at the top.


I admit I still wasn't sure how it would look but now that I've started, I like how it looks. Yes, about done on the smaller roof. Have to finish the small left side section yet by the tower


For now the shingles are brown. I'll add green stippling and some moss. That doesn't mean I like shingling, though. This is gonna be a while as I'm doing it in spurts. ha! But I am sooo glad not to be doing individual shingles again! Did that on two larger houses, so am kind of burnt out. Luckily, if I do the Park Ave. Mansion next, no shingles! It has a flat roof. Yippee! And whenever I decide to work on the Raggedy Ann house, I have black asphalt shingle strips set aside for that.

A couple other things I got done: 

Adding to the last garden post: Got the other flower bed done with some purple and yellow Black-eyed Susan-like daisies. 


Other outside stuff:

Got the trim on around the top window edges. I also added some brick paper to the bottom bare sections between the lattice designs. Those empty spots bugged me but I'm not sure yet if it looks okay or not. I may see if those sections look better with some trim on the sides for dimension. (Ugh, more trim!) But it does look good on the corners and the back. I like how it matches the brick walls on the first floor. I really like the colors and tones in this brick pattern. (From Starboc2 on Etsy.)


Another view of the front. I just love these tombstone chairs! (Older Lemax set when they used to do cooler stuff. I have two more on my other Haunted House porch.)


First floor:

Decided to add a couple spiderweb accents on the larger windows and put up a special portrait:  The Picture of Dorian Gray. (ebook free from Project Gutenberg.)


I decided to split this into two posts, so I'll share some furnishings on the next one.

So, that's it for the moment! Let me know if you try out the shingles. Reminder: I'm also happy to share your projects here; it doesn't have to be just me all the time, ha! So contact me with your info and photos! 
---------------------------------------------------------------

NOTE: I will be looking for Halloween projects to share here on the blog! I'm also thinking of trying something different for this year's Halloween in Miniature like a  themed list for Instagram so friend me on there, too, so you can play along - (cwrite12) The more the merrier, or rather, spookier!! Stay tuned for details! Just click my photo in the top right column for my website and go to the contact page there to message me and to send pix.

Thanks again for visiting! Come back soon for more minis!

August 07, 2023

Half Scale Dollhouse Witch Garden


 I know this took awhile as I admit to not being in the mood to post. Took a little break while I worked on some new stuff.

I do have another post ready on the latest updates for the Witch House (Laser Dollhouse Designs' half-scale Jasmine Gothic Victorian Cottage,) but in the meantime, I decided to work on something else. (Last posts: cottage furnishings updates; see first floor. Click photos for full size; see other posts in left column archives.)

I got in the mood for making some new flowers! It's been a looong time since I made any flowers from scratch and using my own punches, so this was pretty fun. And since it's a witch's garden, I decided Halloween colors would work best.

I made the bases using air dry clay painted black, then covered with railroad dirt, moss, and loose green grass material.

First are Hollyhocks. I wanted them to look rather fanciful and thought the dark orange color was perfect for a witch's house. I love how they came out. 

I used orange printer paper for the flowers (love the color!) and painted rice paper a mix of Soft Green (close to Wedgewood Green) and Hunter Green. The tiny foam balls on top are actually to make grapes from Grapevine Miniatures.

I drew a star pattern in the petal centers with Black Cherry paint using a toothpick, and glued sand mixed with yellow paint in the center of the flowers. The leaves are made from a tiny ivy Punch Bunch punch. 


I punched the Impatiens petals at the bottom from a five-petal punch. 

Also made some tiny Daisies in purple using a smaller daisy punch and jagged leaves. I used yellow flocking in the center. (See top base photo; still not done with these.)

But my all-time favorite:

I wondered what else to put in the flower beds when I saw another post someone shared with my favorite - Sunflowers! So I had to dig in the punches and see what would work best to make smaller flowers. I used yellow printer paper, painted wire, and rice paper painted green. I decided to make them a darker green (Hunter Green) for some contrast. Also used dried coffee grounds for the centers since it is the perfect shade of brown. Easy flowers to make but worth it!

Changed my mind on the center. The tiny sun could work but I decided to use the same punch as I used for the Hollyhocks. Painted brown and dotted the cuts in the edges with brown marker before gluing on dried coffee grounds.

Sunflowers always make you feel happy - real or in mini!

 The real garden:

Speaking of sunflowers: this is where the real ones are at now. Not real great but they're growing at least. I have some Mexican sunflowers, but only a few with flower heads right now. They all seem to be slow this year. 


So, hope I made you smile, too, or at least inspired to do some mini gardening!
That's it for now. Thanks again for visiting! Stay tuned for another post coming soon!