July 17, 2023

Half Scale Witch Cottage Furnishings Update


Odd plants in the potion-making room. 

I admit not being too inspired lately. That happens when you get near the end of a project, though I still have a bunch of trimming and stuff to do yet. (Like that place on the ceiling above. Click photos for full size; see other posts in left column archives. Last post: roof, etc.)

I still have some furnishings to make yet and figure the layout, which is more fun. ha!

So, the few things I've finished lately:

* Plant stand for the potion-making room above. Made the stand out of mat board. Works for the space. Didn't want anything too big. And now I have a place for these 'odd' plants.

* More plants: Leaves, actually. A kit from Castle Crafts. I think I'm going to wrap them around the front porch post. I glued some cloth-covered wire to the back as they're rather fragile.


* Finally! The picture isn't great, but had to show that I got the standing lamp hooked up and working in the second floor! I almost gave up as I had to really fiddle with it to reach in and twist together the two wires from the wall and from the lamp, and then solder them. Took quite a few tries. ha! It's not in place yet until I figure the furniture layout, then I'll glue it down.

* Furnishings: 


Gothic Chest (SDK Miniatures) for the second floor. Just love this set! I painted the front and the top of the knobs gold. I'll add some witchy items in the top drawer.


Love how this table came out! It's card/like mat board, so the legs are rather delicate. Painted with regular acrylic with a light coat of varnish. I like the old-fashioned look. (Also from Castle Crafts.) I'll probably use it next to the window in the first-floor sitting room:


*  Other items: rug and chair I made awhile ago. The rug is simply printed, glued to packaging card, and coated with Mod Podge. The fringe glued on the back is cut from cross-stich fabric. 

Something cool I found: Saw this paintbrush stand at Dollar Tree. Nice way to separate the brushes instead of bunching them together in a cup.


* And the real-life flowers: The morning glories we planted are finally opening! We had added the two trellises on the ends and planted four boxes this time. The vines reach over and grab, and are crawling all the way to the top. 


This striped flower is really pretty.


That's it for this time! Stay tuned for more posts and updates. 

And Halloween is coming!! Not sure what I'll do, but I'll be moving my Fairfield back to the other table and decorate it once I don't open the sliding door any more to the deck.

Thanks again for visiting! 

July 07, 2023

Half Scale Witch Cottage: Up on the Roof


Got that song in my head (and now it's in yours! haaa)

Well... this is probably the shortest project I've done, having started this in May with painting some of the exterior. I wasn't sure how long it would take, but I'm sure the next larger project will take much longer. Actually, finishing up the men's shop in the cigar humidor was my shortest, done in a day. But I had a lot of the accessories finished before, just had to add a few and fill the counter, etc. (See last post: decor. Click photos for full size; more posts in left column archives list.)

Anyway.... the roof is on, with the help of the super-giant clamps. One thing with this kit, at least for me, is I had to cut down the tabs which were not quite fitting. but it's on. Yay!

Attic and ceilings:

Some other things I did: added a small attic space near the ceiling inside. Had to re-glue the attic area fence about three times and will make sure it sticks now as I glued a wood square dowel to the back for support. Yeah, should've done that first! The "attic" base is a piece cut from mat board of some flooring I did in my other house so there's tile paper on top, (not that you can see it!) and added some braces underneath. 

Trim, trim, trim. Ugh! I also put some wood strips on the ceiling sides as it looked too plain. Hate doing it but looks so much better when done, like adding the molding across the roof pieces at the inner peak. And trim in every corner and edge, it seems. ha!

Got the art on the back wall.  I may be using this bookcase and the bench here. (Wall: before I added the rest of the corner trim.)  Unless I trade this out for another bench, I'll repaint and reupholster this one. I'll have to build another Gothic Bookcase (SDK Miniatures) in case I want to switch it out when I decorate the Fairfield fully for Halloween.


First floor:

The first floor divider, made from one of those wooden fans, is in. I like how that came out. To me, the space looked odd without having a small arch or something dividing the two spaces. 


And.... wait! What's that thing in the corner? 

Well... originally I was going to use this face bead (see second photo below) to make a lamp in that spot but I came across this skeleton figure in my stash. Drilled a hole so he can hold the light. It may be a Day of the Dead figure as it says Made in Mexico on the bottom. Thought it fit well in here. I have another one I'll use in another house, or maybe as part of the Halloween set-ups.

Just when I think things are going well, first the aggravating part. Well, several, so beware! haa! Plugged in a standing lamp for only the second time... and the *&^% bulb burnt out! The other lights in the house still work fine so nothing wrong there. Couldn't get a new bulb in, so remade the lamp using the shade parts and  some skull beads. Have to connect the wires together.... wish me luck. ha!

The roof: 

Got some trimming done on the front towers, but first I had to take the outer windows off to get the roof piece on as I realized it wouldn't fit over them!  The tower roof isn't attached yet and have to add the top. Also have to add the decorative piece at the peak of the front wall. Needless to say, I'm tired of trimming! (And not done yet!)

Other stuff: 

Still experimenting with the luminescent powder I found on ebay. It does glow! The green color seems to work best, though the blue works too if there's enough. Mixed it with the craft  varnish but it also seems to work with the clear nail polish. I tried to get it on the teensy cat's eyes but just too small.

The real garden: The Moss Roses are loving the hot weather! Sick of it, but with the ac on and the windows closed it helped somewhat with the fireworks. But the dog still runs around when they set off the big "booms." Ugh!


The roof shingling is next. Deciding on that....

Thanks again for visiting. Stay tuned for more updates! 


June 29, 2023

Half Scale Witch Cottage Fun Stuff: Decor

For fun: a bunch of black cat-themed books.

 While I like how the half Scale Witch Cottage is turning out, building can be a chore. 

Some like to build, I'd rather decorate. ha! 

So it's a nice break to just sit and make some new accessories for the fun of it. A nice, relaxing break. (House: Laser Dollhouse Designs' Jasmine Gothic Victorian CottagePrevious post- plants; some garage sale findsSee first floor. Click photos for full size. Other posts, see left column archives list.)

The books: I have a lot more to make but the set pictured above are all cat themed, mostly with black cats. Perfect for a witch. ha! (Cute cat-themed book cover set from WoWbooknook on Etsy, but has to be shrunk to 1/24.)

Second floor tower room:

One more wall to glue in to the second floor tower room and then the roof goes on, so I had to decide on accessories. It's a small space and won't hold much, so it's perfect for a stargazing room. 

I had a small bench and one of those Victorian-type chairs from another set so I painted both of them black.  I may add another small bench or seat yet along the wall. Also printed out and made a few star and astrology books since this photo was taken that I'll add on the table. 

The centerpiece - it needed a telescope! So had to figure how best to make one. My first try - too big. But the larger one will work in 1" scale if I need one. 

I used a smaller piece of drinking straw on the end, a piece of ink pen cartridge in the center, and the smallest size wood dowel I had at the viewing end to make the smaller telescope. You glue them together staggered. I also cut off a bit more of the straw before I glued them. Painted with multi-surface white acrylic and then gold fabric paint. I glued a mid-sized opalescent rhinestone on the larger end and a tinier white rhinestone on the viewing end. Also put a small piece of string around the viewing end for edging. The stand is a piece of Tiny Turnings and a cross-piece on the bottom made from two cut pieces of strip wood. Pretty pleased how they came out!

Other accessories: 

Decided the witch needed more supplies so made a couple boxes of ingredients to put on a shelf. 


The large Absinthe bottle and other larger size bottles are part of a set of flat acrylic bottle shapes I bought a while back. The smaller containers are kind of interesting. They're actually teardrop-shaped beads. They have a line so I paint the top section gold up to that line for the lid and add a cut-out label. When I found those a while back (garage sale maybe?), I knew they'd make great bottles!


Another ingredients box:

I also made a couple of smaller vintage Halloween card boxes.  All the boxes were made using a piece of larger two-sided corner molding to make the back and the bottom. Then I cut a lower front piece and sides from a piece of strip wood.


Also cut out and framed some signs:

Next, I'll glue the back bedroom wall in, add the border, attach the lights, and paper the roof pieces. I might put some wood strip beams on the inner ceilings for decoration. Also have to make the top "attic" section. Moving along!

shrunk some black cat border strips to put on the second floor wall to break up the purple. Have to see how they look.  (Vintage 1907 patternsLarger images linked here.) 

And more real garden stuff: love the colors of these zinnias!


Thanks for visiting again. More updates coming up soon!


June 25, 2023

Half Scale Witch Cottage: Second Floor Progress


Halloween already on the porch!

So some "small" progress on the Half Scale Witch Cottage. Step by small (sometimes agonizing) step. 👀 ha!

Still a bit of outside trim to do on the first floor exterior. The progress really is step by step as some things just have to be done before others. And a lot of this painting/trimming is really stuff I hate to do. ha!  (House: Laser Dollhouse Designs' Jasmine Gothic Victorian Cottage. Last post- plants; some garage sale finds. See first floor.)

Looking at the pix, I know it seems like I didn't do much. But it took a lot of figuring and planning for this stage. And it's actually coming together better than I thought.

First I decided I had to have a lit pumpkin on the porch! I'll probably change this to a ceramic pumpkin instead of plastic if I have a smaller one (gotta go dig in the pumpkin container!) so the light shows off better. I ran the light up through the floor and the seat of the chair, soldering the wires under the house.

Other things I did:

* Paint/glued in small front roof supports (not shown, next to tower.) Painted small roof. Waiting on some shingle strips.

Here's the house kit photo from the website so you can see the sections I'm talking about:

Second-floor tower room on left side:

We cut holes in the back tower wall piece and the front wall behind it to provide access to the bedroom. Trimmed it with 1/8" thick strips. There's only about a half-inch between the tower piece and the wall so I'll probably add some small wood strips on the outside so it's closed off on the outer roof. 

It just seemed a waste to have that tower space closed in. Why have windows and not use the space? I decided to use the nature print scrapbook paper as it seems to fit in the space. I'll have to glue any furnishings in since the roof will be and the door is glued.

The floor you see is cut from the 9 x 12 star card flooring I ordered from  Melvin's Miniatures  I like it. It's printed well and does not smear if you wipe it! I bought a few other old-fashioned tile patterns that I'll use in the Park Ave. Mansion when I start that. I also used the same floor for the bedroom section behind the wall here.

In case you're wondering... I didn't want to put a full door so this ended up looking pretty cool. I cut part of a plastic gate I had to make a lacy "door." It works perfect when you look through the doorway though you won't see that view once the front tower piece is in except if you peek through the window.

 
With the roof on, but not glued down:

Of course, I had to paper part of the wall again since I forgot to run the light up the wall! ha! I decided to use the top part of one of those "wrought iron" Christmas lantern lights over the bulb. They come in handy. I used one of those lantern pieces outside the second floor door on the Fairfield (the right side) but attached it to a small wood base there. In the tower, I glued it to the wall as it looks like it's attached to the tree.

Bedroom side of front wall:

View of the bedroom wall and tower door: I may put a small black net curtain just on this large window since it's a bedroom. The one side of the purple wallpaper (scrapbook paper) has to be glued down after I run the light wires to the top and glue them so there'll be some light near the peak. I'm adding a small floor/ceiling piece and maybe a rail so I'll have an "attic"-type storage space. Gotta store those brooms somewhere. ha!

I did put the Gothic Victorian bed together from SDK Miniatures. Nice kit and it goes together well. I painted the insets gold, the same way I did the Gothic bookcase and chairs in the Fairfield dining room. (Love this set!) Figuring out the linen colors yet. 

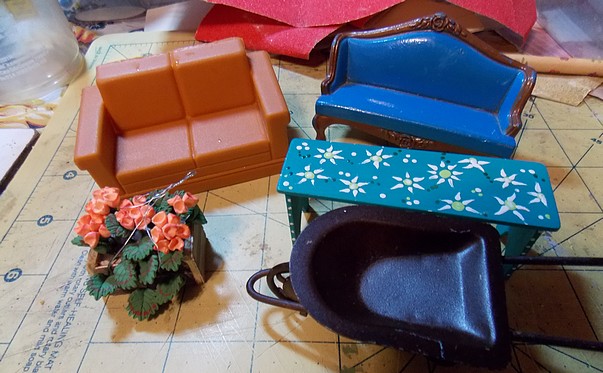
I'll also be using some of these pieces though the coffee table may go on the lower level.

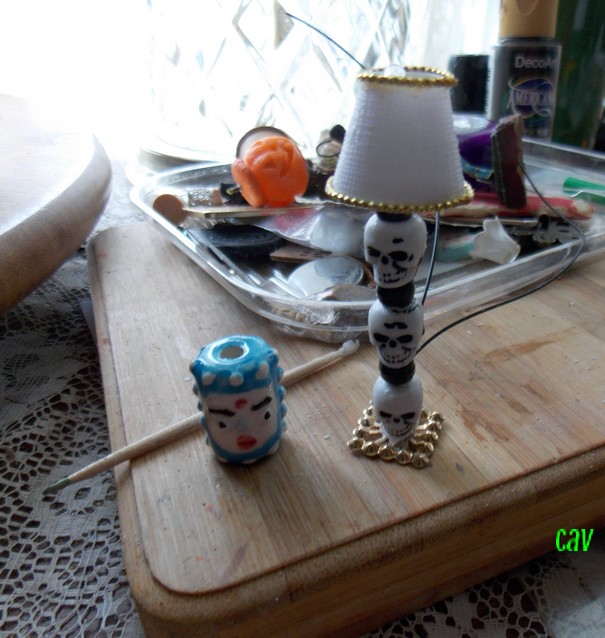
So far the idea for the second floor is a bedroom plus a small sitting area, a standing lamp, and a writing table and chair with a lamp. I also might add the witch's chest full of spells here (for safekeeping; don't want that discovered!) Will see yet what fits where. The tower room will be a stargazing space, I think.

 In the meantime, I fiddled with some pieces from one of those DIY house kits. Decided to use a small sink cabinet for the first floor and added a strip of wood on the bottom to raise the height a little. It'll work as I want to dirty it up since potion making can be messy! I luckily had a smaller one-handle faucet that fit the sink. I also have a small plant potting table that might fit in, too.

I'll have to see what else I can use. And gasp! Realized a witch should have some frogs and toads so found a couple of those. I might make a mold and see if I can make some more in plaster. I know I had some bigger toads, too... somewhere. The things you stash away until the right project--and then you can't find them. haa!

My reminder list of things I want to make:

* Glowing potion jars; magic pouring tea or coffeepot; eyeball stew
* Glowing cat eyes
* Chest full of spells and manuscripts
* Maybe? Eyeball and other plants
* The first floor plant shelf -  and finish that room divider.
* Add cats and toads

And whatever else I come up with. This is one of those projects where you think of things as you go along. I was measuring and too bad, I have a nice glass case that would be big enough but it's not deep enough for this house. I'll have to keep my eyes open for another one.

So... that's it for now! Thanks for visiting - again! Come back soon to see what else got finished!


June 23, 2023

Miniature Take Your Dog to Work Day

 Photo: Workspace in Fairfield Dollhouse attic. See top tab, My Dollhouses, for other links and photos.

While I'm still working on the Half Scale Witch Cottage, thought I'd share a few photos for some of the more unusual holidays. (Click photos for full size; see other posts in left column archives.)

Today is national Take Your Dog to Work Day, and if you work at home, your dog is there, of course. The 29th is also Work From Home Day. See calendar for other dates.

Funny that I never put a dog in all the miniature stores I've done, but I do put them in all my dollhouses, so I'll share those instead.

Another "work", crafting space in the attic of my Country Victorian house, with a companion. See video on website Miniatures page.(Scroll down past blog link there.)

Dog toy also in the Country Victorian house.


Another dog in my larger yellow Victorian dollhouse. (Video also on the miniatures website page. Scroll down past blog link there.)

Dog in my vintage doll Christmas room.

And of course! A corgi for my Tudor Tea Shoppe honoring the Queen!


Speaking of dogs....  Well, if you want to sit and work with a laptop in this room, good luck finding somewhere to sit! haa! My
Dogcatcher's House has about 100 dogs. The fun was the theme and  finding all of them!


That's it for now. I know there 's more but it's finding the photos. ha!  I should have some new updates soon. I'm working on several things in the second floor of the Witch Cottage. Tricky stuff like papering the top tower....

Thanks again for visiting. Come back soon for new updates!


June 16, 2023

Miniature Witch Cottage & Garage Sale Finds

 What are those?? Keep reading!

It's finally church rummage and yard sale time! It's always fun to look as you never know what you'll find and you can usually get some pretty good deals! So had to share some of my latest finds.

The best find is after all these years of doing dollhouses we finally got a scroll saw at a church sale, which makes cutting out doors and windows sooo much easier; see top photo of door openings on the Half Scale Witch Cottage. I'll share more on that later when I make progress on it. (See last post - plants and older posts in left column archives. Click photos for full size.)

Door openings cut out on front wall and on back of tower wall panel on second floor.

 Mr. Dollhouse Contractor used to cut the holes with a jigsaw, which is more shaky and you got wobbly cuts. Always worked around it, but this is so much better. It's also great because it's easy enough that I'll be able to do my own cutting, which will be really nice when I want it done right away and don't want to wait. ha! The great thing is that the saw blade is like new and... you won't believe we got it for only... $5!

You'll appreciate this too - I also found  the cutest small garbage can - tiny, with the pedal and a lift out bucket! Now I don't have to keep getting up to throw stuff out.

The other finds were some inexpensive dollhouse pieces for 50 cents each. The blue couch is a Mattel Littles metal couch which is half scale; the plastic couch will probably fit somewhere too once I cover it in fabric. The table/bench will work in half scale also and is hand-painted. Someone even signed the back. No, doesn't look like anyone I know. Also got another crate of flowers and a metal wheelbarrow.


Here's another pretty unique find I came across at a yard sale: so... what are these?

Once I saw these strange little statues, I knew I had to get them, especially the ones with the faces. Nothing says creepy like statues with faces. ha!

Did you guess?

Actually it's some kind of dragon, medieval or Mayan? chess set. What I liked besides the unique carvings is that they were smaller, so they'll be perfect house and yard accents for my witch houses!

The box they came in is really cool-looking too. 


The neat thing is that dragon - lion? head drawer pull/knob on the front of the box. 

I am thinking (gasp!) of taking it off to use on a dollhouse wall (wouldn't that look neat?) but I think I have to take half of the drawer apart to get it off. So, I'll leave it... for now. I only paid $7  for the purpose of using the statues for dollhouses so I won't feel real bad if I take it apart and then have to re-glue it with a different knob. ha!😏 I have been thinking of making a small antique, brocante-type shop on the bottom floor of the Park Ave. Mansion when I get to that project, so I really like the idea of using this head on a wall.... I know.. and I know you understand. ha! But I buy stuff like this to take it apart or re-use it so no guilt, ha!

Going to a couple other church sales next week so we'll see if I find anything else. And I'll be working on the second floor of the Witch Cottage. Lots of steps to do there but I've pretty much figured out the layout and have the flooring cut. The black/white star print floor I bought will look pretty cool. I think the second-floor tower will be a neat little space, too. Since it has windows, it would be a shame to leave it unused and closed up. It's a tiny room but perfect for stargazing, I figure. (Photo of house from website.)

So... that's it for now! Thanks for visiting and come back soon for more updates!