March 14, 2022

Looking More #Haunted - #Miniature House Progress


Just a few photos this time. As I mentioned in the last post, I'm working on the roof, which to someone who is math challenged and has to cut angles on each side in the center - no fun! (Click photos for full size.)

So, working on that. A few changes - put some weeds on the front , in the windowboxes, and next to the chimney on the side roof. Finished that side and started seeing how some black paint looks. Will have to add more, but getting there... * NOTE: Further along on the roof. Oh, what a project! ha!


The fun part - printed out some more art to use as creepy portraits. These are as addictive as miniature books. Can't get enough! I definitely wanted to add the knife to one picture, ha! So back to the roof now. Working on the angles in the center. Ignore the screams in the background, ha!  Hopefully will have other progress photos soon.  


What do you think? Thanks again for visiting!


March 11, 2022

Progress! Haunted HS #Dollhouse

 Yes, I've been quiet, but steadily (slowly) working on the Half Scale Haunted House. I've been working on the tedious parts, putting brick paper on the outside and started the roof. There is progress! (Wow, has it been since January when I last posted on this house? * See latest post here.) Update: The roof is almost done. Working on the center part now.

Added the balcony and also put two windowboxes on the second floor. They look crooked in the photo since the insides are painted the same as the window but they're not.)  I also decided to leave the bottom fancy trim showing under the brick on the top sections. Thought it added something.

I'm using the textured brick paper from  Starboc2 on Etsy. Gives just the right effect! To be truthful, I still have the section on the right side to paper yet and have to glue the window trim on.


I'd put off doing the paper as it takes time but I'm now on the really tedious part - the roof. I knew I wanted to use the corrugated paper and I'd seen a house where it was cut in rows. I like the effect as it fits the style of the house, but what a job as I have to also cut around the chimneys. But I really like how this is coming out.

I used the silver-coated paper as it's a little heavier. (I found another sheet but it's glittery (only one they had) so I'll have to really paint that more. ha!) I'll still do some touching up and adding some black paint on the roof to age it so that should help cover any spots showing through yet. Love how this looks as the building has that aged look I wanted without my making it too dilapidated!


I'll be putting some lichen and weed-like plants in the planter boxes. I'll also be adding some vines and lichen along sections of the brick and the roof. I'm debating on making some wisteria vines, too, as I like the flowers and think they might add something. The hard part will be cutting the roof paper for the slopes and making sure it's even. 

The light on the wall helped in the attic. I just found the last three sheets of that heavier floor paper at Michael's in a grayish color, which I can also lightly paint if I want. Makes good flooring once you draw the lines on.


So far, so good. Will post again when I have more to show! Thanks for visiting!


March 03, 2022

(Not So) Haunted #Miniature Toy Store


I bought this Carlson store kit a while back from someone online and had finally gotten around to decorating and painting it some time ago thinking it would be a haunted bookshop.

Well, like always, I changed my mind. (Yeah I hear you laughing. 😏) I have plenty of other book projects and ideas like the fancy furniture I have set aside for the Someday Upscale Library roombox.

Then when I found those Mini Toys I shared on a previous post, I knew the project had to change. But how to change it without really changing it? I wasn't about to repaint the whole thing, so I changed the title and a couple of the outside pictures for one. (Click photos for full size.)  I put plexiglass on the top with a carved wood medallion on the ceiling inside. (not shown.) (More toys, update 2)


Toys in the front windows:

Actually, I'd set the project aside as I didn't think the front would hinge right. Luckily, hubby got some screws to fit, so the full front will stay on. I just had to add some top and side inside edge trim for the gaps. Since the outside already was all painted and decorated with creepy pictures, I figured it could become a Haunted Toy Store instead...

And while the majority of the toys aren't creepy, I figured why not? That little ghoul girl in there (Mezco Mini Living Dead Dolls) fits perfectly so she's shopping. Besides, even creepy kids love all kinds of toys, right?

 As an aside, I'd found a whole bunch of those dolls awhile ago at Goodwill of all places, cheap. So eventually I want to do a Halloween party table scene. Here's a pic I found online. I think I have the first one plus the red-haired punk and the last one, plus a bunch of others. I also have some full-size dolls we found at a yard sale. I love the little ones.

The back wall shelves were already installed, so I added some striped paper on the bottom for more contrast and added a wall shelf on the side, plus some creepy toy pictures. Some of the Mini Toys may be slightly larger, but I think they look fine for display. And now I'm hooked. Of course, I'll have to get more. To fill the shelves, you know. (wink, wink). Games will go in the bins on the small table. I'll make more from printies. (TIP: Google dollhouse game printies.) The other table is a sewing machine base topped with spooky scrapbook paper.

The Rock 'Em, Sock 'Em Robots are from the larger-sized Worlds Smallest Toys. Cute, though much bigger, but I figured they can go in here, too. Remember those giant walking dolls from the '50s?  It's all trial and error with the sizes on these mini toys and they keep coming out with new stuff, too. I'm ignoring the Mini Wacky Packages though I could get hooked on those even if they are larger. (I remember the goofy cards. ha!) Funny! The new batch of toys I just got includes a tiny Rock 'Em, Sock 'Em Robot.

The canister on the top shelf is Lincoln Logs (non-opening.). The other is an Avatar figure, which is also in the window since I have two. I added the Kewpie doll as well. There's a very large package of Tempura paints on the second shelf (the economy size I guess. ha!) The skates and animals are erasers. I found the cute Oscar the Grouch figure at the fish department at Petco! You do find stuff everywhere. ha! I repainted the can silver and want to find some green Bunka to make him fuzzier. (Of course, I have every other color but!)

 The back wall before the additions:

So, to me, as I show here, I think you can make almost any size of miniature work, depending on the project. Here's the other batch I got. It includes a second My Little Pony in a different color. The Ouija box will go in my haunted house, of course.


This'll be about it until I add more games. It gets too expensive. Last time I bought a lot of items was when I when I was decorating my Dogcatcher's House. I had to fill it with a bunch  of dogs and at the time, you could find some in 25 cent gumball machines and they also were selling $1 packets of toy dogs that came with that lousy stick gum (like you found with baseball and collectible cards). The hunt was fun, even if it adds up money-wise since there're probably 100 dogs in that house. But who counts, right?

Thanks again for visiting! I appreciate your interest!


February 28, 2022

Funny, Not Funny

 Well, I know my visitors here will understand...


I just got the new Spring Miniatures catalog in the mail. Yeah, the whole back page. What happened to the rest of it????

*NOTE: Yes, they nicely sent me a replacement - in an envelope this time. ha! They said it had been happening quite a bit lately. Hmmm....

February 24, 2022

Mini Miniature Dollhouse Toys


(Note: See the updated Not so Haunted Toy Store I put these in...) 

I've seen people sharing these but wasn't sure on the size. (And I didn't want to start another collection. ha!) Well.... saw a display at the bookstore and once I saw the teensy play phone (remember those?) that decided me! Supposedly Target also carries these though I haven't checked. The ones I found were $7.99 a package. You get five toys. Supposedly there also are sets of Disney toys in the other brand that comes in the ball container. 

Isn't that the cutest thing ever??? And the Monkeys in a Barrel (barrel doesn't open) with teensy monkeys!!!

The other ones are pretty neat too to put on a toy shelf.  They also show one of those push popcorn poppers on the chart. That looks pretty cool, too, but probably hard to find.

The My Little Pony in the box is just over an 1" wide. The Lincoln Logs are also just over 1" high. (Non-opening) I also got the Matchbox round tire car container (doesn't open) and a couple other toys. These are fun!!

 So I guess it looks like I'm gonna take that front opening shop I have that isn't very deep and rework it. I was going to make a haunted bookstore, but I've got other bookshelves and kits to do that. I just have to change the prints and colors, and see how to get a clasp/lock on it.


February 19, 2022

FYI: Online Dollhouse Miniatures Auction


Deanna Spanjar, former dollhouse shop owner in Wisconsin, is auctioning her collection and inventory via Karen's Dollhouse Shop. You can register here. The auction is open Feb.27 with over 500 lots.


February 17, 2022

Best in #Miniature Show first episodes now online


Judges: Interior Designer Michael Lambie and Miniaturist Emma Waddell on Best of Miniature. 

 The first 2 episodes of the Best in Miniature Show airing in Canada is on YouTube now. AND NOW OFFLINE. Only the trailer is on YouTube now.

** Liked this one and still hope to see it! 

There is a different show: 

* (Great Big Tiny Design Challenge in UK - 5 episodes so far up as of 4/26: here, 

** UPDATE 2/20: Someone on FB said they're watching on Discovery Plus, (** seems to not be on STILL in US. Going to ask company when/where it'll air here.) but it's only up to episode 4. New episodes air weekly on Fridays. The creator's site has 10 episodes listed. (So I'll probably sign up later once it's near the end and enough are up. It also has a 7 day free trial and is $4.99 per month.) 

** *** WAAAAAH! Apparently whoever was loading the videos online didn't have the company's permission. So they've all been taken down! Well, I hope this company schedules the shows online very soon!!! I only got to see the first three!!


Hope they schedule in the US soon! 

** And wow! I watched the first one and this is really great! The designs are fantastic! Can't wait to watch part 2 and to see the whole show!!


February 07, 2022

The Queen's Jubilee #Miniature Tea Room Update

 In honor of Queen Elizabeth's Platinum Jubilee, I decided to do a little updating on my Tudor Tea Shoppe. (There are a few past photos and an overall back interior photo here.)

I made this project over 20+ years ago, adapting it around an already partially built Houseworks porch. I'll have to take pix of the sides, all brick and stucco. I made the front and the door, too. The back is open with shelves and the sides are part-walls. If I did anything different now, I would've used the lightweight Spackle as it doesn't crack as much. (Click photos for full size.)

Haven't pulled it out in a long time as the case is very heavy and I had it buried on the shelf. So moved a few roomboxes around and put it in the other cabinet for now, unless I decide to move it again.

I didn't change much, just added some things and moved others around.  I added some flowers above and a planter on the front wall. Still may change the fake planter on the left. And gotta have a Corgi, too!  * I'm still thinking of adding the perfect element - a decorated hat!


Here's the front sign, made with wood pieces, and hooked together chains with Tiny Turnings on the sides.

Added a Queen and Prince Philip portrait photo on the wall and a Queen Victoria at top (round frame not shown.)

Put the large coronation picture on the interior back side of the door  here... Also added the royal plate. (I have an anniversary mini china plate/button and a thimble coming yet from England. Found them at Etsy.) Then if I have to move and uncover this again, I'll light it for better photos. (And I noticed I forgot to put a chair back in. ha!)

I moved everything over to add the magazine shelf kit from Dragonfly Intl. I moved the magazines around and added the paper dedicated to Prince Philip an put a couple of the mini albums in there. The large white framed photo is of Will and Kate's wedding.


Added a couple things and moved items on the shelf. The blue anniversary book on the bottom is a Dateman photo book from the UK. I made the Diamond Anniversary album.


Here are a couple albums I made. The Britain album includes the photos I took when I went there some time back. Yeah, that's me in the phone booth. I think they took all those out now? Which is a real shame as they are cool! The other is another mini album I made of William and Kate. This type of album uses scrapbook paper for the cover and pages. I should update these and make a couple more albums with their kids, and Meghan and Harry's family. Maybe even a Prince Philip memoriam album. Well... eventually as I'll likely have to add others at some point. I did have an idea before to have a shelf with different albums on it. Yes, more ideas. ha!


That's it for the moment. I'll update the photos once I get the other items and add them in.

Thanks for stopping by!


January 31, 2022

#Halloween in January #HalfScale VB House Updates Interior


Maybe that's why Halloween never ends, since it's taking forever to get done here?... haa!

I was going to post before but then I got caught up trying to get some improvements done first... 

So, moving right along on the HS Van Buren...* See previous post or look in archives in left column or use the search box. (Click photos for full size.)

One reason why it takes so long to get stuff done is like yesterday (well today as I type this) - You have to do things in steps so you don't mess up. Like: I had a new front wall/ceiling piece cut since, ahem, I lost the original one. Then had to paper it but couldn't forget to cut a long slit in the paper so I can glue the lamp cord under the paper. Glue to house; waiting, waiting for glue to set. Then paint the other newly cut rectangle ceiling piece since the original is badly warped. Paper one side, paint outside, and add fake trap doors and trim. 

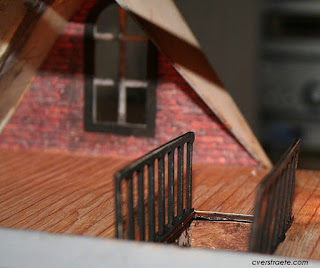
Okay... still here? 👀 Next: The Attic

All kinds of movie references came to mind:


The chair has to be aged, but all I could think was putting a creepy mummified Mrs. Bates-like figure there peeking out... 

And then... what movie do you think of here?

(The side walls in the attic are "news" print scrapbook paper; I have to glue in vertical wood beams once the front wall and ceiling are glued.)

The railings also were added around the attic staircase opening. The brick, which I love!, is printed on bumpy, textured paper from Starboc2 on Etsy. She's in Greece, but fast shipping and good prices. An idea here as I ran out of the thin wood flooring sheets: I found some wood veneer-look heavy scrapbook paper. I drew the lines with colored pencil and I think it works!

Dining room, left room on first floor: On my recent hunt for things I put in that "safe place," luckily, I found the rectangular Gothic table (from SDK Miniatures) I'd glued lace on. This is going to be a Miss Havisham scene, so had to see what I could put out and then age it with gray paint and cobwebs. I have to get some silverware yet Love how this turned out so far!

The roses are handmade from paper. The cake is from Crayola Model Magic, painted gray and added lace glued on. The lace is then painted over.  I took the candles from a wall sconce and glued them into small bead findings. The tea pot (back left) is a charm. Everything is painted over to look aged. The tiny bead caps have pieces of sliced fruit canes and melon balls. I have to figure some yucky old meat or I might just leave the plates as they are. 


The first floor center staircase serves as a divider wall for the parlor room on the right side. And the reason I left a hole in the back of it: (Which I keep thinking also needs a light, so thinking I should snake a flashing battery candle bulb (for those tiny nightlights) up through the floor.) Another why didn't I think of that before? moment. Let my mistakes be your reminders. 💀


It's Curtains! 


The curtains are done. I'd changed my mind (what else is new?) and put these sparkly web curtains here instead. Was just testing the furniture. The settee is from MiniEtchers. I made the coffin bookcase. 

The web curtains (supposedly glow-in-the-dark, cut from a roll of ribbon trim, we'll see) were moved to the right side room, which now will be the parlor. 

Bedroom, second floor:


The bedroom curtains are in and all the trim has been done since this photo. I still wish the room was another color, but that was all I had at the moment. I had a circus sideshow theme in mind, so I'll have to do that in the other house. Have to frame that art yet, though, and might hang it here to liven up the room.

The hall, second floor: I realized once the bedroom wall and door were in at left that this was too dark, so I had to add another light. Bad planning as I should've added a light by the stairs too, which would've been much cooler coming out of that skeleton bead. Well, keeping that in mind for the next house. Lighting is just so hard to envision sometimes!


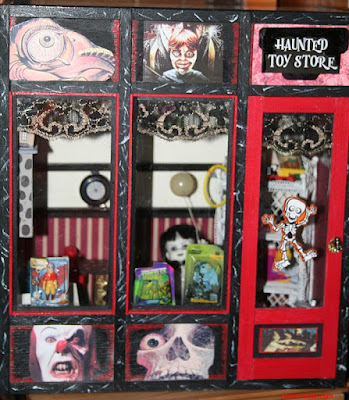
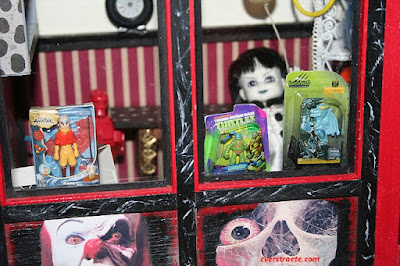
The best part: Decorating the Walls!

Pictures and art are as addicting as making mini books. Good TV watching projects and you can really never have too many! Spooky people, creepy monsters, and more! Here are some of the pictures and frames I did (so far!) I know there are a few more I want to add. I also have some of those lenticular (moving/changing) images. Luckily I found those before since I haven't seen any for a couple years now.
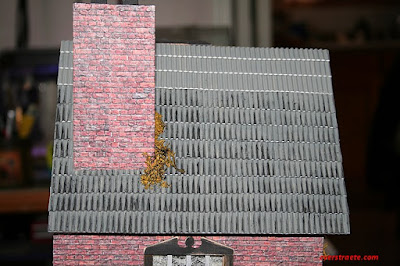
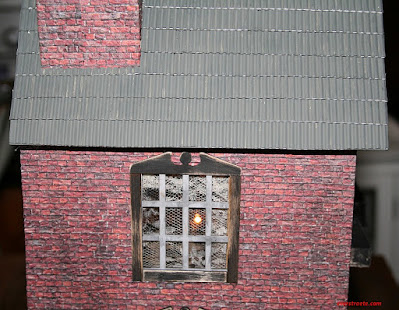


The Outside:


The planning, anyway. Another hard part of the project is having to plan out how the paper will fit, but I love how this will look! I wanted it to seem old; the window trim is all black. I'll add some vines, etc. too. This is only laid here and not glued yet. I'm making paper templates as I have to piece the sheets.

I traced over the window edges with pencil and then cut the holes to fit. The center is trickier as there are two doors.


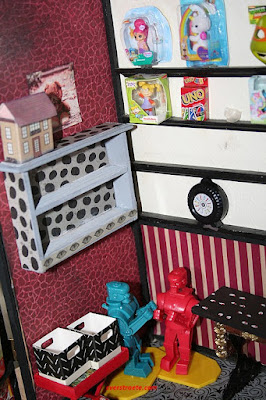
One more thing: 

An interesting find: I found these neat fake flower pods (cheap) at Target a while back. Thought they would be great flower pots.


That's it for the moment. Thanks for stopping by! Until next time!

January 25, 2022

A New #Miniatures TV Show Coming

 I saw that a new minis TV show, Best in Miniature, will be airing on Feb. 11. But.... it's from Canadian broadcasting and will be streaming on...? I saw mention of Discovery+ ? Well, not sure so will have to see if it's on Hulu or something... Here's the trailer I found... looks pretty good!

** Still waiting to hear where/if it'll air in the US. Stay tuned.

** UPDATE: Someone found this - more info and photos from the studio making the show.