Showing posts sorted by date for query half scale haunted house. Sort by relevance Show all posts

October 31, 2024

Happy Halloween! Miniature Haunted House 2

HAPPY HALLOWEEN!!!! Welcome to part 2 of my half-scale Halloween House tour! If you missed the beginning, scroll down or see Part 1 here.


Side view, bedroom. I covered a plain chest with different black/white prints.
 
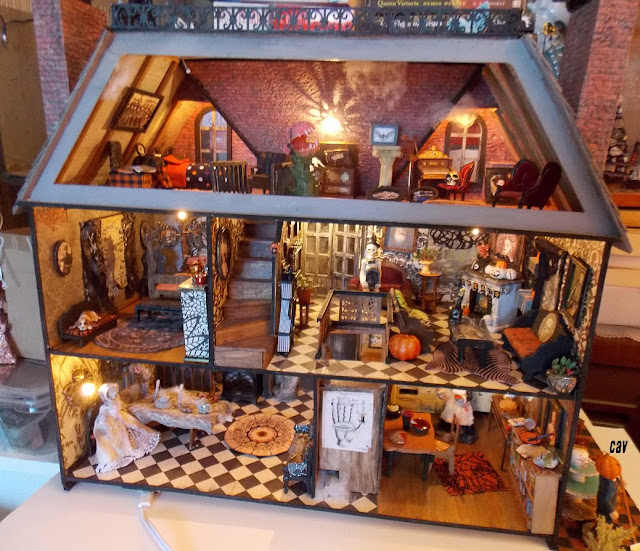
Back view: Greenleaf half-scale Van Buren Dollhouse turned into a Halloween House

* Like to Read? See my Halloween Reading List on the other blog. * 

* Click photos for full size; links to all posts are in the left column archives; other projects are linked on the top left dollhouse tab.* 

**** Continuing the tour, we'll go upstairs

Second Floor: Parlor/living room on right side: 

I added the rug and coffee table since this photo:


Hard to take pix with the glaring light, but I added the funky clock here and a poison plant. A Skellie visitor is taking a break. And a ghostly visitor....


This was fun to decorate using a spooky cat print scrapbook paper I had left. The large armchair on the wall turned out better than I expected. (Also part of the Gothic set, SDK Miniatures.) The side table (TCM Miniatures) is topped with a poison sumac plant kit (also SDK). The furnishings are those cheapie wood punch-out kits I redid. The coffee table was a swap gift that I repainted and added some art inside.

Second floor:

Bedroom - Added more pillows to the cool tree bed from Michelle's Miniatures.


Third floor attic:


I made several furnishings for a small bedroom and sitting room on the left side. There's also a trunk kit (SDK Miniatures.)  I really like the music area on the right side. I found this small plastic organ and Victorian furnishings in my stash and decided it fit perfect here. 

One thing I forgot: Have to make room for the Fortune Teller box I made earlier. (Michelle's Miniatures) It could go downstairs against the wall if I decide to move that couch later.

Hope you enjoyed the tour as much as I did in making the house and furnishings.

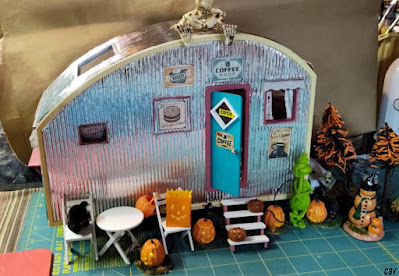
Next: There's another non-Halloween project that I just finished, too. An older kit that also sat around - a camper. My friend and I are setting up a small campground for our Christmas mini get-togethers. Something fun to do. Will share more on that so come back soon!

Thanks again for visiting! 


Happy Halloween! Miniature Haunted House


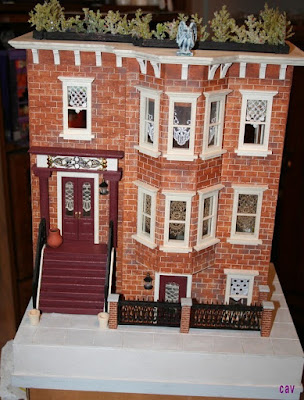
Pictured: Outside back of half-scale Van Buren dollhouse. (Click photos for full size.)

I've done several haunted houses or Halloween-themed houses since it's a favorite way to decorate in miniature.

I've been working on the half-scale Greenleaf Van Buren dollhouse a while, having let it sit and then going back to it some months ago to finish it. So I finally kicked myself to (mostly) finish decorating so I could post it here.

I'm sure I'll add or change more things over time, but I'm done for now. I'd like to add some more decorations on the front walls and some kind of wreaths on the doors, but I can't decide what would look good.

Since this will be kind of long, I decided to split the house tour in two, so be sure to check for the second post  later today as well.

Let's start outside on the Patio:

Well, it looks like Mr. Pumpkinhead isn't such a bad guy after all. He decided to clean up the patio and rake some leaves. How nice of him! (Rake: SDK Miniatures; Table and chair, TMC Miniatures; Bench: Jane Harrop Miniatures, UK).

The window boxes looked plain, so I added some tiny skulls. (I like that decorative pumpkin string on the balcony* but I think I'll add some orange paper in back to show through and then it'll be more visible.) I really liked doing the whole house in brick. I used the textured brick paper from Starboc2/Etsy. *The balcony was part of a fence section from AlphaStamps since I didn't like the bulky piece that came with the house. I also cut out the top row of the fence for the top of the roof. (See top photo.)

C'mon inside!

Front hall: (right side of the dining room)

I like these using little statues like this one of Pan (by the front door.) I have another one like this but in stone color. I also have an archer that I got from WCD Miniatures. Fun decorating additions. I usually pick up one or two new ones at the Fall Miniature Show, Schaumburg, Ill. (Nov. 8-9) Recovering the Victorian couch really made a difference, I think. Really liked this fabric!

Kitchen on right:

I can't help getting a bit gorey here. Decided to use an old Tootsietoy icebox - and I didn't even have to touch-up the chips. ha! I love Tootsie toy pieces (1920s-'30s) and try to use them when I find them cheap. Here's some history on them.) I also hesitated, but gave in and dirtied up a plastic sink/stove section I had as it fit here. Since this photo below, I added two painted seed beads for knobs and a piece of cut solder for the faucet. I think a picture is needed above the icebox.

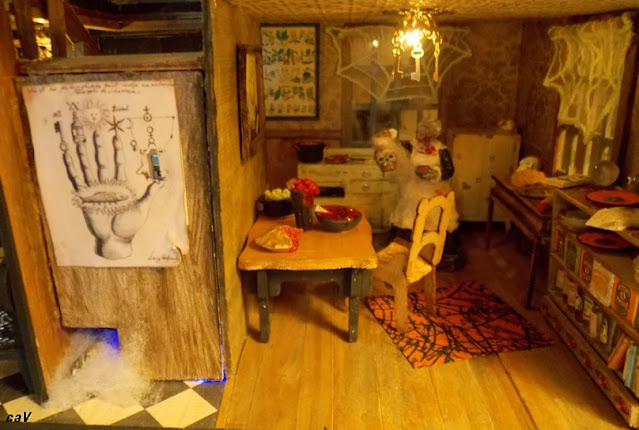
Oh.... I wouldn't bother Grandma if I were you. As you can see, it's best to not complain about the menu or her cooking! That must be what happened to the family portrait, too. Quite a temper!

The table has some yummy bone soup for lunch. There are pies in preparation on the side table. (Side: Narrow Vesper table, All About Miniatures/Etsy ). The bookcase has some potions, whatever other ingredients, and some cookbooks. I liked using a different style this time instead of just walnut stain. This time I painted it gold and used red metallic designs for inserts. (Gothic set, SDK Miniatures.)

Here's a view of the closet and staircase next to the kitchen. Watch out for the monster under the stairs! 

To the dining room, left:


Some items on the table:

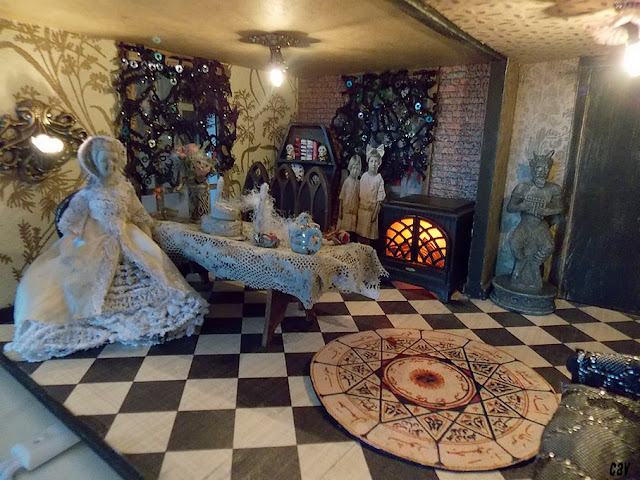
The doll was one of those cheapie figures that I painted gray and re-dressed for a Miss Havisham-style room. The bench seat and table are my favorite Gothic half scale furnishings (SDK Miniatures.) My friend Gigi gave me that little heater and I thought it fit perfect here. I still have to add some silverware to the table.

Next Post: Come back later for part 2 of the tour upstairs! (If you sign up for email headline updates in the left column, you'll know when it posts!)

Thanks again for visiting!

(pixabay.com, cc license)


October 25, 2024

Miniature Halloween Countdown 5: Witches!


Continuing the Halloween Miniature Countdown:

(Click photos for full size; see last post: Witch Cottage.)

Many people don't like dolls in their dollhouses, but in some, I do. I like dolls, always have. 

Of course, I've dressed quite a few witches for Halloween, both 1" and half-scale.

The above is a favorite, which was in my haunted house, but now is in a greenhouse scene. Here are several others in this post.

* The Halloween posts will continue on Monday.


September 16, 2024

Halloween: Haunted House


Every haunted house needs a garden gnome, especially a zombie gnome!

** Today is Day 16 of #septemberspookyseason24 on Instagram. Daily posts and some giveaways via @wyrdworldminiatures. (Click photos for full size.)

* Follow me also - @cwrite12. I'll try to post my daily (hopefully) Halloween inspiration here also with a reminder. Join in! 

TODAY'S PROMPT: Haunted House....


Which is still underway. Making progress on the Van Buren half-scale dollhouse. I'm close but I'm not-quite-done yet.

So sharing the previous photo of the front. I am working on a brick patio in the front of the house, so here's that progress.


I had this brick sheet forever and decided it would fit perfect for the house and would look even better painted black so it matches. I think it looks much better, doesn't it?


The small garden bed has a zombie gnome (top photo). I was lucky to find a couple sets from Lemax one year. The corner giraffe is a "topiary" animal like The Shining. I have a lion for the other side but I'd like to find a bear. These are smaller zoo animals so closer to half-scale size. The chair set (it comes with two planters) is from TMC Miniatures. I'll add some impatiens around the fountain and am making a bench/seat for the left side.

That's it for the moment! Will show more as I get more done. Thanks for stopping by again.


September 14, 2024

Halloween: Spooky Miniature Witches


 (Click photo for full size.)


** Today is Day 14 of #septemberspookyseason24 on Instagram. Daily posts and some giveaways via @wyrdworldminiatures. (Click photos for full size.)

* Follow me also - @cwrite12. I'll try to post my daily (hopefully) Halloween inspiration here also with a reminder. Join in! 

TODAY'S PROMPT: Witches/Wizards

I skipped yesterday since I didn't have anything to fit, but this one today is easy!

For some reason, I have made or have quite a few witches! Synonymous of Halloween, I guess. I do have a wizard, too, but not sure where the photo is.

The above witch was in my 1" scale haunted house, which is now packed away. (No room).


 Here's another flashier witch I dressed a while back. 

I still like this cute little girl witch, too. (Ignore the frame.)


And more recently, there's the 1/24th half-scale witch I dressed last year for the Witch's Cottage. (More photos and video at name link.)


* Thanks again for visiting. Be sure to stop by for more posts and photos!


September 02, 2024

Halloween: Van Buren Dollhouse Furnishings

 Another month and a new post! Where does time go?

I've been working on making some furnishings and decorating the half-scale Greenleaf Van Buren Halloween dollhouse I finally got back to last month. It had been sitting awhile so I decided to finish the trim and top roof trim, and I have to admit, it looks pretty nice. I realize I still have to add some cobwebs to the inside ceilings, too. (See last post - abandoned room. Click photos for full size.) ** See end for the Instagram #septemberspookyseason24 game photo!

I kept looking at it (or was it peering at me?) and finally decided to start adding some art/pictures, which really makes a difference. We'll see how well I can get photos as some may be hard to see. I make a lot of pictures like the eerie landscapes below as they're fun to do and just to have them on hand, even if I don't use them all right away.


The rooms are in progress. I hate showing photos of things not finished, but I also love sharing how it looks so far. So, no win. ha! But taking the photos gives me an idea of what I need to fix or change. You stare at things but it seems only a photo shows the goofs or changes needed. You know how that goes...


Parlor/Living room: This has a cool cat pattern background from scrapbook paper I had. Sadly, it's gone except for maybe a tiny piece. I added the creepy picture to the fireplace top. (Warning: I bought the fireplace last year (or the year before) at Michael's and have bought lit items before with no problem. ** Be sure to check things now: I bought a larger lit pumpkin lantern this year (not shown) - which I learned after I was home that it came WITHOUT batteries. Things are getting cheapened. I would've been really mad if I'd paid full price.)

The coffee table was received in a past Half Scale group swap. I painted it and added some creepy manuscripts inside.  


A pot of poison sumac (SDK Miniatures.) and a Dracula book (of course!) is on a side table from TMC Miniatures. This goes in the parlor above and in second photo below, next to the maroon Gothic chair near the door.


That ghost gets around!


The Kitchen: so far: I am thinking of putting that spice cabinet there on the right side wall. Have to add more dishes. More poison plants in the skull on the cabinet.


Looks like someone got mad... haaa!


Still in progress. I hung onto this old plastic kitchen stove/sink piece for a long time but I think it fits well here with the Tootsietoy fridge/cabinet. I think I'll have to age this even more. I wasn't going to make it really dirty, but it still looks too clean. Have to add bead knobs and a larger faucet yet.

Here's what's cooking so far, eyeball soup and bloody steak (have to add the liquid in.) I'm being pretty tame here... (for me). ha!


Bedroom:


The tree bed kit (Michelle's Miniatures) fits pretty well in here, along with the chaise kit. I need to add in more furnishings yet and a rug.

Just a short tour for now. I'll be adding more things and more photos soon, so stay tuned!

For fun:  (Click to see full size.)  #SEPTEMBERSPOOKYSEASON24


** September also is #septemberspookyseason24 on Instagram. Daily posts and some giveaways via @wyrdworldminiatures. * Follow me also - @cwrite12. I'll try to post my daily (hopefully) Halloween inspiration here also with a reminder. Join in! Sept 1 prompt is Tumbling. Today Sept. 2 is...Feathered Friends. (Some of these may be hard to match. See photo above.)

 
   *** Ahhh, I remember, I do have a Feathered friend... the vulture in my large haunted house on my website! My pet vulture is from Barb's Mini-Gems.


August 14, 2024

New Halloween Project: Abandoned Room


Hey, it even has a ghost already! haa! (Click photos for full size.)

While I'm working on furniture kits here and there, I've been deciding what larger project to do next.

I am leaning toward starting the half-scale country cabin kit I got awhile ago  - the Alisha Country house kit from Laser Dollhouse Designs. I have an idea of turning it into a more contemporary house, kind of black and white, which would be very different for me. But... I will put touches of color. I can't help it! Eventually, as I have to do some planning first since I want to change some things around in the house and it'll probably be the winter project. 

I'll also start setting up the small Halloween display in the real house. Will be nice to have something up and lit. In the meantime while I work (yes, still!) on decorating and filling the Van Buren dollhouse for Halloween, I thought of doing something smaller as an in-between project.


The box looks better painted gray. (Excuse the light on the glass.) (* See the room update here.)

I had another photo box sitting around, (this one is 5 1/2" h, 8 1/2" w, 3" d) that is smaller than the one I used for the Tiki Bar. I buy these things at Goodwill and set them aside until an idea hits. So.... once I saw my friend Gigi's teensy abandoned room, part of the Robin Betterley 2023 calendar club kit project, I realized the photo box would be perfect!

Here's the club kit:

Here's Gigi's teensy abandoned room which is sooo cute!

I like doing haunted houses and that, but I also like the messy, abandoned look which I haven't done yet. Believe it or not, it's really hard to totally mess something up, especially after you put a lot of work into making it!!

So that is the plan here: a fully abandoned half-scale room. I like the idea of building up the floor, too, to have the ground showing underneath as above.

  Some supplies to start:

First, I painted the whole box gray and will add some black over it for aging. I cut a false wall out of mat board and cut window holes in it. I have a couple Grandt Line plastic windows I've had awhile that work well since I'll be wrecking everything. I got them cheap so I won't feel bad messing them up. I put some LED lights behind the wall to light it up, dimly, of course! I also put a magazine landscape on the back wall behind the windows. I put wood sticks behind the wall to provide some space behind the windows.

Here's the wall so far (not glued in and paper not glued yet): Yes those are lights behind the windows. I had a two-light string and battery set on hand. (Evan Designs has all kinds of different sets.) I have to wallpaper the wall, and add some moss around the window and on that tree branch. I'll put the floor in after the wall is done and the paper in. 

The wallpaper (scrapbook paper) is cut in strips like real life, then dirtied, torn, pried up, and whatever else. I'll put up dingy ripped curtain remnants too. Might add some falling plaster and have visible brick patches, too. So far, so good!

Accessories will vary as I see what looks right. I have a plastic Victorian couch that will be perfect to break and wreck. I cut part of that bookmark and dirtied it up. (Gasp!) It'll work here. The other part can be a small rug in another room.

It's been pretty fun working on this! Believe it or not, it's actually harder to make something messy. It's hard to decide to wreck kits or furniture on purpose and decorating-wise you don't want to go too far. Or is there really such a thing as too far in an abandoned room? We shall see!

I know, not a lot to show yet, but I think it's turning out pretty good so far. Sometimes a small project is a nice change,  though it often can take as much time as a larger one, right?

Making a list for myself of things I could add in:

* Mice, gotta have mice! Or rats... either way.

* Spider webbing cobwebs     * Broken lamp and end table

* Old picture frames and pictures   * Forgotten toys?

* A discarded suitcase or crate?    * Broken chair?

* A stack of old books and magazines, some with pages torn out.

Other suggestions are welcome. I'll share more pix as I get things done.

********

* For fun: Get free mini Halloween cross-stitch patterns (black cat, pumpkin, bat, etc.) I use 22 count cloth for smaller results.

Thanks again for visiting! I appreciate you stopping by! Come back soon for more updates.

* PS -  Don't forget, you can sign up for the headline email updates in the left column to let you know when there's a new post.