April 28, 2024

Soon Summer sunflowers!


One of the tallest sunflowers I had last year!

It is finally nice enough outside and is expected to stay that way now so the real-life planting begins!  (* Click photos for full size.) (* Except....what a storm last night! But the rain will be good for the seeds!)

So, we started planting the rows of sunflowers (about 6 to 8 in each row). First mammoth ones, then a row of what are supposedly giant sunflowers, then a row of lemon sunflowers that are slightly shorter. Then I'll do a row of the bushy sunflowers and if there's room, an extra row of Mexican sunflowers.

Mini-wise, I like making flowers, too, sunflowers being a favorite. Here's some I made for the Witch's Cottage before: I hadn't made these in a while, so they they were fun to make again. Will have to do some more, plus make even tinier ones to go with the Tiny Sunflower House underway. Here's more pretty hollyhocks and yellow daisies I also made for the Witch Cottage.


In real-life I also put in a patch of Mexican sunflowers in an old tire and opposite the large sunflower area. I also have another spot visible from the deck that had only a few come up last year, so I want to add even more this time. I love the different bright orange shades of these flowers. (See Tithonia.)

Also have been soaking the Morning Glory seeds and got one planter done. Have three more to go once the seeds are ready. This was a pretty flower last year. I'll share more photos as things bloom.

The planters go next to some trellises we put up on the side of the house. Hopefully we'll have a bunch bloom this time.

I'd like to try something like these in miniature yet. Will have to look at my punches to see how close I can get.

That's it for now! Will post more as I make progress on some things.

I did start painting that compartmentalized box to make into "holding" rooms. I'll share that, too.

Thanks again for visiting! I appreciate your stopping by! Btw, you can sign up for email headline alerts in the box in the left column that'll let you know when I have a new post!

April 26, 2024

Xtra Special! #Ghost Fiction Coming - Surprise!

Another writing interruption - and a cool, or should I say booooo! Surprise!


Taking the third listing on the cover, C.A. Verstraete brings "Secrets of the Lost Mine" to Noncorporeal II where "The mine has haunted Jake Simon since childhood. Now, with its closing, maybe he'll find peace - and discover its secrets."
* Time to get in yet on the Kickstarter!!
* See their Facebook page.

April 25, 2024

W for One Hit Wonders Fiction: A to Z Blog Challenge 24

 Today for the A to Z Blog Challenge, I'd thought I'd share again a great short fiction anthology I have a story in. The stories are really fun to read. Be sure to put up a review if you read it!  (Back to Day 1 - Next: X-Y-Z, The End)

The unique anthology, (I Just) Died in Your Arms: Crime Fiction Inspired by One-Hit Wonders is now available!

** New review: 4 stars! See Fundinmental.com

Based on 12 somewhat familiar songs, including my haunting tale, "Wildfire," inspired by the sad song  of the same name. See the song and story list below.

***BONUS! Buy the paperback - free shipping anywhere!! * Get it here! (If any problems, use main link here.) Paperback only $10! 

* Another option - paperback only $12 at IngramSpark.

 * Also available on Kindle and at Barnes & NobleSmashwordsKobo - UK, Kobo - US 

* Just saw it on the Japanese Kobo site  * German site - and Australia 

* Find it on Goodreads.

(Note: affiliate link may earn some commissions.)

                                   ***********

Songs and stories: 

* Vinnie Hansen: 96 Tears

Song: 96 Tears, ? and the Mysterians (1966) - Listen 

Jeanne DuBois: Na Na Hey Hey Kiss Him Goodbye

Song: Na Na Hey Hey Kiss Him Goodbye by Steam (1969) - Listen

* Josh Pachter: The Rapper

Song: The Rapper by The Jaggerz (1970) - Listen

* J. M. Taylor: It’s Hard to Die

Song: Seasons in the Sun by Terry Jacks (1974) - Listen

Christine Verstraete: Wildfire

 Song: Wildfire by Michael Martin Murphey (1975) - Listen

* Sandra Murphy: Pigeon Talk

Song: 867-5309/Jenny) by Tommy Tutone (1981) - Listen

 * Joseph S. Walker: Come On Eileen

Song: Come On Eileen by Dexys Midnight Runners (1982) - Listen

* Wendy Harrison: It’s Raining Men

Song: It’s Raining Men by The Weather Girls (1983) - Listen

* Bev Vincent: Somebody’s Watching

Song: Somebody’s Watching Me by Rockwell (1984) - Listen

* Leone Ciporin: Life in a Northern Town

 Song: Life in a Northern Town by Dream Academy (1985) - Listen

 * Adam Gorgoni: Bitch

* Song: Bitch by Meredith Brooks (1997) - Listen

* Barb Goffman: Teenage Dirtbag

 Song: Teenage Dirtbag by Wheatus (2000) - Listen 

April 24, 2024

Update on Mini House: A Z Blog Challenge 24

 For U, I decided to add an update on that "tiny house" kit I was working on. It's almost together, but I've been working on getting the inside pieces put together and finishing the outside.  (*Click photos for full size.) Back to Day 1)

Here's the kit as it was: (The house is 5" h, 3" w.)

I decided to add some lace with glitter touches on it in the inside windows. I'll share that later when I show how it's assembled. 

Here's the new outside. I decided to use a bolder, larger brick on the bottom step. I think it adds 'something.' I cut pieces from a chipboard railing I had for the balcony. Easier than using the tiny pieces they wanted you to cut. Of course I've lost pieces so had to improvise. I made a new plain front door from mat board and made a wreath for it. The smallest top shutters were cut from pieces of wood.

I rather like how this is coming out so far!

This is the paper on the inside walls.

The kitchen pieces again: 

Here's the bedroom and living room pieces so far.


I went with yellow and print fabric instead of the gray for the couch and chair. And I painted the formerly pink bed headboards white. The other furnishings were in shades of blue and turquoise. There are more pieces, but they need to be accessorized yet.

I'll show more as I get things done. The biggest part was getting all the exterior done, so, moving on! Next is getting the floors glued, the wires attached, the walls glued, and then putting the hinges on the front wall. The crazy teensy spiral stairs are assembled, though I had to add a few steps since I didn't space them out enough for the height.

Stay tuned for more posts and updates! Thanks for visiting again!


April 23, 2024

The Dollhouse Mansion Roof: A-Z Blog Challenge 24


Mansion, thrid floor sitting room/bedroom

Continuing the A-Z Blog Challenge. (Back: Day 1; click photos for full size.)

I'm probably behind a letter or two, but I'm just continuing on.

Today's part 2 of showing the finished mansion (so far, there are always things to add!). See yesterday's post of the outside, diner, and floor 2.

I know I showed parts of these rooms, but I've added some pictures and might've moved things around too.

Floor 3: the cook/chef's rooms

I like the old-fashioned feel of the bedroom/sitting room; see other photo at top of post. I used my favorite textured brick paper (from Starboc2 on etsy). I really like this one with the different colors which gives it an aged look. The tile floor sheets are from Melvin's Miniatures. The bed was made from mat board scraps. I realized later the purple tufted chair is signed from Judee Williamson. I changed the Michael's TV (former Christmas scene) to show I Love Lucy.

The table and one chair is part of the kitchen cupboard kit from D. Tales (Ron Chase). The other chair is from All About Miniatures. I still have to add books in that bookcase too! (Bookcase kit, SDK Miniatures.) Yes that's a tiny fishtank under the light, found it in my stash from a past swap.

Right side bedroom/kitchen: 

This house kit was fun as I could adapt it with the idea of separate apartments in mind. So this is the diner chef's room. And since he likes to cook, he doesn't mind sleeping in the same space with a small sink and cooktop so he can try out new recipes. Have to add a small TV in here for him yet. 

The sink counter and small cabinet is from the kitchen cupboard kit from D. Tales. I painted the table from a past half-scale group swap. The bed was made using extra pieces from a punch-out furniture kit. TIP: I glued the top bed cover to a piece of aluminum foil so it looks like an unmade bed. 

The rooftop:


I loved making the rooftop garden, giving me another floor to decorate. I have to find/add a small grill yet. I also put LED lights around the edge of the greenery. And had to have a gargoyle figure on top to guard the house.

The nice thing is this house isn't real big, so it's easy to take off the cover and decorate for the holidays. I look forward to putting Halloween and Christmas items in here. You'll be seeing more of this house later when I add other things and re-decorate.

What's next? Some updates on that "tiny house" kit...

After that? We'll see.... Stay tuned for a few more monthly posts.

Oops! Sorry, about the video front being on the side! The rest is normal! (I can't test these until the post goes live. If they don't work, they're on YouTube - front video.)

Video: back of house -  on YouTube.

Thanks again for visiting! Hope you've enjoyed touring the project. Hard to believe it's about complete now except for a few additions. 

Now what do I do????? haa!


April 22, 2024

Putting the Dollhouse Mansion Rooms Back Together - A to Z Blog Challenge 24


The Park Ave. Mansion front

* Continuing the A to Z Blog Challenge, I'm putting several days' letters together and probably mixed some days up. (Click photos for full size; See previous L post on the mansion with other photos. Back: Day 1)

Finally - finally! I can show some final pictures of the Park Ave. Mansion (from Laserdollhousedesigns which I bought on eBay.) Hope you're not sick of this project yet. I'm not! haa!  ** Link at bottom but here's part 2 showing the rest of the mansion. ***

I love flowers, mini and real! - Front of the mansion (this was at Easter.) The left planter is kind of cool - for something different, I used an old wood spool. I made all the flowers from punches.

Sad... the real-life tulips aren't even open yet and now it's gonna get near freezing again. Even some frost expected. Grrr! Hope they survive as they'll be so pretty!

As I mentioned in the last post about my favorite Half Scale Mansion, I had a lighting problem 💩 which I'd put off fixing for quite a few days since I was really aggravated about it. Well, last Monday I I finally decided to tackle it and---TA-DAH! It worked - the "it" being fixing the diner wall light and rewiring the standing lamp on the third floor. What a huge relief!! 😅

Well.... Never be too quick to celebrate. 💩💩The diner wall lamp bulb burned out. Again, a second time. *&^%!!! And several days later, I finally got brave enough to fix it. Yay!!!!! It  wasn't as bad as the first time. What a freaking nightmare! I'm leaving the house alone for now! I moved nd covered it until I decide to add more things. 

Lesson learned: I ended up having to re-solder a separate bulb and light cord on.I kept the light wire super long and all I have to do is pull the lamp frame (which is glued separate) to fix the light. Whew! I know, more than you want to know, but I have to rant a bit. ha!

On to the tour!

 Here's the finished back, which I didn't show before. (I admit, I get tired of retaking photos and sometimes I'm just too lazy to re-do them! ha!) For example, there is a fern plant and screen added since this photo at the end of the second floor bedroom so the chaise is in a different spot now. haaa!


Despite some initial building problems I had, probably since I had changed some of the original design to delete some walls and fake walls, this came out better than I thought. To be different, I made false walls, doors, and lit exit signs on the left side walls that would go out to "the halls" instead of using stairs. Yes, that's where the bathrooms would be, too. Gotta use your imagination. 😀

Floor 1: Diner
I've shared this before (See previous post with diner photos) as I just love how it came out.
A tip: the hanging globe lights here and on the third floor ceiling are actually cut from LED Christmas light replacements. They're a cut-glass pattern and work really well!

Here's the left side. I changed the curtains on the door as I think they match better now.


 I'd thought of making a diner awhile ago, but it was fun adapting it to the smaller half-scale size. (1/2" = 1 foot, so a person is roughly near 3" tall.) I still have another cafe table kit (SDK Miniatures) to make and put in.

I moved some things around and added appliances on the end counter. I might add a glass yet for the shakes. I did add a mug under the coffeemaker after this photo and touched up the blender. (All from ShopMiniDecor and More on etsy.) The counter is my own design, using some cabinets from  MiniEtchers.

I love how real the cooking food looks. Made them from Model Magic Clay, painted, (red/pink, and burnt umber) then added some Glaze and some paint to make it look like cooked grease.

Added some buns with toppings in the works for the burgers. The tomatoes are cut from a polymer clay cane I bought awhile ago. Some of this stuff is close to 1" scale size (like the tomato cane) but I sized everything to the smallest plates. I don't like things so tiny you can't see them or handle them. I drop enough stuff and have to hunt for it. ha!


Floor 2: The rich widow's apartment

I loved the colors in here. The bedroom furniture is part of a Victorian set from HartsDesireMinis on etsy. I think the screen is from a second Victorian set with a vanity and dressing table I haven't made yet. I made the chaise from a d. anne ruff furniture pattern.


Floor 2: sitting room, right side

I made the chairs, chaise, and octagon corner table from the d. anne ruff patterns. I remodeled the fireplace and made the mantel for it using marble wallpaper. I added a gold filigree flower with glued on "jewels" in front of the fireplace opening. I bought the right side lamp (a Brooke Tucker Golden Christmas idea) from someone a long time ago.

I do have a pair of resin half-scale doll kits from Marcia Backstrom saved that I was lucky to find a long time ago. They're assembled but I have to dress, paint, and wig them. They're an older couple and I'd thought they'd fit the theme here. But that'll take me a while to get to making them. I haven't worked on dolls in a while so this will be a challenge.

* Part 2 tomorrow: I'll share the third floor and roof garden, and the videos next, so be sure to come back tomorrow!

Thanks again for visiting! 


April 19, 2024

Annual Half-Scale Swap; A to Z Blog Challenge 24

This year's swap:


My items, last year's swap


Continuing on the A to Z Blog Challenge - getting that P in here for SwaP. (* Back to Day 1. Click photos for full image.) 

Been doing this for years and it's always fun getting the box of hand-made items from the annual Half-Scale Swap. Members of the half-scale group on Groups IO do such a great job! (* Click photos for full size.)

Here's last year's Kitschy swap and links to previous swaps.

There's usually a theme as a suggestion, but everyone can make what they want. This year the theme was general, but I at least make whatever comes to mind at the time. I already have next year's idea and was lucky to find the components at the dollhouse show! 

Hopefully I didn't mix up names as I unwrapped these for photos.


Cute handmade bread and baskets - Gail (SoCal)

Coffee table - Paula W

Round rugs - Emily M. (she has a great HS house collection. Check out her blog.)

Brown planter - Bea J

Toaster (with teensy toast slices!)  - Karen from MiniEtchers.com

Tiny wicker planter w/ greenery (holy cow she wove all those!) - Glenda D

Neat whale picture and love the real-life postcard! Robin,  Merriweatherminiatures on Instagram.

Vintage landscape painting, newspaper, Christmas deer - mine.

Cool dress mannikin, Adrian C - Makes me want to do a dress shop!

Plate shelf, Ruth G - Red/black braided rug, Eva P -  Easter basket, Emily B

Neat 3D printed baskets and shells, Jackie B


Cute!! I was making a hot chocolate table before. Can always use more mugs too! - Helen S


Plants, copper planters, Sharon J - Tray, cookies, Mary W - Bag, grocery boxes, Annilee T

These are the cutest! So tiny! Teensy gnomes, Sydney H


Toy wagon with some fun toys! Love that it has a Raggedy picture so it'll fit in the planned Raggedy Ann house. And that almost looks like the Raggedy camel! - Cyndi McD - And I think the tiny Christmas packages are from our organizer, Terezinha


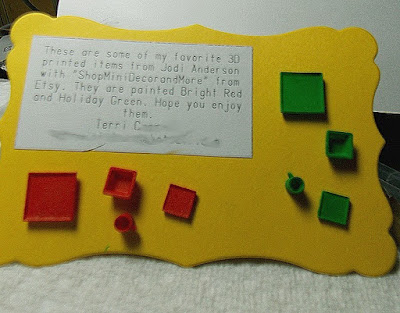
Also got these great 3D printed plate and cup sets from Terri C. Cool mod design. (The plate sets are from ShopMiniDecorandMore on Etsy.)

*******

Once again, great stuff, nicely done! Always fun opening this box each year. - and I already know what I'm making next time! Thank you everyone!


April 17, 2024

N for Noncorporeal Fiction: A to Z Blog Challenge 24


Today is the letter N-O for the A to Z Blog Challenge. 

(Back to Day 1. Next: 4/19 - P for the Half-scale SwaP )

Figured since I mentioned my upcoming story before, I wanted to share the art and the upcoming Kickstarter, starting 4/17 TODAY.

My story, "Secrets of the Last Mine," will be in the spooky anthology, Noncorporeal II, coming soon from Inkd Publishing.

 *** Follow the Kickstarter to get in on cool editions and other goodies! Starts TODAY 4/17! 


* *  Follow Inkd Publishing on FB for the latest news.

April 15, 2024

Love My HS Mansion - A to Z Blog Challenge 24

Continuing the A to Z Blog Challenge with a favorite project - L-M for Love my Half-Scale Mansion! (*Click photos for full size/better view. Back to Day 1.)

The Mansion, technically the Park Ave. Mansion from Laser Dollhouse Designs, has been a favorite to work on. Okay, they're all favorites ha! But I wanted to try something different this time and wanted a vertical project. While I love how some people have turned theirs into modern homes in black and white, I had the idea to make separate apartments on each floor. And I wanted to do a diner on the first floor. I've never built a diner/restaurant but thought this would be fun in half-scale. (The standard 1" scale is 1" = 1 foot. Example: a 6-foot-tall person is 6" tall. In half-scale, it's roughly half of that.)

The back: (before finishing)

The diner: Love this but I have to re-fix the left wall light again. Before photo. I still have a few other things to add yet.

I was hoping to add some final finished room photos here but... I had an eclipse of the dollhouse! The day of the eclipse, I had to change a bulb, then changed another - somehow got a short and the house went black! Luckily we only had to cut the electric tape underneath the house in one spot, then re-solder to get it working again. Whew!

The long explanation:  But.... I still have two lights to re-figure  and wondering if I want to try getting a pin-bulb in that wall lamp again. Such a trial! And I have to re-solder a new lamp to the wires I cut in the top floor. Trying to see if I have a lamp that will work or I'll try the floor lamp again except leave a longer cord if I have to refit another bulb. Learned my lesson. I hate these bulbs and next time will put a wall socket and use a plug so I can remove them to work on! Otherwise I use 12 v bulbs I get in a big pack that aren't sold strictly for dollhouses and they last a long time! I'll do a video tour soon once it's all done. Meanwhile: 

Floor one: The diner:

I took the unusual step in this house of adding fake walls and doors leading to the hall stairs/elevators like a hotel. I didn't want to use stairs as they take up too much room. I've since changed the door curtain to white so it'll go more with the other window.

Floor 2: The rich widow/building owner's apartment:

Left side: Bedroom, so far - pre-moving in stage. Still things to be added and changed. I painted and decorated pieces from the Victorian bedroom set and screen (in temporary spot) from the Victorian dressing room set from HartsDesireMinis /etsy.


I just love the bed and colors.


Floor 2 right side - hall/living room. Furnishings on the way!

Floor 3: first look - cook's apartment

The diner cook/chef lives on the third floor. The left side sitting room is shared with his daughter, who waitresses in the diner. I have more furnishings added since this photo. That standing lamp is the other one I need to fix. I love the brick. (All textured brick papers used in and outside house from Starboc2 on etsy. The tile flooring except in diner is from Melvin's Miniatures.)

The door on the right leads to the cook/chef's small kitchen and sleeping quarters. He likes to try out new recipes sometimes or stay up late watching TV after a long night. I'll add a small TV and pictures, plus his late night snack and some cooking items in here yet. I loved adding the turquoise color to match the bed fabrics and curtains, and to coordinate with the tile floor.

The bed was made of small wood scraps. The bed covers were glued to a piece of aluminum foil so I could "scrunch" them to look rumpled, like he just got out of bed. It's hard to tell here but the ceiling light is made from a "crystal" design globe removed from some replacement LED Christmas lights. They make great light covers. Used them also in the hanging lights in the diner.

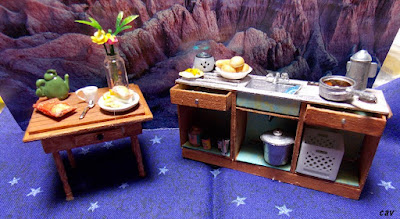
The wall sink/cooking unit was from a kitchen cupboard kit from D. Tales Miniatures. I added some food and items. The table was from a swap which I decided to repaint to match the room. 


I need a spoon by that pot. I know I have some wooden spoons... somewhere. 😆

Added some food to the table. I should've put the half-sandwich, oranges and chips on a dark plate to show up better. I might change it. The mug is a shaped bead with a thread handle.

Upper roof: I added greenery in planters all around for privacy and to give it a certain look. Plus the gargoyle guard in front. (Photo taken before windowboxes added.) I'll add a small grill once I find one I like.


I added a light string around the greenery, too.

There'll be more photos once I fix the lights and have a "moving-in" day. I got fed up so taking a few days away from this. ha!

 Next: 4/17-18, Weds.-Thurs: N-O - Noncorporeal II Fiction