Showing posts sorted by date for query half scale country house. Sort by relevance Show all posts

January 05, 2025

First 2025 Miniature Projects


What's on the worktable this year?

Made some new furniture (above). (*Click photos for full size.)

Awfully cute pieces so far. The empty shelves will have books, lots of books. It's all part of this Magic Library book nook kit I got for myself and my friend for Christmas. I have to say, it's a nice kit. Cute stuff, goes together well. No maker name on it but I got it on Amazon.

Then this got started:

I mentioned in November that I got the half-scale Abriana Country Cottage from Laser Dollhouse Designs, which I'm calling the Lavender Cottage. (website photo).


So far, all the windows are painted (22 larger, 2 small, what a chore!) though I still have to fill in the line around the window. Was trying to decide what color would look better? Leaning toward a darker green (marker).


Here's the base and first floor level  - so far. I know... real exciting. ha! This is a much smaller house (14" w x 10" d x 19" h) and funny as I didn't realize it doesn't have the exterior scribing for siding like the Witch Cottage has.


 I don't want to glue on siding, so I'm going to try something different - I'm thinking of using stucco (lightweight spackle from the hardware store) - in Lavender to match the theme idea. It can be tinted with acrylic paint. I'll share how that goes when I get to that point. I stuccoed a small house, the bakery, previously, which turned out fine. 

 I might have to change the name of the cottage as I am hoping to add a lot of wisteria vines to the outside. We'll see if I can do Lavender plants, too. Some plant ideas: SDK Miniatures has an ageratum plant kit, which could look nice in clumps for a border; 


I could also add purple pansies, some delphinium (but in purple), (website photos) and I've made some African violets before. We'll see what I have on hand and what I find at the Spring shows. I also have a lot of punches if I can figure out some other flowers.


There are always lots of decorative things to make when doing a house, so I'll be working on various kits and other things as well.

I shared earlier about the first two pieces I made for the Lavender Cottage, this chair and a plant, along with the clematis trellis, which really came out pretty. There are other pieces set aside as well.

An interesting find:

Found these nice 1/24 LED lights on ebay. Reasonable too ($6.49 pair) and they have a bright yellowish tone light to them. Ordered some more in black and a coach-style light. Going to use these on the front of the cottage. They come with a 3-volt battery pack (2 AAA batteries) but will probably run an electric tape line and use a small 3-volt transformer as you can go through a lot of batteries over time.

Just a small update. That's it for the moment! What are you working on?

Here's to more miniature fun this year! Thanks for visiting and your interest in my projects!


December 05, 2024

Birthday & Advent Calendar Miniatures

The "birthday" cake shop

Had some pre-birthday fun with good friend Gigi. This year was a first as we also decided to make each other a miniatures-filled advent calendar. What a fun idea!

First I have to share the so-cute little scene (above) that she made for me from a kit. These are so cute (and she has more patience than me in working in this size.) The little scene is 4.5" high.

She also gave me two of these really cool Tudor-inspired wood benches she made from a kit (country benches kit, The Daisy House), and I made another two. They will go in a Tudor-flavored loft house I'll be working on soon. I have a great batch of Tudor-Medieval style food I got years ago in swaps that I've been saving to eventually do this kind of project. It's one of the very few 1" scale projects I'll be doing.

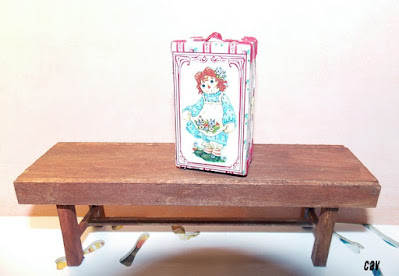
The adorable Raggedy Ann box is part of the Advent Calendar we are exchanging with each other for the first time this year. Fun thinking what to make and what to fill it with! 

The box is actually a trunk she made from a Dragonfly Intl. kit. I have admired the kit, but never got around to buying one. Sooo cute! And while 1" scale, I'm still going to put it in the half-scale Raggedy Ann house (to be finished at some point.) The photo shows it up lighter, but here's the inside: So cute and so detailed!


My photos are not too great, but I admit I'm too lazy to do the right set-up for the lighting. ha! Bear with me!

We opened the calendar days 1-4 since our get together was on Day 4. The funny thing was she had mixed up the dated boxes, something I didn't expect when I opened it! For some reason, I thought they'd be in order! So I had to re-shuffle my dated boxes around for her  too. ha!

She also gave me these teensy paper Halloween houses for the fireplace mantel and these really cute Halloween decorated plate shelves.


We'll be opening individual days on our own and then are getting together again two times before Christmas. It's always fun as it forces me to get some things done. ha!

This week I worked on a small kit I found at Goodwill of all places (Hobby Lobby Delightful Den kit). 


The bookcase, which I have to repaint, is about 3.5" high. I remade what was an odd-sized loveseat to turn it into a smaller chunky chair. I loved this print I found and thought it came out pretty well. I'm hoping both fit in the Lavender cottage or another house. I usually end up bashing these kits and taking out pieces to use in other projects instead of building the actual room.


Another holiday-themed project I'm working on is a half-scale Christmas house. I found one of these smaller plastic kid's toy houses and for $1.99 I couldn't pass it up! It'll work out well as a Christmas house since I didn't have a half-scale scene set up. So we'll see how far I get on it. I'm repainting it now and doing some wallpapering. I'll show the progress soon. 

That's it for the moment! Stay tuned for more Christmas miniatures and projects! Thanks again for visiting!


November 11, 2024

Next: Half Scale Miniature Cottage & Show

 New cottage!

(website photo)

Yes, yes, I still have other projects but I couldn't resist and got a new 1/24 - half-scale house. This time I got the Abriana Country Cottage from Laser Dollhouse Designs, a rather "cute" 3-story cottage. I liked it as it's not super big but still enough room to decorate. It's 14" w x 10" d x 19" h. (*Click photos for full size.)

 I got several other houses from them: first was the Park Ave. Mansion that I added a diner to; then the Jasmine Gothic Victorian Cottage, which became my Witch Cottage; then the Alisha Dollhouse, which is set aside and will be a kind of country cabin. (It may sound like a lot, but I've seen how kit prices have gone up, so it's good to buy these, paying them off over time, and buying them when they're relatively cheaper. I can see the price difference in kits I bought quite a while ago; and some kits I bought years ago. Besides, I don't drink or smoke, which is costlier. ha! )

I really do like the nice details this company offers in their houses. Great doors, and nice stairway and porch railings. Though all those tiny parts to paint always looks scary at first. ha! But I like the building challenge, the planning, and especially the decorating!

This time, I had to plan out the colors to see what would work. Decided on Lavender walls, Hauser Green (a darker sage green) window frames, Antique White windows with a purple in the line around the windows. I'm thinking of adding shutters in African Violet.

I'll have to make wisteria and work on that clematis kit I've put off every time I look at all the tiny petals! (kit photo - SDK Miniatures.) 

I may do a kind of 1940s-flavored interior, a mix of old and new, I think. Still deciding how I want the inside to look. I was going to do a sage kitchen in the other house, but I think I'll do a sage/yellow/white kitchen in this one. Here's a 1940s style kitchen (Daily Mail) a woman did that's pretty close to some of the kits I have. 

Maybe I'll use this sink and cooker kit I bought last year (or use the stove kit I have that looks like the one in the link):

I found some neat vintage linoleum patterns to make flooring:  I kind of like this one with yellow and green in it. 


Probably going to do some brick walls inside. I seem to do that in all the houses as I like the brick look and the paper has great detail. I have quite a bit of the textured white brick paper left that I used in the Park Ave. Mansion, (Starboc2/Etsy), so I might experiment putting a light coat of paint on it. 

I'll sort some kits soon to see what I might use in the house. 

Show Stuff: Here are a couple new kits I got at the show which I may or may not use in this house depending on how they fit in.


I liked this resin table for a hallway or near the front door inside.


Here's something fun: I got a kick out of the teensy dumpster and garbage bin. Going to dirty them up. Guess I'll have to have a doll or skeleton arm sticking out of the dumpster at Halloween. (I watch too much Blue Bloods on TV.) ha!


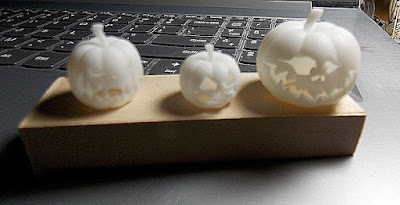
I also found a set of 3D printed pumpkins that I can paint and put lights in. Love the scary faces!


Another different garden statue and urn.


That's it for the moment! Thanks for visiting. Come back soon for more updates!


August 14, 2024

New Halloween Project: Abandoned Room


Hey, it even has a ghost already! haa! (Click photos for full size.)

While I'm working on furniture kits here and there, I've been deciding what larger project to do next.

I am leaning toward starting the half-scale country cabin kit I got awhile ago  - the Alisha Country house kit from Laser Dollhouse Designs. I have an idea of turning it into a more contemporary house, kind of black and white, which would be very different for me. But... I will put touches of color. I can't help it! Eventually, as I have to do some planning first since I want to change some things around in the house and it'll probably be the winter project. 

I'll also start setting up the small Halloween display in the real house. Will be nice to have something up and lit. In the meantime while I work (yes, still!) on decorating and filling the Van Buren dollhouse for Halloween, I thought of doing something smaller as an in-between project.


The box looks better painted gray. (Excuse the light on the glass.) (* See the room update here.)

I had another photo box sitting around, (this one is 5 1/2" h, 8 1/2" w, 3" d) that is smaller than the one I used for the Tiki Bar. I buy these things at Goodwill and set them aside until an idea hits. So.... once I saw my friend Gigi's teensy abandoned room, part of the Robin Betterley 2023 calendar club kit project, I realized the photo box would be perfect!

Here's the club kit:

Here's Gigi's teensy abandoned room which is sooo cute!

I like doing haunted houses and that, but I also like the messy, abandoned look which I haven't done yet. Believe it or not, it's really hard to totally mess something up, especially after you put a lot of work into making it!!

So that is the plan here: a fully abandoned half-scale room. I like the idea of building up the floor, too, to have the ground showing underneath as above.

  Some supplies to start:

First, I painted the whole box gray and will add some black over it for aging. I cut a false wall out of mat board and cut window holes in it. I have a couple Grandt Line plastic windows I've had awhile that work well since I'll be wrecking everything. I got them cheap so I won't feel bad messing them up. I put some LED lights behind the wall to light it up, dimly, of course! I also put a magazine landscape on the back wall behind the windows. I put wood sticks behind the wall to provide some space behind the windows.

Here's the wall so far (not glued in and paper not glued yet): Yes those are lights behind the windows. I had a two-light string and battery set on hand. (Evan Designs has all kinds of different sets.) I have to wallpaper the wall, and add some moss around the window and on that tree branch. I'll put the floor in after the wall is done and the paper in. 

The wallpaper (scrapbook paper) is cut in strips like real life, then dirtied, torn, pried up, and whatever else. I'll put up dingy ripped curtain remnants too. Might add some falling plaster and have visible brick patches, too. So far, so good!

Accessories will vary as I see what looks right. I have a plastic Victorian couch that will be perfect to break and wreck. I cut part of that bookmark and dirtied it up. (Gasp!) It'll work here. The other part can be a small rug in another room.

It's been pretty fun working on this! Believe it or not, it's actually harder to make something messy. It's hard to decide to wreck kits or furniture on purpose and decorating-wise you don't want to go too far. Or is there really such a thing as too far in an abandoned room? We shall see!

I know, not a lot to show yet, but I think it's turning out pretty good so far. Sometimes a small project is a nice change,  though it often can take as much time as a larger one, right?

Making a list for myself of things I could add in:

* Mice, gotta have mice! Or rats... either way.

* Spider webbing cobwebs     * Broken lamp and end table

* Old picture frames and pictures   * Forgotten toys?

* A discarded suitcase or crate?    * Broken chair?

* A stack of old books and magazines, some with pages torn out.

Other suggestions are welcome. I'll share more pix as I get things done.

********

* For fun: Get free mini Halloween cross-stitch patterns (black cat, pumpkin, bat, etc.) I use 22 count cloth for smaller results.

Thanks again for visiting! I appreciate you stopping by! Come back soon for more updates.

* PS -  Don't forget, you can sign up for the headline email updates in the left column to let you know when there's a new post.


June 23, 2023

Miniature Take Your Dog to Work Day

 Photo: Workspace in Fairfield Dollhouse attic. See top tab, My Dollhouses, for other links and photos.

While I'm still working on the Half Scale Witch Cottage, thought I'd share a few photos for some of the more unusual holidays. (Click photos for full size; see other posts in left column archives.)

Today is national Take Your Dog to Work Day, and if you work at home, your dog is there, of course. The 29th is also Work From Home Day. See calendar for other dates.

Funny that I never put a dog in all the miniature stores I've done, but I do put them in all my dollhouses, so I'll share those instead.

Another "work", crafting space in the attic of my Country Victorian house, with a companion. See video on website Miniatures page.(Scroll down past blog link there.)

Dog toy also in the Country Victorian house.


Another dog in my larger yellow Victorian dollhouse. (Video also on the miniatures website page. Scroll down past blog link there.)

Dog in my vintage doll Christmas room.

And of course! A corgi for my Tudor Tea Shoppe honoring the Queen!


Speaking of dogs....  Well, if you want to sit and work with a laptop in this room, good luck finding somewhere to sit! haa! My
Dogcatcher's House has about 100 dogs. The fun was the theme and  finding all of them!


That's it for now. I know there 's more but it's finding the photos. ha!  I should have some new updates soon. I'm working on several things in the second floor of the Witch Cottage. Tricky stuff like papering the top tower....

Thanks again for visiting. Come back soon for new updates!


May 10, 2023

The Witch's Cottage Update: Colors!


A "little" update on the half-scale Jasmine Gothic Victorian Cottage from Laser Dollhouse Designs, or what I am calling The Witch's Cottage. Previous posts: Potion cabinet, some show stuff; Post 1, planning. Some 3D printed items. (And if you want to see some neat projects during May, type in #mayminimakers on Instagram for daily miniature project posts! Come follow me if you're on there!)

Somehow I overlooked mentioning the size of this house previously. It's 10W x 11D x 19H. Ceiling height just over 5" or just big enough. It's actually soon for a post as I didn't get much done, but I can't resist blogging. ha! So the base is assembled and electric taped. The supports are on and.... deciding on colors! (Note: the pieces above aren't in the right spots; it's just to show the colors.)

Funny, as I'm not a big fan of green but I do like these shades. Since this is a botanical witch's cottage, decided it needs "earthy" colors. So: the background walls are wedgewood green; the contrasting tower walls are a slightly lighter celery green; the porch and base background use dark umber brown. The circles use the sage green with dark blue spruce green for the leaves. The flowers are painted a medium yellow from a Target brand paint sample on the base trim. Sigh. It is a-lot-of-painting! 😏

I found a couple papers I like so far: the stucco look for a ceiling or wall and this floral. It's a big print, I know, but I wanted something bold and I like it. I think it'll look good on a partial wall or two. Maybe I'll add brick or wood wainscoting. I'm not necessarily using this fireplace; it's just to compare the print size. 

I also ordered more of the textured brick paper (Starboc2 on Etsy) as I want to do a white or light grey brick in the mansion and a used-brick pattern here. Previously I used a reddish brick from them on the outside of the Fairfield; and a brownish brick on the foundation of my yellow Country Victorian. See house links on the My Dollhouses page link under the top banner. 

This used brick should look nice in this cottage:


I also ordered two of these zebra rugs printed on cotton canvas: 


As it is now spring, outside work and planting are beginning. Did the first mowing as the grass was getting pretty long. (Don't worry there are still plenty of  dandelions as early food for the bees!) We plant in an enclosed area to keep the bunnies out except for the end "hill." The large sunflowers go there and usually - hopefully - get ignored until they're big enough to take away some short fencing. Mexican sunflowers (Tithonia) are in; a favorite! (They are a dark and light orange, like giant daisies.) My giant sunflower patch is planted, too. The annual plant sale is Friday so we'll go pick out flowers and veg plants.

I know, a short post, but wanted to share... something! ha! Back to painting. Ugh!

Thanks for visiting again. Hope to have more substantial updates soon!


March 30, 2023

Fairfield & Other Dollhouse Attics

The unfinished Fairfield attic before.

 Today's topic: Attics!

Feeling a little lost as I finally added what I intended for now to the Fairfield and covered it up. But I will be showing you the rooms you didn't see yet, so stay tuned for upcoming posts.

(Click photos for full size; see other posts in archives in left column or tab on top. * See last post: Fairfield Plants, Additions & Hall and the annual Half Scale Swap. Bonus: Check Emily's blog tutorial to make a beaded curtain.)

For now, thought I'd share something I seem to be hooked on. No matter the house, lately every one has to have an attic. ha! It's fun to have an area to store things and have another room you can use for any purpose. So here's a look back at some different attics I've finished:

***

In the first half-scale house I did, the Country Dollhouse, I used the attic as one large room with extra beds (made from those inexpensive wood punch-out furniture kits) and a craft area. The room was painted "wood" paneling made from strips. (*See all photos of house on website.)


***

In my fairly recent large Victorian house, I decided to add an actual small attic space for storage. I like how the brick paper looks with the wood. (See video of house on my website. Scroll past blog section at top.)


***

The haunted Van Buren house also has a full attic space on the third floor. I really like how the brick looks here. (I always use the textured brick paper from Starboc2 on Etsy, who's from Greece.)    * See other photos on top page tab: My Dollhouses.)


***

For fun, here's how the Fairfield attic space started. At this point I wasn't sure how it would turn out!


Now it has both an attic sitting room and a tiny bathroom next to a storage-attic space, the best of both worlds! I normally don't add bathrooms but this house had enough room to add two, one on the second floor and I squeezed one in the attic space.

Sitting room and bathroom:


Attic space:

After putting some things in, I decided to add an extra bed in there, too. Why not have somewhere a guest or one of the boy's friends could sleep? The bed was a simple make using end pieces also from the cheapie punch-out wood furniture kit plus a piece of matboard and foam for the mattress. I love the tie-die-type fabric. I was lucky to find a whole bag of different colors and prints at Goodwill a while back.

I added the Western art above the bed, which is from the recent half-scale swap. Also put other art and a teensy barometer (also a previous swap item) on the wall. Though the vintage metal camera isn't half scale, once I found it in the stash I wanted to use it. Thought it too cute not to add in next to the vintage radio. I have one of those folding cameras in real life, and they're fairly large.

That's it for the moment! Thanks again for visiting. 

* Next: A to Z Letter B -link live day of post. Come back soon for more photos!