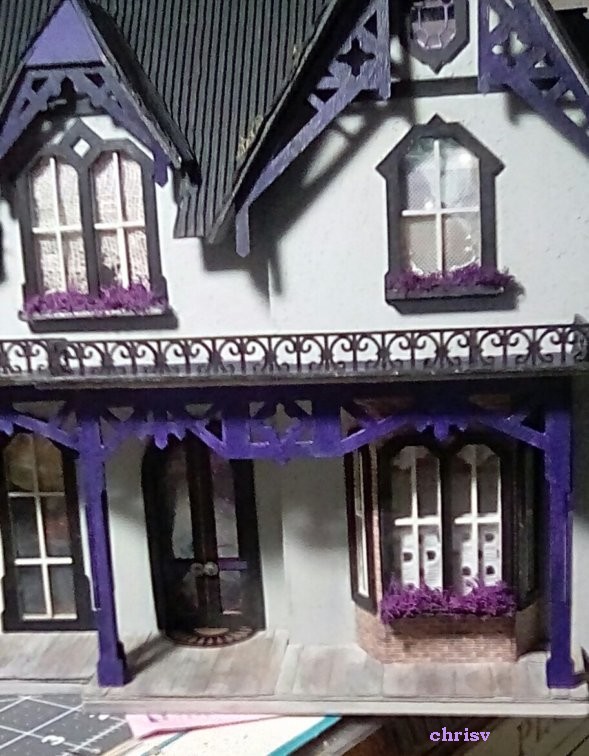
Showing posts sorted by relevance for query half scale haunted house. Sort by date Show all posts

January 08, 2020

#Miniatures Year in Review 2019

It's always fun to look back and see what you've worked on. Gives you a boost, too, when you feel like you've gotten nothing done! 

It doesn't look like a lot, but I know I've worked on quite a few single items, too, but I'm not sharing them all. ha!  (Click photos for full size.) Thanks for looking! ☺
(Free animations: https://www.fg-a.com/)

Here are a few of the projects I've worked on this past year:

New small scene I did in a small niche box I bought at the flea market. Sometimes it's fun just to do a small scene and use some extra stuff you have on hand.


Finished exterior of Half Scale Haunted House. Added roof porch trim from Alpha Stamps (cut off part of a larger fence.) Added some plants and figures. Still have to do lights and decorate the inside. 


Working on a Lady's Shop cabinet. (Cabinet from MiniEtchers.) Added top trim and flowers since this photo. 


Raggedy Ann shadowbox made in an older NAME
 (National Association of Miniature Enthusiasts) kit.


Redecorated the Half Scale Shed kit (from MiniEtchers) and moved it next to the orange Halloween house.


Made fuchscia flowers. Easier than I thought. (Bonnie Lavish plants kit.) I added some sparkle paint on the top pink stamens for an extra fun touch. Nice kit. I'd like to get some more of these.


Made these half scale chairs. 


Finished painting the outside of the shop from the Houseworks Street of Shops for the record store. Partially assembled since this photo. Inner window trim added also. Have lights, stone and outside decorations to add next. 


Added  - I found the interior pic so far. Lots of color! Love this scrapbook paper. The window sills are an iridescent cloth. 


Still making lots of mini books as they're so addicting. 
Top: Half scale books


June 21, 2019

Latest Mini Projects: Window Room

I had shared this photo on FB recently and didn't say what it would be, only that it'll feature an old favorite....


The kit is a wall-hanging window. It was a 2015 NAME  Day (National Association of Miniature Enthusiasts) kit called "Window Shopping." (See some finished and framed examples here.

Someone also let me know (after I had problems following the pictures in the instructions and finally figured it out) that there were also directions in the NAME Gazette. (Nice they have all the issues here. See Vol. 44 #6 for this project.). Funny as I'm usually pretty good with instructions but I pulled out this kit and put it away three times before I finally tackled it!

I thought it was a cute idea and a small simple way to highlight a few items in a collection. I was lucky and picked it up at a show for $10.

So.... what is mine going to be? Well....  I had done a previous shadowbox on a specific theme and thought this would be perfect for some of the smaller items I have, some came from my Half Scale group's annual swap.

Ta-da! 
Here's a preview of how the room is set up so far. This is a test fit; I have to glue everything in yet. I'd really enjoyed doing the other small shadowbox, (see photos), so I thought this would be a perfect follow-up and something I could also hang on a wall. The fabric Raggedy print background and the bookcase kit are from Dragonfly International.

The walls and floor have to be glued in yet, but I have to paint, measure and glue in the wall shelf brackets first. This is one of those kits that you have to make sure you do certain steps first. That outer frame as seen  in the top photo will be covered in a brick wallpaper.


The Low Bookcase kit from the Girls' Bed Set is 3.5" h, 3 7/8" w and 1" d. It goes together nice though a hint is to add some strong glue like E6000 or Quik Grip and hold with rubber bands until it dries to get a tighter fit. 

I also got a set of Raggedy Ann book covers from Dragonfly for the bookcase and plan to add some flowers as well. I'm thinking of putting in a white wire chair and a small doll as I also got a fabric Raggedy print dress kit from Dragonfly, too.  Next time, I'll show any further progress I make.

And still working on: 
Yes, I'm a procrastinator. I still have to put the lights in the Half Scale Haunted House I was working on, which is set aside at the moment.Then I have to cut, paint and add a chipboard "wrought iron" railing on the roof edge that I got from AlphaStamps. This one is nice as it's 2.5" h and I can cut it into two pieces. I'm going to use part of it for this project and then I'll still have another piece to use, too! So, still working on that, as well.


If you can't tell, the "vase" in the left poppy flowers below is a bone portion from part of a Halloween bone-parts necklace. Ha! The fuchsia plant is made from a Bonnie Lavish kit. Loved making it and it came together easier than I thought. I have to put a hanger on it yet. Definitely want to do another. These are 1" scale flowers, but I like using this size too even in half scale as some of the HS flowers can be so tiny! The house has 1" scale plants out in front anyway and they fit fine.


So that's the progress so far.  And yes, I'm working on a writing project, too, but it's nice to keep the creative juices going in both areas. 

Until next time! Thanks for stopping by.

July 19, 2019

Update: HS haunted House + Easy Fence Tutorial

I finally got back to finishing some details on the Half Scale Haunted House. (See some exterior photos here, the gardens and the beginning and inside.) (Click photos for full size.)

The house is a Greenleaf kit I've had for ages and finally decided to work on as I knew it had to be a spooky house! 

I think putting on front window boxes and the fun purple moss definitely added a nice touch of color! I also added green moss to the roof (which helped cover some things) and thin dowels on the top peak edges, which don't show here. There's a puff of smoke coming out of the chimney, too! Next is adding in the LED lights and decorating inside - that's the fun part! But other than the hard time measuring wallpaper and roof pieces to fit since the house was pre-assembled, I did enjoy working on this house. I just wish the rooms were bigger

The roof porch has a piece of trim along the top edge but it looked too plain as it was. I knew it needed some kind of fencing, but what? Here's an easy, inexpensive way to add a fence to your project:

Easy Roof Trim Tutorial

This is an easy way to add decorative trim to a project. All you need are scissors, tacky glue, paint and your preferred varnish or Mod Podge. I used Ceramcoat satin water-based varnish. The fence is the 2.5" tall wrought iron fence from AlphaStamps. Do a search and you'll find lots of nice fencing and gates to use here.


The fence is chipboard, a kind of pressed cardboard which makes it easy to cut and paint. What's nice is it's also flexible and bendable, so it's easy to work with but it will be sturdy once glued in place.

 I chose this design as it has two sections. I thought it would look best for this project to use the part without the points, so I cut off the bottom design with scissors. You might need a little light sanding to smooth down the slight bumps on the top edge.


Measure size to fit space as needed. I tried to match it up so each end would mostly have a bar to make it sturdier. Paint both sides with black acrylic, then seal with a varnish or Mod Podge. 

Glue in place along front section if needed and at edges and bottom. That's it. Very easy!  I'm sure there are tons of other uses for this, too. Have fun!


(I know this doesn't show too well with the black against dark purple. I'll try to get outside shots once it gets a bit cooler.)


December 14, 2021

Lights! #Miniature #Halloween #Dollhouse Update

Let there be light! 

(In case you're wondering, the yellow "house" in the back is a sectional cookie/storage jar!)

Yes! I know it's been a couple weeks since the last update, but finally I have some progress to show!! (Click photos for full size.)

Remember the Half Scale Greenleaf Van Buren kit I was building for a haunted house? (Yeah, I'm so slow. I see I started this back in August. ha!)

(site stock photo)

I admit, I was kind of stuck. There are parts that are NOT fun to do in dollhouse building (at least for me!) I don't like doing trim and papering, but yesterday I finished up papering walls and trim I needed to do before I did electric. Truthfully, I don't like construction much, either; I enjoy the decorating and planning the most.

Finally! This morning got the rest of the lights installed and everything soldered. And they work. Yay! (Okay, laugh. Only seven lights as the rooms are small.) 

As this is kind of an "older" Victorianish house, I decided to use some square jewelry findings I had as bases and some smaller bead caps for the lights. (Yes, it's crooked here; every time you take a photo that happens. ha!) 

I like the effect so will be doing this again in the Fairfield. I really like the result of painting that textured scrapbook paper a bronzish-gold too so will repeat that also. I only wish I had more of that Halloween cat print paper. I do have a small scrap left that'll have to do for some shelves or something.


For something different, I had a pair of bead cap earrings I'd found a while back. It had a smaller and medium sized cap with tiny keys hanging from the edges. Had to use one for the parlor ceiling light. The other will be in the FF house. (Shades of that creepy house and show, Locke & Key on Netflix?)


Another element I had to try for something different was making a wall sconce using some octopus-shaped buttons (think the horror monster Cthulhu from HP Lovecraft.) I cut the back off and glued a larger bead cap on for a sconce. As this cap absorbs most of the light, I added a ceiling light in this room, too, which will be the dining room. The light is another idea I plan to duplicate. These will be near-twin haunted houses, I think. 😀 I can swap things between them. ha!


That's the fun of it - trying to think up different things to make to make it unique. More to come! Next will be adding raggedy curtains, some lace and some cheesecloth (black and white), and then adding some cobwebs in, too. Also have to add the interior trim and do the outside. Door and window trims to be painted yet, too. I can't make it totally run down, (I admire the look of an abandoned dollhouse, but can't get myself to wreck it like that. ha!) but I'm doing some things here I decided I won't do in the FF house.

And the Fairfield? Oh, that's another story. Lousy, confusing design besides the lousy wood. I was really fed up with it. Got a few pieces figured out, so hopefully can get some walls glued and papering done. Maybe I'll feel better about it if I make some progress on it. In the meantime, I also was working on my pieces for the annual half scale group swap. About done which is good as I'm ahead for once. More on that later when I can share.

I still plan on doing a Miss Havisham kind of dining room (and still haven't come across the first table I'd already decorated, so I'm doing another one!)  I'm using the Gothic table kit from SDK Miniatures covered with lace. (I love this set!)

For inspiration, I saw this wonderful Miss Havisham figure made by the amazing James Carrington of England. His Etsy shop is empty at the moment, but some photos of other works are there. 


So, that's it for the moment. Stay tuned for more as I get things done. At least I feel like I'm getting somewhere now. 😁

April 08, 2022

Miniature #haunted house update


I was going to post this at the end of March, but time got away from me. Anyway, here's an update of a few thigs I got done since the last post. Yeah, I know, slow progress but...? 

The roof is done (ghastly project) and I think it came out pretty well. Any goofs I covered with moss in strategic places...  ha! I got the fence from Alpha Stamps (I cut and used the smaller pieces on my other Greenfield haunted house) but I also got a bat border which I might use in front. Have to add those around the roof edges yet.

I put a vine on the side, too, for many reasons including that I lost the original top window piece and had to cut a new one which wasn't quite perfect. But I thought the vine added something.  I also made a section of ferns and wisteria blooms (purple floral soft/shredded foam glued to cloth wire) to add to the front yet. As you see the octopuses are not on yet, either. ha!


Also made a few flowerpots to put on that really too small for much else balcony in front. I'm thinking of making a new patio/outside front yard to put some statues and things, maybe some seating areas with gardens and shrub borders. Have to figure it out yet. The idea: I'd like to add a semi-formal eerie garden with animal topiaries (like in The Shining) could be cool. I found a couple small plastic toy animals I saved to cover in green grass (that's why you have all this weird stuff!) Stay tuned!

The fun part: some inside stuff: 

 The gothic bookcases turn out to be too tall for the second floor since I didn't want to cut off the front cross. So I shaved it down a bit and decided to use the single one on the first floor. I'll use the double set in the Fairfield (which I checked and since the second floor where I want to use is only 4 1/2" tall (the first floor is 5" tall) I'll probably cut the top crosses and re-glue them. (from SDK Miniatures.)

The small bench is a southwest style piece from Annie. This was fun: once I saw this spiderweb table set at a show some time ago from Michelle's Miniatures, I knew the quarter-scale table would work as a half scale side table. (Oh I see she has a cool spooky face Adirondack chair in half scale that would be fun to get!)


* The 'I Thought of It, So Now I Have to Do It' Idea:

Once I thought of that light under the stairs, well, I knew it would bug me unless I tried something. (The photo is red as I covered the flash to show the blue light.)

Soooo...  The back wall here actually was pieced since I had changed the original staircase top tread and had to fit a new back. I filled it in with three pieces since I didn't think I'd be pulling it out again. 

I decided to use the round piece with a switch from one of those cheap tea lights. I changed it so I had to solder a new blue LED light to the metal. Next, I measured a new full back using picture framing mat board, stained it (Gloss Mod Podge tinted with Brown Umber Acrylic Paint) and then cut out the hole. I glued the switch in with Quik Grip and then glued the picture back on over it, cutting out a small slot for the switch. 

Ta-dah! It's all lightly glued so I can take it apart to change batteries and then re-glue when needed. It's more a novelty so I won't be lighting it that much though. Next time, (yes there'll be a next time if I plan it ahead!), I want to try using one of those blinking LED's. There are tea lights with those but I didn't have one handy.


That's it for the moment. I added a few things to the toy store and the Tea Shoppe, that's for another post. Even more fun: got some cool things in the annual half scale swap and the dollhouse shows are coming up at the end of the month. Be sure to come back for more photos!

Next?


And.... yes.... I got the Fairfield out. Again. I'm determined and just don't want to quit on this yet. The two sides are glued. Realized I left one small wall part out that I can't fit in now so I'll have to cut it into two pieces for each floor. And next will have to wallpaper the inside of the tower to fit it in and put brick paper on the fireplaces. I studied and restudied those instructions, trying to ID pieces so it's (kinda) starting to make sense. Changing some things, of course. Will share again when I have some real progress. 

Thanks again for stopping by!

April 28, 2018

Spring '18 Dollhouse Shows!

Wow didn't realize it's been awhile since I posted here.  Doesn't mean I haven't been working in miniature - of course I have! But I've also been busy writing and such, with a new Lizzie Borden, Zombie Hunter book out and book two also! (See website for details and cool covers!)

This blog, though, is where I talk and share MINIS! So, here's a look at a few things I found at the Spring Chicago-area shows (in Schaumburg, IL) and a few things I saw (and couldn't buy. ha!) (Click to see images full size.)

Love these kits from SDK Miniatures. I've been saving her Gothic items for my half scale Haunted House I plan to do. So, when I saw these online I had to have them! I didn't realize she'd be at The Miniature Show, so I saved myself some shipping! Aren't they great? The center kit is a half scale ivy kit.


I also found this cute Halloween set and decorated tree, both from Cindy's Minis. I had bout a chair/couch set and a small skirted table with parson's chairs from her before online.


An interesting set of iridescent "glass?" blocks I found at the Three Blind Mice Show. I got two packages as I thought they could be some kind of window or bath decoration when I do my half scale sea captain and mermaid house. Also found some plain frames and this pretty decorated frame, plus some other metal minis to paint from Mesh Miniatures. I want to use the frames for the spooky Halloween face pictures (that change from plain face to scary face.)


Yes I bought some other things I dosn't need to take photos of - a wood counter, some light sconces and glass chimneys, lots of "small"things. 

I did  find the NAME Day 2015 Window Shopping Kit that looked interesting to try, so I got one. Here are a few photos from an Omaha club's finished kits.   Here's a photo of an unfinished kit. (I got it for $10.) Now to decide how to finish it: Raggedy Ann or Halloween items? Hmmm.....

Now for some things at The Miniature Show that I didn't buy... Care to guess prices? ha!
Handmade leather vintage prams and bicycles.  I didn't write down prices but the prams are in the $300 range - bikes are in the $200 range.


 These are gorgeous hand-painted miniature oil paintings. 


I can't fault any prices on artwork. Joannes Landemann's amazing mini reproductions of 17th century Dutch masters were also on hand (which are in the $1,000 and up range. You have to see these to appreciate the work - see a selection on Pinterest.

Very nice handmade miniature leather chairs. ($365)


 Cool Steampunk-decoraated Tardis Box (Dr. Who)


Handmade dress and jacket outfits. 


Nice shabby furniture assortment.


I couldn't resist getting this tiny sailed ship for my sea captain's mantle.


So just a small selection of things I saw or bought. Good show! Always have fun there.