Showing posts sorted by relevance for query hinge. Sort by date Show all posts

April 23, 2016

#AtoZ 2016 - Tudor Half Scale Miniature #DollHouse Bakery

Welcome to the 7th annual A to Z Blog Challenge in April!  
Come back daily for more exciting posts and even some giveaways!
Check out the 1000+ blogs on the list! 

Today is the letter T for Tudor House Bakery
(See the Upper Floor tomorrow)  


I started this house a while back and then put it aside. Originally, it was going to be a greenhouse, but I decided to make it into a bakery and upstairs living space instead.

I bought the house a loooong time ago at a show. So, some projects do sit around a while until inspiration hits.

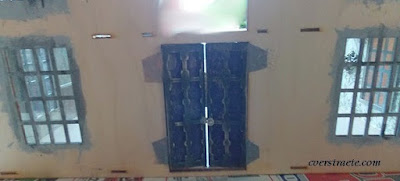
The outside is covered with lightweight stucco (or wall compound, Spackle) with some plastic brick spots showing through. (I share how to do that in my book, In Miniature Style II or get the Kindle version of the first, shorter ebook, In Miniature Style.)

Well it's winter yet, I guess, since I didn't put flowers in the window box! See the door how-to at the bottom of this post. (Click images for full size.)
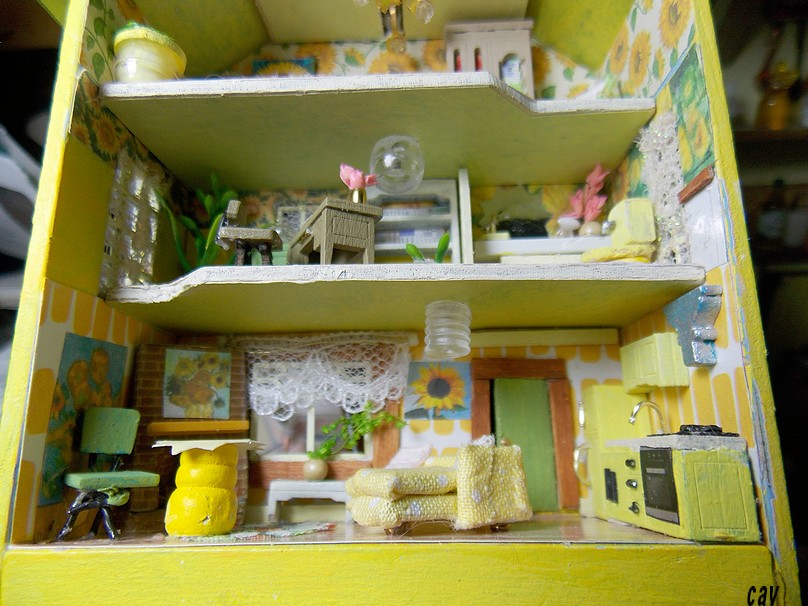
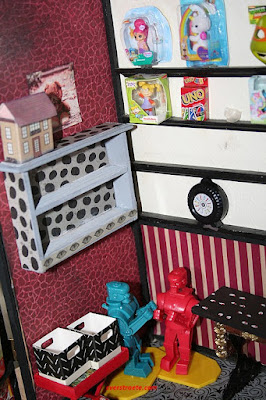
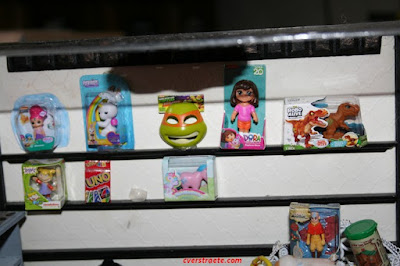


Floor 1: Bakery


The bakery case is made from a bookshelf with acrylic plastic glued in front and a larger wood piece glued on top for the counter. Cover front edges, top and bottom of the plastic  with wood strips (coffee stirrers.) The stove is a magnet. 

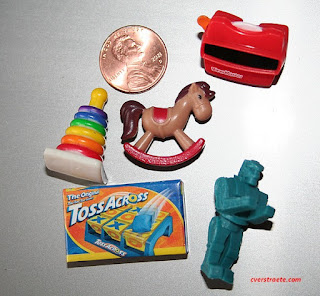
My friend Kitty Balke made most of the cakes and desserts. A few cakes are from the annual Half Scale Yahoo group swap. I made the brown and yellow cake on the back shelf from wood furniture plugs. Paint and cover with colored sand. I use dimensional or "puff" paint on top for icing. Add small fruit slice. Glue to a small button for a plate. Most of the square and round plates, including the plate for the mixed pastries on the counter, are buttons.


Left side: The cabinet (below left) is a kit from Petite Properties (UK). I made the table from a round piece of mat board cut out and sanded. The base is a chess pawn, cut, sanded and glued to painted table top. The chair is made from the punch-out Creatology 1/24 scale, punch-out furniture kits from Michael's. 


Right side:  Counter with cupcake art on right wall is made from a box shape and piece of wood for the top. The table is also hand made. The round center table was a purchased resin piece; I added the wood on top. The chair is also from the punch-out furniture kit, with an added seat cushion. 

The rug is a paper print-out coated with Mod Podge, with fringe added to the ends. I like to do it this way to give the rug a floor-cloth look.

Fringe a Rug: Everyone has their own method. An easy way to do it by measuring a piece of cross-stitch fabric to the width of the rug. Cut it to about four-to six rows deep, enough to give you a few rows to glue on the back of the rug and to have several rows sticking out on the end. 

Glue to back of rug with Tacky glue. Pull the strings to desired length for fringe. You can trim the fringe down if you think it sticks out too far. For an extra "glam" look, lightly coat the fringe ends with a metallic gold paint. 


* Come back  tomorrow to see the second floor.


Make a Hinged Door: (See top front photo.)

The door is handmade.  Before you make the hinges, measure the height for the doorknob. I used flat silver beads and attached one to each side of the door with Quick Grip and a cut-off straight pin. See directions below for cutting the pins. You don't want to try fitting the door knob in after the door is hung. (Yes, done that too! ha!)

HOW TO:  1. Scribe lines into a piece of wood cut to size for the door. It fits into the open space and above a piece of wood set into the floor for the jamb. Cut wood strips for top and bottom, and glue to face of door to provide something for the hinge pins to grab onto.

2.  I cut hinges out of the tin from the top of a peanuts can with scissors. NOTE: Measure hinge to fit across door on side and attach to wall under the doorway frame. 

3. Cut hinge into an arrow shape. Drill small holes into the wood strips with a small hand drill. Line up hinge and push hole into the tin. Coat back of hinge with Quik Grip to door and to edge of doorway so it fits under the frame. 

4. Cut off small pieces of straight pin with wire cutters. TIP: Hold the pin with a pair of needlenose pliers while cutting unless you want to be hunting for the pieces all over. (Don't ask how I know this. ha!)

5. Gripping pin with pliers, dab end into Quik Grip then push it into the hole in the hinge. Push down on top of pin with a hammer or flat side of the pliers until it's all the way in place.  do the same to the end of the hinge to hold it in place.  

6. Measure your side door frame piece. Press the wood piece onto the wall and over the hinge so you get an indent on the back side from the pin. Gouge out this space slightly so the frame fits flush to the wall, then glue in place. Once measured, your door frame will be glued over the hinge. The door can be opened - carefully - but excess stress may pull the pins out.

May 06, 2024

The Tiny Sunflower Dollhouse - Progress!

Ta-dah! The back!
Below: the front (which I showed before, but not attached yet)

 I finally worked some more on that tiny yellow sunflower house. (See previous post.) * See the 50% off sale link at end below!

That piece of chipboard fence I used above on the balcony sure came in handy. I also cut teensy pieces to use for chair "legs" instead of cutting and gluing pieces of wire that they always want you to do in these kits. (It was a leftover fence piece from Alpha Stamps.)

So far what's done:

I did get the side walls and floor glued in, and some furniture placed. There are some goofs, but hopefully, they're not too noticeable. 

The living room/kitchen:

I decided not to use the center counter. I made a table with a bead base and used wood pieces to make a chair (using those horrible wires, but this time they stuck on!) That bead table looks a little hokey but actually looks better from the top angle. Maybe... I may change that top yet to a small painted square. What do you think?

That small white table with the "greenery" plant by the window was cut off another piece and sanded down. I thought it fit there well. I hate that I see every little flaw I have to touch up. haa! Oh, well! 👀😇

I ignored all those fiddly lights and decided to cut the plastic piece they gave for a standing lamp and glued it to the ceiling. I used a clear pony bead on the second floor ceiling and painted inside as a side table by the bed.

Odd that the bathroom didn't have a toilet so I adapted one using a bead base, cut an oval seat from mat board, then trimmed part of a wood cabinet piece for the back tank. I used the kitchen counter in the bathroom instead.

 I have to make some sunflowers yet, too, which I may put in "pots" (beads) on that front walk. I'll probably put this in a small dome or case, so I may have room for a little grass  and some other flowers or "foam" flowers. We'll see how it goes.

Here's the top floor:


There is a spiral staircase for the right side to the third floor and a ladder that goes in that notch on the second floor, but I honestly don't like either one. I may just leave it as is or think of something clear I can add instead. Then have to connect the LED lights and hinge the front on yet. So far, so good.

Overall, it's not too bad. This stuff is so small that I think it works best to view it overall and not up too close. ha! It's busy, but if you've followed any of my stuff, you know I like busy. 😁

What's interesting is the wallpaper doesn't look that oversized once everything is inside. I still like that top sunflower paper a lot and will use it in another project.

The kitchen pieces again: 

I decided not to use the counter on the right here and painted it lighter for the bathroom.

Here's the bedroom and living room pieces to show the size.

I'll post again once I get more done.

Stay tuned for more posts and updates! Thanks for visiting again!

* FYI: If you didn't know - SALE! 50% off highest item at Miniatures.com with code FiveFive50 - to May 9. * Excludes RGT dollhouses, previous orders, landscape kit, no other coupons or discounts. But there is free shipping over $35 (and it counts before the % off.)


December 28, 2021

#Halloween #Dollhouse Update


Getting there! I'm at the not-so-fun part of the building - putting in trim and floors. The floors are easy; the trim, ugh, all that cutting and measuring. But.... seeing progress! (See archive in left column for previous posts! Click photos for full size.)

Ok not so exciting, but the front door's in and turned out good. I know, the pic isn't great, but I don't want to take it again. I'll get a better one after the wall is papered and the trim's on. Yes, I'm using duct tape this time to hinge it since it's strong and won't tear. 

Here's the door from the inside in the front hall. I got the stairs and wall in too. (Finally, after also having to glue the handrail several times!) I had to add a light in the hall as it seemed too dark, so I used a bead and a glass flower petal that I touched up with black paint. There will be two small part walls on each side of the left dining room for dividers. The wood floors aren't in yet. I have to darken them more. I have to find more of the thin wood-sheet flooring. Almost out! Test-fitting. But I like how this looks kind of old.


Right side of the wall in the living room. I used painted card for the bottom of the walls. The wall trim is strips cut from a bamboo mat. Have to decide on some raggedy curtains yet. Probably going to use dirtied-up cheesecloth.


Curtains in the upper left bedroom. Made the lace rather raggedy. I love the look of painting the textured ceiling a coppery-gold! I'll be adding more "dirt" on the walls plus trim. And hang cobwebs in most of the rooms, too. I hate all the trim I have to cut. I want to get to the good part -hanging pictures and decor, ha!

I have a lot of outside trim to paint yet as well. One good thing is I don't have to be neat. It's all black trim that'll be sanded to look worn. Next, I have to paper the outside. I'm using the textured brick paper on the whole house. 

That's it for now! Hopefully some better stuff (and better photos!) coming. Stay tuned! 


March 03, 2022

(Not So) Haunted #Miniature Toy Store


I bought this Carlson store kit a while back from someone online and had finally gotten around to decorating and painting it some time ago thinking it would be a haunted bookshop.

Well, like always, I changed my mind. (Yeah I hear you laughing. 😏) I have plenty of other book projects and ideas like the fancy furniture I have set aside for the Someday Upscale Library roombox.

Then when I found those Mini Toys I shared on a previous post, I knew the project had to change. But how to change it without really changing it? I wasn't about to repaint the whole thing, so I changed the title and a couple of the outside pictures for one. (Click photos for full size.)  I put plexiglass on the top with a carved wood medallion on the ceiling inside. (not shown.) (More toys, update 2)


Toys in the front windows:

Actually, I'd set the project aside as I didn't think the front would hinge right. Luckily, hubby got some screws to fit, so the full front will stay on. I just had to add some top and side inside edge trim for the gaps. Since the outside already was all painted and decorated with creepy pictures, I figured it could become a Haunted Toy Store instead...

And while the majority of the toys aren't creepy, I figured why not? That little ghoul girl in there (Mezco Mini Living Dead Dolls) fits perfectly so she's shopping. Besides, even creepy kids love all kinds of toys, right?

 As an aside, I'd found a whole bunch of those dolls awhile ago at Goodwill of all places, cheap. So eventually I want to do a Halloween party table scene. Here's a pic I found online. I think I have the first one plus the red-haired punk and the last one, plus a bunch of others. I also have some full-size dolls we found at a yard sale. I love the little ones.

The back wall shelves were already installed, so I added some striped paper on the bottom for more contrast and added a wall shelf on the side, plus some creepy toy pictures. Some of the Mini Toys may be slightly larger, but I think they look fine for display. And now I'm hooked. Of course, I'll have to get more. To fill the shelves, you know. (wink, wink). Games will go in the bins on the small table. I'll make more from printies. (TIP: Google dollhouse game printies.) The other table is a sewing machine base topped with spooky scrapbook paper.

The Rock 'Em, Sock 'Em Robots are from the larger-sized Worlds Smallest Toys. Cute, though much bigger, but I figured they can go in here, too. Remember those giant walking dolls from the '50s?  It's all trial and error with the sizes on these mini toys and they keep coming out with new stuff, too. I'm ignoring the Mini Wacky Packages though I could get hooked on those even if they are larger. (I remember the goofy cards. ha!) Funny! The new batch of toys I just got includes a tiny Rock 'Em, Sock 'Em Robot.

The canister on the top shelf is Lincoln Logs (non-opening.). The other is an Avatar figure, which is also in the window since I have two. I added the Kewpie doll as well. There's a very large package of Tempura paints on the second shelf (the economy size I guess. ha!) The skates and animals are erasers. I found the cute Oscar the Grouch figure at the fish department at Petco! You do find stuff everywhere. ha! I repainted the can silver and want to find some green Bunka to make him fuzzier. (Of course, I have every other color but!)

 The back wall before the additions:

So, to me, as I show here, I think you can make almost any size of miniature work, depending on the project. Here's the other batch I got. It includes a second My Little Pony in a different color. The Ouija box will go in my haunted house, of course.


This'll be about it until I add more games. It gets too expensive. Last time I bought a lot of items was when I when I was decorating my Dogcatcher's House. I had to fill it with a bunch  of dogs and at the time, you could find some in 25 cent gumball machines and they also were selling $1 packets of toy dogs that came with that lousy stick gum (like you found with baseball and collectible cards). The hunt was fun, even if it adds up money-wise since there're probably 100 dogs in that house. But who counts, right?

Thanks again for visiting! I appreciate your interest!