No matter what, I can't seem to stay away from doing something spooky for long.
I'd seen this small corner vignette kit from The Covered Chipboard before the Spring Showcase show, but for some reason didn't think of reserving one. I got to the show and changed my mind, but the kits with the Gothic window were gone. (* Click photos for full size. And other kits I did get! See show post here.)
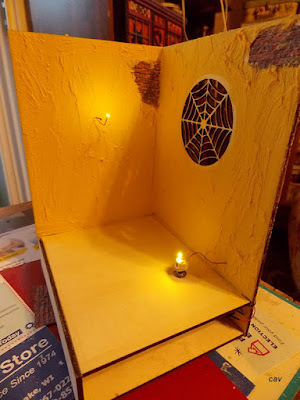
I decided to get the kit with the round spiderweb window and proceeded to see what I had in my stash to use. I figured the kit would make a nice half-scale background for photo taking and be a cute scene otherwise.
After assembling and gluing, I covered the walls with lightweight Spackle (hole filling compound - you can get a small tub at the hardware store.) I like using this as it has a "frosting" consistency and can be tinted with acrylic paint.I also glued on some textured brick pieces to have exposed brick spots. I had to add in the two lights so they'd be under the wall compound.
I mixed in a mustard yellow and then -- oh! It came out more yellow than I wanted.
No worry. I aged the walls with light washes of brown chocolate paint and touches of Wedgewood green. My friend came up with the great idea of adding some blue plastic on the window to give it a nighttime look and having rust lines streaming down the wall, like the window had leaked. I added the lines and spots by the window using burnt sienna acrylic paint. I also added the floor from a wood placemat and the painted wood shapes. I'm still deciding what chair to use, maybe a rug, and probably some scuffs on the floor.The flooring is painted and cut from a wood strip placemat. I'm sad that I only have a small piece of this left as it's made really good floors. I decided to add a strip of matboard to cover the lower opening (which was supposed to go on the other end. ha!) to access the battery. I folded the end so I can pull out the battery when needed.
That's about it. A simple, fun and reasonably priced little kit with good results.
Back to the *&^% shingling on the Lavender Cottage then. I'll get it done yet! Next I want to work on the garden for the front of the house.
* Thanks again for visiting! Stay tuned for more projects and miniature updates! *


