I'm on a roll! Or should I say hot dog or hamburger bun? ha!
Well, I'm pretty tickled with the latest results in the Park Ave. Mansion's half-scale diner. (* See last progress post; and other posts in the left column archives. ** Don't forget to click photos for full size to see them better!)
Decided to work on more fries, the diner back counter, and a big part - the fryer. This is the thinking part, but fun when you get to figure out an idea you have in mind - and that it mostly works without a lot of screaming and, er, some swearing! ha!
Now bear with me, if any mistakes show or things are missing yet that I have to fix, add, or fill in, but I was pretty happy with how the fryer came out!
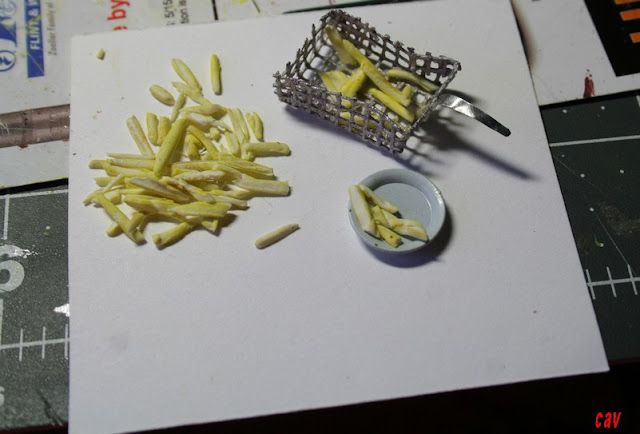
The basket is needlepoint canvas cut to a square shape and folded to form a box. The handle is silver metal cut from an embossed coffee can liner. I also used the embossed pieces for the counter backsplash. I'm very happy with this as I had it in mind and luckily found a piece of canvas in my stash! Hungry, yet? 😋
The fries are still being "cooked," but are simply Crayola Model Magic air dry clay touched up with yellow pastel chalk. I have to add more, then add some rust color pastel to make them look more done. Then I'll seal them with matte Modge Podge and add some gloss varnish to make them look shiny and to have some "grease" in there.
I'll fiddle around with cutting and arranging the fries more, too, but if I do say so, they do look like fries. They are tiny enough to get away with just giving you the idea of what they are. I just wish I could get the photos better to show that. I'll take more photos later outside in natural light to avoid the flash bleaching things out.
As you can see in this unfinished photo, the fryer goes at the right end of the counter. I'm also using part of the embossed metal from a coffee can liner for the counter backsplash, which I glued to picture framing matboard. (see below.) I've been saving those for ages, knowing eventually I'd use them. And even better, I even found them when I wanted to use them. haa!
Here's the counter below without the fryer. The backsplash worked out well. The dividers on top of the counter are "splash guards" around the grill area. The left counter will be a prep area. I'll add some food cooking and try to make it look like grease, I hope. The stove burners and knobs will be to the right of the second guard piece.
I hate showing half-done pix, but I couldn't wait. ha! Next, I'm gonna add the rest of the backsplash, the faucet, burners and knobs, wall shelves, upper fan, and some food signs and art. Plus I want to try making some pots and frying pans from manila folder or card to stack around and under the counter. I also have to stack some dishes and glasses, and fill the sink up! And then there are more tables to add and a gifts shelf/counter besides the front customer counter you saw last time.
Digging around in my stash, I found some veggies I got from past swaps, and cakes, too. Maybe I'll add a desserts table using the bottom of a hutch though I might have to figure out a plastic cover for that so the place doesn't get shut down by the mini health department (even before it opens!) haaa!
So far, so good! Turning out better than I expected. Stay tuned for more progress!
Thanks again for visiting and come back soon for more!


