Pages

March 24, 2021

Big Fan of Those Fans! #dollhouse #miniatures


Can I say again how much I love those wood fans from China? So many uses!

Previously, I made some decorative wood boxes around the windows in the Half Scale dollhouse, and it's the second time I've used them around stairs. I love how they look.

Ta-Da! Next...


I'm super thrilled that I figured out the room divider for the back of the dollhouse room! This is a pretty different design, I know, but I realized the hall had to extend around the room so I could add a door to get to the attic as I didn't want more stairs. (That'll be on the plain wall on the left, which will be covered with the matching black/white scrapbook paper.) But so far, it's turning out pretty well! (It isn't glued in yet and I had to sand the edge so it wasn't cleaned up here.)

I used the heavier wood ends of the fan on both sides for stability. For the center top, I cut the pieces from the fan blades and alternated them because of the angles. I trimmed some of the edges to make them straighter and reversed the smaller pieces so they'd fit. They're glued into pieces of channel wood. I used a different stain this time to give a little contrast. 

And yes, there will also be a large gold picture frame on that glaring blank wall in the hall beyond the railing. We'll add a hanging light also.

So far, so good! It's nice when an idea you have turns out - and I'm glad it worked so I didn't wreck the side pieces! Last time, I cut up a lot of blade pieces to get it the boxes how I wanted, but that was expected for a first try. 

Soon: Decorating And...

Getting closer to the best part of building - the decorating. Soon! But there's  a lot of trimming and finishing to do yet. (And then the porch to build outside, and window boxes, etc. etc. I'm using the fans on the porch railing, too!) Once I finish the wall, then the lights can be installed and the  third floor/ceiling can be put in. There is a beautiful (expensive!) chandelier for that bedroom. A one-time splurge though I just bought some more hanging lights again. That's why you don't keep track of costs in a dollhouse. ha!

More building, too! The third floor will have a wood attic above the bedroom, (I used a wooden placemat in this book box for the walls and want to see if it'll  work here as I don't want to cut individual pieces. I used pieces of a wood Chinese calendar in the other HS house attic (bedroom area below), but I don't have any more of those.)  I love having a place to put all the extra stuff and "junk"!); I may add a part bath enclosure here as well, just a part open door showing a sink or something.

 The other two attic rooms in the current house will be a combined craft area and sitting room/baby's room while the mother works upstairs. (Since I have a nursery set to use! Unless I repaint the crib and add it in the master bedroom and use a cradle upstairs. Either way. I don't want it to seem like the Flowers in the Attic books with the kids locked away in the attic. ha!) 

 A girl's room will be in the tower room at the end, which needs false doors on the wall to "connect" it since we didn't put door openings in. Some things just weren't planned at the beginning of working out this house and were changed later. Lessons learned! 😀 

Stay tuned for more! And, thanks again, for stopping by!


March 22, 2021

Replicating Real Life #Dollhouse #Miniatures


The fun of collecting and creating in miniature size is having a realistic replica of something from real life.

 That's evident by the interest in all the miniature toys that are suddenly popular like the Mini Brands food items and the Wacky Packages items - small scale replicas of real life food products and parody products. I admit both these are "cute," though they are more Barbie size (1:6 scale) than dollhouse scale (1" =1').

Most of us creating in miniature like adding those real-life touches, no matter the size. In my case, I enjoy working in 1:24 scale (half scale or 1/2" = 1'). Yeah, it's small, but I like that you can get the realism without it being so small you have trouble seeing it. (Folding things can make you feel like you're all thumbs, though!)  I made the shelf above a while ago for a kitchen. The shelf is 4" long. The printable (printie) food boxes range in size from under 1/2" to just over 1/2" wide and 1/2" high or so.

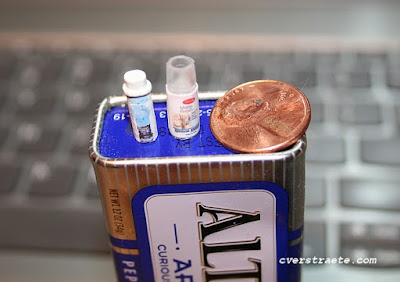
This post actually started with a couple of items I got in last year's annual swap from the Half Scale group. I got a kick out of the paint cans a couple people sent and wanted to figure out how to make more. Hard to get a real good photo as these are only just over 1/2" high. (Emily Morganti made the can on the right using part of an LED Christmas bulb for the cap, she said. Check out her blog - she has some great half scale dollhouses and ideas!)


I was pretty happy with how mine came out using a dowel rod, thread and a slice cut from the end of a wood paint brush to make the cap. I shrunk down the label in my Word program. (They look a little beat-up in the photo since the camera picks up every-single-mark. ha! But on a shelf, they look pretty good.


 I also just found some tiny beads with straight sides that might work for other color and clear plastic caps. They're called Perler Beads and used to hook onto pegs almost like Legos. The pegs are part of shapes like butterflies, etc. 

We'll see if they work for my purposes. The beads are about 1/4" high, similar in size to the clear cap on the first can photo though that one has slightly angled and rounded sides. I'll  try and make some to see how they turn out. You need more than a few cans on a shelf, right? And once you start making something, I admit, you get kind of hooked on having multiples. ha!  I wanted to see what size a 1" scale can would be also, though I'll likely need a larger dowel and a bigger bead. But that's another day. 

I've been making some other things as well for the latest Half Scale dollhouse so stay tuned! 

Thanks again for stopping by!


March 17, 2021

Half Scale #Dollhouse Decorations: #miniatures

 Latest work on the Half Scale Victorian House. 

Read All About It! ha!

I'm waiting on an order of lights to get here  (well, I used some in the previous HS Country House; also see attic interior) so had to get more! Hint: if you're new to miniatures, it's like a real house - always things to do or more things to buy - or re-buy! ha!)

So... in the meantime I've been working on a few decorative items. I wanted to do some different things in this house. I usually use scrapbook paper for the walls. In the upstairs office I decided on a travel theme, so I used this paper. I loved the colors and also used it to line the wall bookcase. It's pretty neat looking in full size. 

(As a reminder for myself, Emily Morganti, who builds/decorates some great HS houses, has this same bookcase in her house's living room. Check out her HS sofa instructions here.)


For fun, I painted some of these silver charms to use as decorative objects on the shelves.

And... of course, I have a bunch of books made already (which I can't find at the moment), but I don't mind making more! (see top photo.) These are nice, vintage-style books. I sprayed them first with matte acrylic sealer, then sealed with a couple coats of matte Mod Podge. Then I traced the designs with a stylus on a mouse pad to accentuate the outlines. I frame the books around picture frame mat board, cut to fit, and paint the edges with Tulip Metallic Gold fabric paint.

I was pretty pleased how this geranium came out! It's not made the usual way. I don't have an actual geranium leaf punch so I used a different, much larger shaped leaf and cut out sections, but it worked out well. It's set in a larger printed bead as I wanted to use the planters outside the double doors in the second floor hall. I'll share some tips on the flower in a coming post. Yes, half scale plants are usually very tiny so I wanted these just a bit bigger than that. 

Something else I forgot to share last time: got the window boxes made! I was making them slightly larger at first but this will work fine. Made them out of wood after all. Once I started, it wasn't so bad! Luckily, I had some channel wood which saved me from making all four sides. I only had to add the end pieces!


And... the other pieces below are wood snowflakes cut in half. I'll paint them and put them above the windows for some decorative elements. There 's two styles since one set goes on the tower and one on the front windows. 

I'm trying to figure out the color scheme as the windows are brown with the vintage white inner trim on a yellow house. I'm thinking fuchsia for the window boxes and a Wedgewood green for the shutters. I plan on adding other contrasting wood trim and decorative pieces to tie it all together. I don't want it to be too plain (as it is now!) (Not sure what color to paint these pieces. Suggestions?)


Until next time... thanks for visiting!

March 12, 2021

Fanning The Latest #Miniature Project...

 Okay, you can groan at my bad pun. Couldn't resist. haa!

But.... you all know those pretty, and very useful, Chinese-made wood fans?


Yup,  we all have some. In fact, I found a bunch a while ago at a garage sale or something (waaaay back in pre-Covid days!) and had to buy them. I didn't have a plan for what I'd do with eight of them, but hey, they were .10 cents a piece. You don't pass that up!! (Click photos for full size.)

But.... as every dollhouse hoarder knows, they'll come in handy... someday. And they did!!

As I shared previously, I've been steadily working on the Half Scale Victorian House. The floors are in on the second floor and working on putting in some trim before the ceiling goes in. I was doing the bedroom, which will have a kind of flowery romantic feel with Victorian-style furniture. 

I used a slightly contrasting fabric for the curtains that had an old-fashioned look. I love-love-love the lace I found for the inner curtains, too! Then I got an idea that had to be done even if I didn't want to do all that measuring, cutting and trimming - fretwork box frames for the windows!


Of course I ended up cutting a lot of pieces to fit right and then replace those that pieces got broke as these are pretty delicate. 


The pieces have to be reversed to meet up since they are angled. I glued the trim on top the cut fan pieces. Then.... of course! - I found they weren't wide or deep enough so I had to glue on extra channel pieces to the sides and back to make them fit. But I'm happy with the results!


The bedroom, it turns out, had to be shortened so I could add a small hall at the back which will have a door leading to the attic. I don't want to build more, but I have an idea to enclose the open part of the bedroom by making some screening with more of the fan wood. (See end of wall below.) I don't want to enclose it totally so I can actually get my hand in there to decorate!

That hall connects to the center room, which has an open space at the end enclosed by a gold fence. There'll be a hanging light in the open space. I think this was scrapbook paper, not exactly half scale, but I like how it looks. I want to put planters with red flowers by the double doors. 

It's hard to see in this photo, but I like that it has a kind of hotel lobby feel to it! I also used the wood fan pieces for the railing around the stair opening. 


Besides figuring out the room screen, I'm also planning on using the fan pieces on the front porch railing. I really don't want to deal with those tiny individual spindles and I think this provides a better look. So, on to the next parts. There's a lot of trim to finish, too, and fix any little mistakes that might've been missed.  Stay tuned for more!