Pages

June 08, 2022

#Fairfield #Dollhouse: More Progress


I've been steadily (ok slowly) getting a few things done on the Half Scale Fairfield Dollhouse. (Photo: Yeah, it's taking so long, it's looking like a desert around here full of dried bones. haa!)

But, so far, so good! (* Update: 7/1  - yes, still working on things. Will have a new post soon! Hope to get some lights installed next and top floor glued in.)

Remember I showed the cool gothicy parlor fireplace in the last post? Now I'm figuring out the opposite fireplace in what will be the dining room, right next to the parlor. (Click photos for full size.)

I had this skull piece I bought from a previous Michael's Halloween sale, and have been saving it... (surprised I found it!) though I wasn't sure what to do with it. I thought it might be a doorway mantel, but I think this will work for the second fireplace. 

Dining room fireplace pieces:

This is just a test so it's not straight yet, but I think it looks kind of cool. The pieces are positioned below but not glued yet. The oval shapes are the bottom pieces cut off the face beads on the front of the parlor fireplace. I painted them a light coat of white so they'd match the skull piece better.

 Another thought: I wanted to use the bead pieces to coordinate with the other fireplace but I'm thinking this might look better without them. I could use the pieces then in the upper bedroom fireplace as I'd thought of perching small skull heads on top of them, which might look better. You can't have too many skulls around, you know. heh-heh.


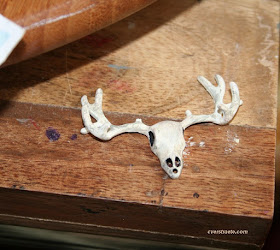
Almost forgot! In keeping with the skull theme, I painted this metal deer skull I found at Hobby Lobby (Timeless Treasures). I think it will look cool above the fireplace. 

The Kitchen:

Back to the kitchen (next to the parlor.) I didn't like how the inner doorway looked since it had three layers -the wall and two doorframes, so I cut some wood to fit. I cut and painted a top inner piece from mat board since the wood didn't want to bend enough. It looked best to paint the edges to match the rooms on each side though the door jamb/floor piece looked best black.

Dining room side:

Kitchen side doorway: The floral paper by the right doorway goes into the front tower/front hall. As the large doorway into the kitchen is open, I extended the floor to match. Wall trim is next and the ceiling before I can glue the alcove to the right side kitchen wall (not shown.) Also have to add the kitchen door and trim in before I close it up. 


The stairs go along that wall so have to figure that out, too, and trim those. I eliminated the outer wall that enclosed the stairs as I think it looks better to have the stairs open. I'll put one of the kitchen pieces in the space under the back of the stairs, maybe the Tootsietoy metal  fridge. Love how it looks against the paper!


Also got the two walls enclosing the second floor bathroom done. Haven't glued them in yet as it's kind of tricky to line up and the ceilings have to be marked first. (So many things you have to pre-plan in this house!) 

Decided to use the sliding barn door (originally from MiniEtchers.com) on the front side of the wall. The wall butts up to the second floor window, leaving space at the end of the hall (so far) for the spiral stairs, unless I think of a better place to put them. The bath will use the faded blue Victorian-style scrapbook paper so I painted the door to bring out the blue though only a portion of the inside will be visible. I tend to re-use the same scrapbook papers in different houses since they look good and I like them, so why not? (Yes, the hall paper below is also in the sitting room in the other more haunted house.)


More doors:


I'd decided to have the  second floor window in the tower cut out for a door instead so I can use the small roof as a second porch instead. I also changed the main door (again) since the door I had didn't open. I like this one better. I also filled that small hole on top of the door with wood since it seemed silly as it didn't really do much. I put a tiny black sequin (cut off some decorated fabric) behind the main doorknob for some contrast. The doorway will be filled in with wood strips and I'll piece the interior paper on the other side and trim it. The colors so far, and I'll be adding other colors for contrast. I decided to do a different color scheme. There will be brick and part siding plus other trim on the exterior.
Testing 1, 2:

I'm also testing out making a mold of the skull piece since it'll never be found in the stores again. Hoping it works. Using Amazing Mold Putty (www.moldputty.com) which I bought a while back. Also trying out PermaStone mix to make the new copy though I  do have a big jar of plaster I can use, too. Will let you know how it works out.  Okay, that's it for now!

Thanks again for visiting. Come back for more updates and projects soon!