April 29, 2022

HS #Minis Swap, Off to Shows!


Yay! I'll be off to the annual Dollhouse Shows in Illinois tomorrow! (Bishop International and The Spring Showcase) I'll try to get photos of displays, etc. and show some of the things I find.

So...in the meantime, figured I'd show the fun items I got in the annual Half Scale Group Swap a few weeks ago. (Click photos for full size.)

Look forward to this every year. Been doing it for years and never disappointed!

The theme this year was Antiques. It's a starting point, but you don't have to stick with the theme.

Top: assorted items. 


Fun stuff! I made the award and dog picture. (The little white package are the checkers; not opening that until I glue them down!)

I made art and the trophies. The statues could be smaller but it's what I found to work with... Trophies, of course, are all sizes...


This was pretty cool. Love this hat and stole set! Maybe I'll make a small stand to hold them.


See you when I get back from the shows!

April 26, 2022

UK #Dollhouse #Miniatures Show Videos


These have been staying up online so I'll post the link:

The latest Episode 5 (and the first 4 episodes) of the UK minis show, The Great Big Tiny Design Challenge, are (so far) still viewable online.  See link. to catch up.


April 25, 2022

#Miniature Tea & Toy Store 2; Happy Birthday to the Queen!


While I'm working on the Fairfield (yes! I have papers cut and ready to go in; paper and trim for the fireplace and I can add some lights! But... the problem with this house (so many!) is all the planning. Do one thing, realize have to do something else first. It gets tiring. Why I start and then get nothing else gets done. More on that later. Sigh.) 

Moving on... I added some new things to both the Tudor Tea Shoppe and the Haunted Toy Store, so thought I'd do a combined post. (Click titles for last posts or look in left column archives. Click photos for full size.)

The Haunted Toy Store

Never say never. I saw mentions online of people finding the Disney Mini Toy Brands, which got me curious. Well, since I came across some at Meijer, I bought one. (But!!! I see some people sharing a mini Dumbo! Oh, I love Dumbo so I keep searching as I don't want to pay $12 for one mini figure.)


Anyway....pretty cute. This one also came with a small shelving unit to assemble. Interesting is they also now have Mini Fashions Brands with purses and shoes (but Barbie sized.) Cute, but I'm not going to start on those (though I could set those up in the Mego Cher doll dressing room I have which is put away... I better not think of that! Running out of display room!) 

I know a few of the items are larger, but in comparison, they work as toys for the Living Dead girl doll. I can also change her out to a creepier doll, too, but she seems to fit in here. 


I also added some of the Lemax haunted toys I got last year  to the wall shelf.  I'd bought two packages then as I thought they were cute and I've learned - they never reissue the same items though they did have new mini gnomes again this past Halloween that were slightly different than last time.  

I also added a Big Bird I found at Petco. It's getting full now like a toy store should be, with lots to look at. Glad I changed this project as these are fun things to look for. (Hey, I still have some wall shelf space I can fill!) 


* * * 

The British Tudor Tea Shoppe
Happy Birthday to Queen Elizabeth, who just turned 96 and is celebrating 70 years as monarch!

I probably made this project some 20 years ago, but looking at it again, I realized my big oversight - no Union Jack teapot! Gasp! Well, when someone online shared a photo of a set they'd seen (Timelines brand) at Hobby Lobby that I'd never seen there before, of course I had to find one! Naturally they were out of them at sale time, but I went back again and found that plus this pretty set of pitchers for flowers and a nice silver tea set. I'll save those for other projects. (Funny that I went back again and the sale was back on so I got another British teapot set, this time at half price!)


The Union Jack tea set really adds something to the bottom shelf here, don't you think? (The blue book is a Dateman miniature photo book from the UK.)


I also decided to add some flag bunting and a small Jubilee sign outside, plus some more flowers. It thought it looked kind of bare before. It needed a few pops of color, right? This project probably sat for 10 years or so, so it needed updating. I added the new newspapers, too, and the Queen and Prince Philip portrait inside.


Some other additions include these really nice handmade pillows from a UK maker at Etsy (LadybirdandPenguin), so I had to add a couple. (And they were so reasonable, just under $2 each!) I think they really add a nice touch.


I also added the ceramic Jubilee sign (a button) and a thimble from Birchcroft China/Etsy, also in the UK.  I like adding things that are British made for authenticity. Even the food as that meal plate on the table (second picture above) and the large black tea container on the floor (partially shown at right below) were from a dollhouse shop in London when I went there years ago. The silver model below (and a toy dragon by the shelves) are from Westminster Abbey. The photos on the wall are from the trip, too.  I'm sure I'll keep adding a few new things, but I'm running out of room!


Thanks for stopping by again! Hope you enjoyed the tour! 😃

Stay tuned for more posts. And the dollhouse shows in Chicago (Tom Bishop International Show and the Spring Showcase show in Schaumburg, IL) are next weekend, so really looking forward to that! Will share photos of what I found and things I found interesting.


April 08, 2022

Miniature #haunted house update


I was going to post this at the end of March, but time got away from me. Anyway, here's an update of a few thigs I got done since the last post. Yeah, I know, slow progress but...? 

The roof is done (ghastly project) and I think it came out pretty well. Any goofs I covered with moss in strategic places...  ha! I got the fence from Alpha Stamps (I cut and used the smaller pieces on my other Greenfield haunted house) but I also got a bat border which I might use in front. Have to add those around the roof edges yet.

I put a vine on the side, too, for many reasons including that I lost the original top window piece and had to cut a new one which wasn't quite perfect. But I thought the vine added something.  I also made a section of ferns and wisteria blooms (purple floral soft/shredded foam glued to cloth wire) to add to the front yet. As you see the octopuses are not on yet, either. ha!


Also made a few flowerpots to put on that really too small for much else balcony in front. I'm thinking of making a new patio/outside front yard to put some statues and things, maybe some seating areas with gardens and shrub borders. Have to figure it out yet. The idea: I'd like to add a semi-formal eerie garden with animal topiaries (like in The Shining) could be cool. I found a couple small plastic toy animals I saved to cover in green grass (that's why you have all this weird stuff!) Stay tuned!

The fun part: some inside stuff: 

 The gothic bookcases turn out to be too tall for the second floor since I didn't want to cut off the front cross. So I shaved it down a bit and decided to use the single one on the first floor. I'll use the double set in the Fairfield (which I checked and since the second floor where I want to use is only 4 1/2" tall (the first floor is 5" tall) I'll probably cut the top crosses and re-glue them. (from SDK Miniatures.)

The small bench is a southwest style piece from Annie. This was fun: once I saw this spiderweb table set at a show some time ago from Michelle's Miniatures, I knew the quarter-scale table would work as a half scale side table. (Oh I see she has a cool spooky face Adirondack chair in half scale that would be fun to get!)


* The 'I Thought of It, So Now I Have to Do It' Idea:

Once I thought of that light under the stairs, well, I knew it would bug me unless I tried something. (The photo is red as I covered the flash to show the blue light.)

Soooo...  The back wall here actually was pieced since I had changed the original staircase top tread and had to fit a new back. I filled it in with three pieces since I didn't think I'd be pulling it out again. 

I decided to use the round piece with a switch from one of those cheap tea lights. I changed it so I had to solder a new blue LED light to the metal. Next, I measured a new full back using picture framing mat board, stained it (Gloss Mod Podge tinted with Brown Umber Acrylic Paint) and then cut out the hole. I glued the switch in with Quik Grip and then glued the picture back on over it, cutting out a small slot for the switch. 

Ta-dah! It's all lightly glued so I can take it apart to change batteries and then re-glue when needed. It's more a novelty so I won't be lighting it that much though. Next time, (yes there'll be a next time if I plan it ahead!), I want to try using one of those blinking LED's. There are tea lights with those but I didn't have one handy.


That's it for the moment. I added a few things to the toy store and the Tea Shoppe, that's for another post. Even more fun: got some cool things in the annual half scale swap and the dollhouse shows are coming up at the end of the month. Be sure to come back for more photos!

Next?


And.... yes.... I got the Fairfield out. Again. I'm determined and just don't want to quit on this yet. The two sides are glued. Realized I left one small wall part out that I can't fit in now so I'll have to cut it into two pieces for each floor. And next will have to wallpaper the inside of the tower to fit it in and put brick paper on the fireplaces. I studied and restudied those instructions, trying to ID pieces so it's (kinda) starting to make sense. Changing some things, of course. Will share again when I have some real progress. 

Thanks again for stopping by!

March 21, 2022

Give Me Your Two Cents! #haunted #miniatures


 Here's your chance to weigh in!

Since I haven't decided yet and everyone loves to share their opinion (ha!), for fun I thought I'd ask for input. Who knows, you may agree with me or change my mind! Give me your two cents on which windows looks best with this octopus decoration. 

I used one of these Cthulhu (I never can spell this right!) octopus decorations as a light on the sitting room wall, but I thought they'd look pretty interesting on top of two of the windows in the front of the house-- but which two?

If you can comment, please do and let me know which number you like. If you can't comment, you can contact me at my website and leave a message with your choice. Or let me know on Facebook or on the Half Scale group if you're in that as I'll be posting there too.

** RESULTS: A few answers.  One liked the bottom; a few liked the top. A different answer I didn't consider was putting it on the bottom of the top window. (Considering it.) And an unexpected answer was not liking any. So, there it is! I'll try a couple temporarily, I think. Thanks for the input. 

Here's the choices: (click photos for full size)

1 - Front bottom windows


2  Front center windows. (I thought this level had enough going on already with the windowboxes and small deck?)


3 Upper shaped windows (But I thought maybe this makes it too busy with the peak decorations already there?)

What do you think? Which one do you like?

(Yeah, I've gotten further on the roof. Close now but what a *&^ job.)


 Will let you know the results and the final choice. Thanks again for stopping by!

March 17, 2022

Thrift Store Finds! #dollhouse #miniatures


 Got some good finds lately at Goodwill. The miniatures lately have been few and far between, but I lucked out recently. (Click photos for full size.)

Top photo: I found these cool figures a couple weeks ago. They're actually thimbles, I guess, but are perfect for figures in a lady's shop, on a counter or something. I also found a working double window for only $2.99!

This week, I actually found a bunch of furniture. A couple good pieces and cheaper stuff, but that's ok. I'm not doing as much 1" scale, but I have several boxes to fill yet. Painted or not, it's good as filler furniture.  I haven't come across these painted dollar store furnishings in a while (and at least they had them priced at the right price, 99 cents each.) I may use them in a flower shop for now. I have a Halloween storage box I bought a while ago, so maybe I'll make a potion shop or something. Haven't decided, but I'll probably get in a flower-making mood again once things start blooming in real life.


The brown desk is interesting; older piece as it was made in Taiwan.


Speaking of flowers... got a bunch of punches. Snowflake, a couple others, but I was mostly interested in these two: the pawprint will make good petals and the other will make a neat flower.. have to experiment. Poppy, maybe? Here was a good find, too - a bunch of 1/2" flowerpots for 50 cents. Nice to have a variety instead of just the wood pots.


That's it for now. Thanks for visiting and looking! 

March 14, 2022

Another #Dollhouse TV Show - in UK

 Well, maybe some US companies will get on the ball here... eventually.

Michael Robbins (who makes cool spooky items under the name Michael R Miniatures on Etsy) announced he's one of 10 contestants on a new UK miniatures show, The Great Big Tiny Design Challenge, which airs March 28 in the UK. Here's the YouTube intro. 

We can only hope this and the other minis show will get picked up to stream somewhere that we in the US can watch both! 

* FYI: All the episodes (so far) up to #5 at this writing on 4/26 are online here.)

Looking More #Haunted - #Miniature House Progress


Just a few photos this time. As I mentioned in the last post, I'm working on the roof, which to someone who is math challenged and has to cut angles on each side in the center - no fun! (Click photos for full size.)

So, working on that. A few changes - put some weeds on the front , in the windowboxes, and next to the chimney on the side roof. Finished that side and started seeing how some black paint looks. Will have to add more, but getting there... * NOTE: Further along on the roof. Oh, what a project! ha!


The fun part - printed out some more art to use as creepy portraits. These are as addictive as miniature books. Can't get enough! I definitely wanted to add the knife to one picture, ha! So back to the roof now. Working on the angles in the center. Ignore the screams in the background, ha!  Hopefully will have other progress photos soon.  


What do you think? Thanks again for visiting!


March 11, 2022

Progress! Haunted HS #Dollhouse

 Yes, I've been quiet, but steadily (slowly) working on the Half Scale Haunted House. I've been working on the tedious parts, putting brick paper on the outside and started the roof. There is progress! (Wow, has it been since January when I last posted on this house? * See latest post here.) Update: The roof is almost done. Working on the center part now.

Added the balcony and also put two windowboxes on the second floor. They look crooked in the photo since the insides are painted the same as the window but they're not.)  I also decided to leave the bottom fancy trim showing under the brick on the top sections. Thought it added something.

I'm using the textured brick paper from  Starboc2 on Etsy. Gives just the right effect! To be truthful, I still have the section on the right side to paper yet and have to glue the window trim on.


I'd put off doing the paper as it takes time but I'm now on the really tedious part - the roof. I knew I wanted to use the corrugated paper and I'd seen a house where it was cut in rows. I like the effect as it fits the style of the house, but what a job as I have to also cut around the chimneys. But I really like how this is coming out.

I used the silver-coated paper as it's a little heavier. (I found another sheet but it's glittery (only one they had) so I'll have to really paint that more. ha!) I'll still do some touching up and adding some black paint on the roof to age it so that should help cover any spots showing through yet. Love how this looks as the building has that aged look I wanted without my making it too dilapidated!


I'll be putting some lichen and weed-like plants in the planter boxes. I'll also be adding some vines and lichen along sections of the brick and the roof. I'm debating on making some wisteria vines, too, as I like the flowers and think they might add something. The hard part will be cutting the roof paper for the slopes and making sure it's even. 

The light on the wall helped in the attic. I just found the last three sheets of that heavier floor paper at Michael's in a grayish color, which I can also lightly paint if I want. Makes good flooring once you draw the lines on.


So far, so good. Will post again when I have more to show! Thanks for visiting!


March 03, 2022

(Not So) Haunted #Miniature Toy Store


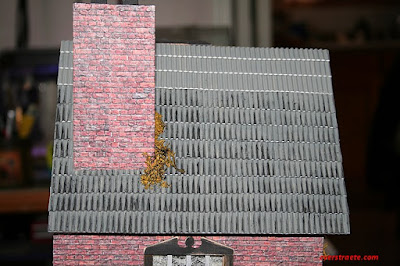
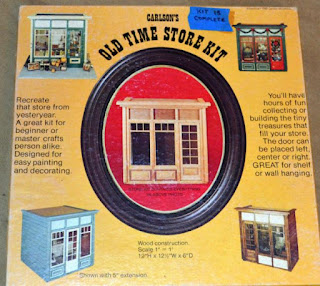
I bought this Carlson store kit a while back from someone online and had finally gotten around to decorating and painting it some time ago thinking it would be a haunted bookshop.

Well, like always, I changed my mind. (Yeah I hear you laughing. 😏) I have plenty of other book projects and ideas like the fancy furniture I have set aside for the Someday Upscale Library roombox.

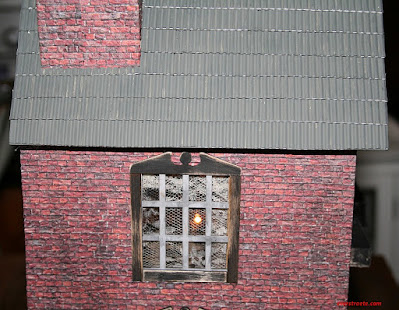
Then when I found those Mini Toys I shared on a previous post, I knew the project had to change. But how to change it without really changing it? I wasn't about to repaint the whole thing, so I changed the title and a couple of the outside pictures for one. (Click photos for full size.)  I put plexiglass on the top with a carved wood medallion on the ceiling inside. (not shown.) (More toys, update 2)


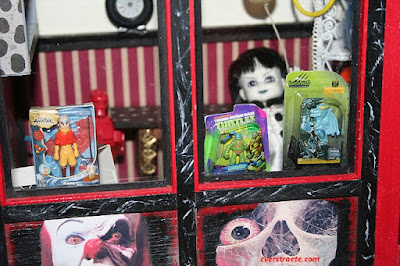
Toys in the front windows:

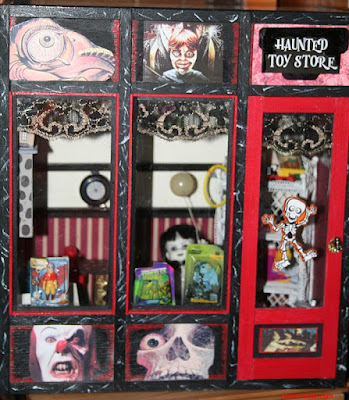
Actually, I'd set the project aside as I didn't think the front would hinge right. Luckily, hubby got some screws to fit, so the full front will stay on. I just had to add some top and side inside edge trim for the gaps. Since the outside already was all painted and decorated with creepy pictures, I figured it could become a Haunted Toy Store instead...

And while the majority of the toys aren't creepy, I figured why not? That little ghoul girl in there (Mezco Mini Living Dead Dolls) fits perfectly so she's shopping. Besides, even creepy kids love all kinds of toys, right?

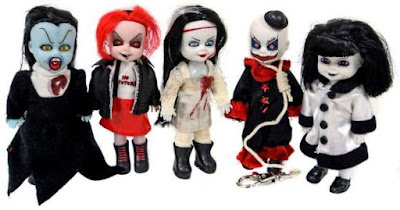
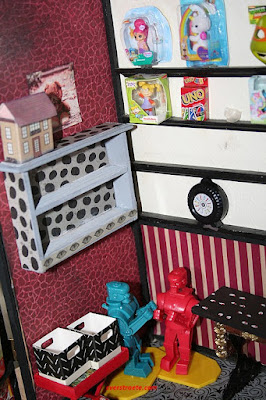
 As an aside, I'd found a whole bunch of those dolls awhile ago at Goodwill of all places, cheap. So eventually I want to do a Halloween party table scene. Here's a pic I found online. I think I have the first one plus the red-haired punk and the last one, plus a bunch of others. I also have some full-size dolls we found at a yard sale. I love the little ones.

The back wall shelves were already installed, so I added some striped paper on the bottom for more contrast and added a wall shelf on the side, plus some creepy toy pictures. Some of the Mini Toys may be slightly larger, but I think they look fine for display. And now I'm hooked. Of course, I'll have to get more. To fill the shelves, you know. (wink, wink). Games will go in the bins on the small table. I'll make more from printies. (TIP: Google dollhouse game printies.) The other table is a sewing machine base topped with spooky scrapbook paper.

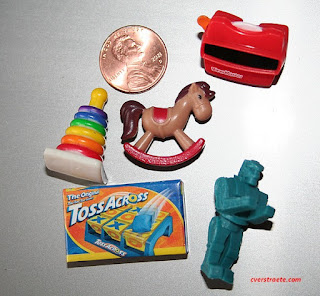
The Rock 'Em, Sock 'Em Robots are from the larger-sized Worlds Smallest Toys. Cute, though much bigger, but I figured they can go in here, too. Remember those giant walking dolls from the '50s?  It's all trial and error with the sizes on these mini toys and they keep coming out with new stuff, too. I'm ignoring the Mini Wacky Packages though I could get hooked on those even if they are larger. (I remember the goofy cards. ha!) Funny! The new batch of toys I just got includes a tiny Rock 'Em, Sock 'Em Robot.

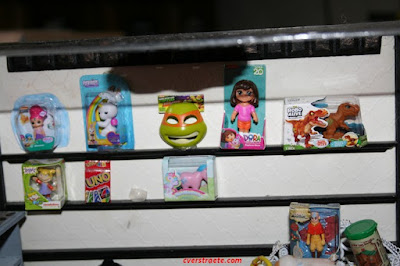
The canister on the top shelf is Lincoln Logs (non-opening.). The other is an Avatar figure, which is also in the window since I have two. I added the Kewpie doll as well. There's a very large package of Tempura paints on the second shelf (the economy size I guess. ha!) The skates and animals are erasers. I found the cute Oscar the Grouch figure at the fish department at Petco! You do find stuff everywhere. ha! I repainted the can silver and want to find some green Bunka to make him fuzzier. (Of course, I have every other color but!)

 The back wall before the additions:

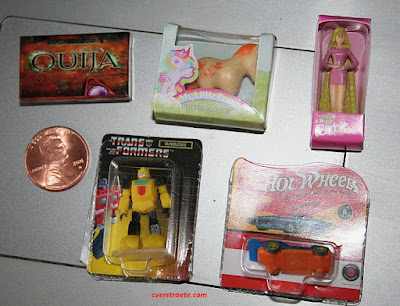
So, to me, as I show here, I think you can make almost any size of miniature work, depending on the project. Here's the other batch I got. It includes a second My Little Pony in a different color. The Ouija box will go in my haunted house, of course.


This'll be about it until I add more games. It gets too expensive. Last time I bought a lot of items was when I when I was decorating my Dogcatcher's House. I had to fill it with a bunch  of dogs and at the time, you could find some in 25 cent gumball machines and they also were selling $1 packets of toy dogs that came with that lousy stick gum (like you found with baseball and collectible cards). The hunt was fun, even if it adds up money-wise since there're probably 100 dogs in that house. But who counts, right?

Thanks again for visiting! I appreciate your interest!