July 30, 2019

#Paris #Miniature Project 21 - Flowers!

Welcome back!

Remember Gigi shared in last week's post about her floral plans for the balconies???

Well. here are two of the finished samples. LOVE them! Love the color and how they cascade over the window box. These will really look good at the upper floor windows....  Love the fullness, too. (Ivy and Geranium flower kits from TheMiniatureGarden (UK) on Etsy. She really has nice kits in 1/12th and 1/24th scale.)
     Great job!--Chris 

*** And on Friday's Update - Yes, there will be one! Wait'll you see the curtains and.. some construction! 

****************************************


The planning continues for the Paris Miniature Project which is my friend Gigi's  Serendipity Shed renovation for the HBS 2019 Creatin’ Contest. 
(Click photo in left column to go to Day 1 or here - Day 1  - See last entry Day 20.)
 * Don't forget you can put your email in the subscribe to updates box under the Paris photo in left column also to let you know when a new post goes up.

Until next time… Happy Creating!--Gigi

July 23, 2019

#Paris #Miniature Project #20: A Month Later!

Ta-Da! Yes, it's a new Paris Miniature Project Update!!


It has almost been a month since I last provided an update, yikes!  It’s been the summer laziness that has gotten to me. I manage to do the schoolwork that I need to do, then just read or binge watch shows on Netflix. I need to get motivated as I will also soon be a teacher’s aide in the English department at my son's school. I'll be working 20 hours a week so I will have to definitely prioritize my days. But, enough of that and on to what (little) I have accomplished.


I ordered four kits from TheMiniatureGarden on Etsy of the Ivy leaf and red Geranium Paper Flower for the two balconies on the second floor. The photo (above) is from the seller on Etsy showing the finished products available. As you can see, they trail longer than the typical geranium flower. Most likely I will have two kits per flower box. I made the flower boxes below from scratch to fit on the balconies. 


I did finish working with the curtains. From the picture it may seem one is longer than the other, but that's not the case. They are long and will be “puddle” curtains that sitt on the floor. I have attached little golden tassels to each side. These are also on Etsy (highlandminis) along with the expandable curtain rod that I'll use for the third floor windows (which are all painted and glued into place. So, a wee bit more progress!

Next step is to finish the second floor which will be a beautiful deep maroon wall-to-wall carpet, then the second floor can be glued together. I am getting so excited for all three floors to be put together. I really like the inside rooms, but it's the outside I'll have the most fun with!

Thank you all for being so patient with me on this journey. I do hope you're enjoying seeing the pictures. Please do leave a comment and even suggestions. I appreciate hearing from you!


The planning continues for the Paris Miniature Project which is my friend Gigi's  Serendipity Shed renovation for the HBS 2019 Creatin’ Contest. 
(Click photo in left column to go to Day 1 or here - Day 1  - See last entry Day 19.)
 * Don't forget you can put your email in the subscribe to updates box under the Paris photo in left column also to let you know when a new post goes up.

Until next time… Happy Creating!--Gigi


July 22, 2019

Update: Miniature Record Store

I thought of two other roomboxes before I decided the corner kit from the Houseworks Street of Shops would be perfect for the miniature record store.


The hardest part after that? Painting! Ugh. I hate painting. It seems like it took forever to figure out the colors on this. Still doing finishing touches and of course I see more places to touch up. ha!

The other two shops will be Halloween (fortune teller shop and a Halloween store) so I figured I'd tie them all together with purple. I like the dark purple marble effect instead of black for a change.

One of three or four record tables in progress, too! I have A-LOT of records to make. haa!

July 19, 2019

Update: HS haunted House + Easy Fence Tutorial

I finally got back to finishing some details on the Half Scale Haunted House. (See some exterior photos here, the gardens and the beginning and inside.) (Click photos for full size.)

The house is a Greenleaf kit I've had for ages and finally decided to work on as I knew it had to be a spooky house! 

I think putting on front window boxes and the fun purple moss definitely added a nice touch of color! I also added green moss to the roof (which helped cover some things) and thin dowels on the top peak edges, which don't show here. There's a puff of smoke coming out of the chimney, too! Next is adding in the LED lights and decorating inside - that's the fun part! But other than the hard time measuring wallpaper and roof pieces to fit since the house was pre-assembled, I did enjoy working on this house. I just wish the rooms were bigger

The roof porch has a piece of trim along the top edge but it looked too plain as it was. I knew it needed some kind of fencing, but what? Here's an easy, inexpensive way to add a fence to your project:

Easy Roof Trim Tutorial

This is an easy way to add decorative trim to a project. All you need are scissors, tacky glue, paint and your preferred varnish or Mod Podge. I used Ceramcoat satin water-based varnish. The fence is the 2.5" tall wrought iron fence from AlphaStamps. Do a search and you'll find lots of nice fencing and gates to use here.


The fence is chipboard, a kind of pressed cardboard which makes it easy to cut and paint. What's nice is it's also flexible and bendable, so it's easy to work with but it will be sturdy once glued in place.

 I chose this design as it has two sections. I thought it would look best for this project to use the part without the points, so I cut off the bottom design with scissors. You might need a little light sanding to smooth down the slight bumps on the top edge.


Measure size to fit space as needed. I tried to match it up so each end would mostly have a bar to make it sturdier. Paint both sides with black acrylic, then seal with a varnish or Mod Podge. 

Glue in place along front section if needed and at edges and bottom. That's it. Very easy!  I'm sure there are tons of other uses for this, too. Have fun!


(I know this doesn't show too well with the black against dark purple. I'll try to get outside shots once it gets a bit cooler.)


July 16, 2019

Update: Miniature Window Room

Updates will be coming soon on Gigi's Serendipity Shed. I've seen it in person - looking good!! She's doing a great job and adding some neat little touches.

In the meantime,  I wanted to share the progress of the interior of the miniature window room box I first shared here. I love how it turned out!  I'm just going to glue down the table and chair as I won't be taking it out. I also do have a couple tiny doll figures that - of course - I can't find at the moment. So I'll have to add them later or put them in another project.  Ignore the blank spaces as those are covered by the front. I'm working on adding the frame and acrylic to the box front at the moment.  (click photo for full image.)

The boxes on the floor, book covers and cabinet are from Dragonfly International. I found a couple Raggedy Ann doll boxes online and made the other boxes, signs, album and game printie myself.


And well, here I am trying to make a "nice" project, right? 

Look what I found at this fairy garden site: haaaa! Cracked me up. They're 2" tall. (They also have some cute Halloween figures and sets.)


June 28, 2019

Miniature Inspiration - Street of Shops, records

Looking at some ideas for projects I've had in mind...

I got another corner shop and double window shop from the Houseworks Street of Shops. 

I also have the single window shop and an extra corner shop to do yet. Deciding which will be what store. I like the corner shop and was thinking of using that for the witch's bakery. The single window shop will probably be the fortune teller's house next door. Maybe I'll use one for a ladies shop. I have lots of stuff saved for that! I'll have to make sure I can fit them together in one space as that looks so neat that way. 

I have two others I made a long time ago, my miniature tea shop and a spooky plant greenhouse.  (See finished pix here.)

Then the big project is a record store. But... holy cow. I've barely begun making album covers based on these examples I found, especially in this video below!

Some records (a few!)  I made previously:


* 1970s record store

* Scale model exterior record store

June 25, 2019

#Paris #Miniature Project 19: Latest Work

Wow, we're on Day 19 of the renovations to the Serendipity Shed!
(Click photos for larger size!)


Bonjour! Finally, some progress, but it may slow down again as for this week and next week I have overlapping classes so that means double homework…sigh.  I am diligently working on the assignments to allow myself some fun time.

YAY!! The first floor walls and floor are glued together!!!  


I am so excited to have the first floor coming together! Each floor will be its own module and can be set aside as its own “room box" so to speak. So, each floor will have its own floor and ceiling. This will make it easier to transport and to turn the LED lights on and off. Obviously I still have to stucco and paint the outside walls, and put in the windows, but there is progress.


Speaking of the first floor, as I have some mismatched furniture pieces, they are drying with 


the second coat of varnish to match the round table.  So, the first shop is coming together nicely.

As I am hoping to get the second floor module glued together soon, work is continuing on the second floor as well. I finished the door. The door on the inside is a rose matching the wallpaper and on the outside it is bright red color to make it “pop.” I love red and I 
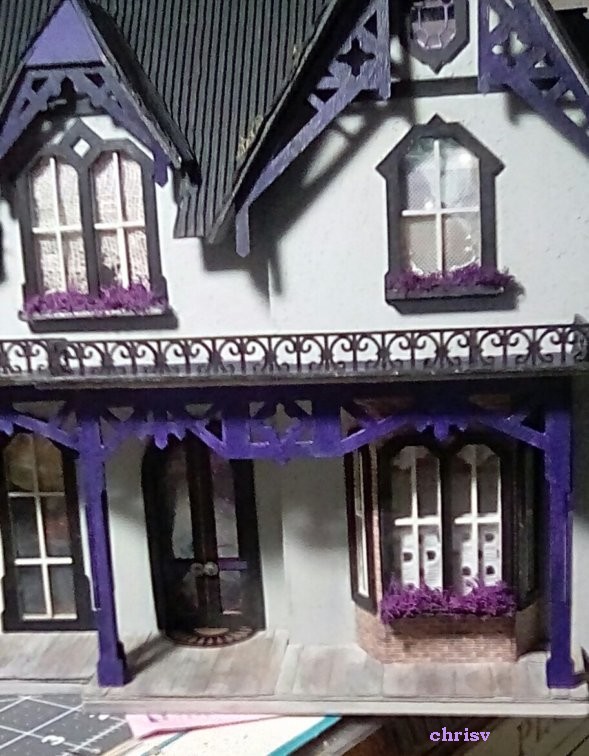
just had to bring in the color somewhere. I love how the door turned out. (Image 1 doesn't quite show the tone. But that outside red really adds something!--Chris)


Work has begun on the small balconies outside the second floor windows. The windows are in already, but the shutters and trim are just laid out for this picture. I will glue I place once the second floor module is together.  (I am assuming you are making small "boxes" for the balconies?--Chris)


The final picture is of the second floor windows from the inside and the start of the curtains.  The curtains are a silky yellowish gold and have been pleated at on the upper half. The lower half will be tied slightly back, and they will “puddle” on the floor. (I really like the color. The whole thing is looking really good - and I've seen it in person!--Chris)


So, my dear followers, thank you so much for continuing to come back and share your opinions. Please leave comments and any questions you may have. Your input does provide inspiration and ideas!


The planning continues for the Paris Miniature Project which is my friend Gigi's  Serendipity Shed renovation for the HBS 2019 Creatin’ Contest. 
(Click photo in left column to go to Day 1 or here - Day 1  - See last entry Day 18.)
 * Don't forget you can put your email in the subscribe to updates box under the Paris photo in left column also to let you know when a new post goes up.


Until the next time… Happy Creating!

June 21, 2019

Latest Mini Projects: Window Room

I had shared this photo on FB recently and didn't say what it would be, only that it'll feature an old favorite....


The kit is a wall-hanging window. It was a 2015 NAME  Day (National Association of Miniature Enthusiasts) kit called "Window Shopping." (See some finished and framed examples here.

Someone also let me know (after I had problems following the pictures in the instructions and finally figured it out) that there were also directions in the NAME Gazette. (Nice they have all the issues here. See Vol. 44 #6 for this project.). Funny as I'm usually pretty good with instructions but I pulled out this kit and put it away three times before I finally tackled it!

I thought it was a cute idea and a small simple way to highlight a few items in a collection. I was lucky and picked it up at a show for $10.

So.... what is mine going to be? Well....  I had done a previous shadowbox on a specific theme and thought this would be perfect for some of the smaller items I have, some came from my Half Scale group's annual swap.

Ta-da! 
Here's a preview of how the room is set up so far. This is a test fit; I have to glue everything in yet. I'd really enjoyed doing the other small shadowbox, (see photos), so I thought this would be a perfect follow-up and something I could also hang on a wall. The fabric Raggedy print background and the bookcase kit are from Dragonfly International.

The walls and floor have to be glued in yet, but I have to paint, measure and glue in the wall shelf brackets first. This is one of those kits that you have to make sure you do certain steps first. That outer frame as seen  in the top photo will be covered in a brick wallpaper.


The Low Bookcase kit from the Girls' Bed Set is 3.5" h, 3 7/8" w and 1" d. It goes together nice though a hint is to add some strong glue like E6000 or Quik Grip and hold with rubber bands until it dries to get a tighter fit. 

I also got a set of Raggedy Ann book covers from Dragonfly for the bookcase and plan to add some flowers as well. I'm thinking of putting in a white wire chair and a small doll as I also got a fabric Raggedy print dress kit from Dragonfly, too.  Next time, I'll show any further progress I make.

And still working on: 
Yes, I'm a procrastinator. I still have to put the lights in the Half Scale Haunted House I was working on, which is set aside at the moment.Then I have to cut, paint and add a chipboard "wrought iron" railing on the roof edge that I got from AlphaStamps. This one is nice as it's 2.5" h and I can cut it into two pieces. I'm going to use part of it for this project and then I'll still have another piece to use, too! So, still working on that, as well.


If you can't tell, the "vase" in the left poppy flowers below is a bone portion from part of a Halloween bone-parts necklace. Ha! The fuchsia plant is made from a Bonnie Lavish kit. Loved making it and it came together easier than I thought. I have to put a hanger on it yet. Definitely want to do another. These are 1" scale flowers, but I like using this size too even in half scale as some of the HS flowers can be so tiny! The house has 1" scale plants out in front anyway and they fit fine.


So that's the progress so far.  And yes, I'm working on a writing project, too, but it's nice to keep the creative juices going in both areas. 

Until next time! Thanks for stopping by.

June 18, 2019

#Paris #Miniature Project 18: A Peek!

Gigi's been waylaid with other things at the moment, but we did get together and were moving furniture around! Sometimes the hardest part is finding what fits and what looks best.


Here's a peek at what she's been deciding on and what got painted.

That cabinet really looks good. Oh, and this is new!!! Is that a red door I see? LOVE it! Update: That is the second floor door - and it's red on the outside and rose on the inside. Nice! That looks great and really makes it pop! Nice contrast with the wallpaper, too.

Stay tuned for more details as we proceed here!

Until the next time… Happy Creating!--Gigi


The planning continues for the Paris Miniature Project which is my friend Gigi's  Serendipity Shed renovation for the HBS 2019 Creatin’ Contest. 
(Click photo in left column to go to Day 1 or here - Day 1  - See last entry Day 17.)
 * Don't forget you can put your email in the subscribe to updates box under the Paris photo in left column also to let you know when a new post goes up.

June 11, 2019

#Paris #Miniature Project 17: More Progress!

We're baaaack!

(Note: There was a glitch where the comment section seemed to disappear but it looks OK now. So don't worry, we're not ignoring you! We appreciate your comments!)


Bonjour Mes Amis!  I am back, finally!  Last week was so busy with homework as I even had to do a five minute video presentation of myself talking about the assignment.  You can well imagine how many retakes I did…LOL, but it is behind me and I even got a perfect score! 


Thank you for your input in narrowing down the colors for the color on top of the stucco.  The color choices are shown in the picture so you can see the green trim color of the shop.  The roof above the window will be copper.  From left to right:  the white blob is the stucco which is really an off-white look. The first color is mocha, then provincial blue (as it has been renamed), and sage. I even asked my 14-year-old son which color he liked best. He did not like mocha, but he was undecided between the provincial blue and sage. So, my dear readers, please choose the color. 

 (My two cents - I do like the sage, but yeah, it is so close to the green anyway... So maybe the Provincial blue will work better? But I admit, I'm not sure of the blue with the green... I'm wondering... maybe a gold-tone would work even better?--Chris)


I got the “tiled” floor done. It really looks old and feels like tiles. I got the DIY from YouTube and of course I cannot find the video again to give credit. I took the wallpaper sheet resembling tiles and lightly sanded it, then used Triple Glaze. When it was dry I scored each row horizontally and vertically. I gently folded each row to expose the crease of each “tile row.” 

(I saw the application in person and the Triple Glaze's thickness and texture reminds me of Diamond Glaze,which I've used on small projects for dimension. The Triple Glaze really does give a nice "thicker" texture. I'll be seeing this in person this week so I'll have a better idea how it looks.--Chris.)

Next, I used black shoe polish over the paper and the black polish got into the scored grooves causing it to look old. I love it!  I also got the ceiling done. It’s plastic tiling that was painted to look like the old copper ceiling. I used a jewelry finding for the circle around the light and the light is from Lisa Hicks at  https://aweebitteeny.com/.

(I have to say, I LOVE the old tile look on the ceiling and floor, and the colors. I have the same shop kit that I may use for my witch's bakery or the Fortune teller's shop and I just may copy this color scheme. I also would like to try out this floor process.--Chris.)


While I was waiting for things to dry, I started a kit from Jane Harrop, (www.janeharrop.co.uk). Her kits are fantastic! This one is a kitchen cabinet kit. I painted it a light sage to match the little cabinet to the right. I still need to complete both add hardware.  (Love the kits! And the colors and pieces are all looking good!--Chris)

This cabinet (without the sink) is from Julie Warren (Little Bits & Pieces). She has lots of videos on YouTube, is on Facebook and has a shop on Etsy. These two pieces will be the part of a small kitchen for a quick bite to eat. The fireplace on the left is the final choice as it has a low profile and looks fantastic with the “wrought iron” screen from Sherry Taylor (Smallsminnimall on Etsy). The unpainted shelf with hooks and book ends is from www.Artofmini.com.  More will be coming soon! Thanks for following along!


Until the next time… Happy Creating!--Gigi


The planning continues for the Paris Miniature Project which is my friend Gigi's  Serendipity Shed renovation for the HBS 2019 Creatin’ Contest. 
(Click photo in left column to go to Day 1 or here - Day 1  - See last entry Day 16.)
 * Don't forget you can put your email in the subscribe to updates box under the Paris photo in left column also to let you know when a new post goes up.