The Sun-Times ran a full page obituary yesterday on the death of miniaturist Hank Kupjack.
Kupjack, son of the late Eugene Kupjack, carried on the "family business" with his brother, Jay. The father was one of the principal artists who worked on the legendary Thorne Rooms at the Art Institute of Chicago.
Growing up in Chicago, the Thorne Rooms were one of the highlights of a trip downtown, along with seeing Colleen Moore's fairy castle at the Museum of Science and Industry.
Another legend is gone.
February 21, 2019
January 30, 2019
January Projects: Miniature #Dollhouse Books
BOOK-MAKING!
(PS - If you're looking for real-life books, check my comprehensive list on the Pages tab at the top of the blog!)
I posted before about making miniature books. Yes, I'm still at it and came upon a couple cool ideas. (Click photos to see full size.)
I've been making an assortment of faded, old-looking books. Here's some of them:

I also was making a bunch of modern horror books before for the Mini Horror Bookstore project. I put that on hold for a bit.
Thanks to Jennifer's Miniatures on FB for offering a great tutorial on making "fancier" books. A few ideas I'd used before; a couple I tried and made some different books this time.
Here's my version - Fancy Mini Books:
I resized the sheet of vintage book photos to a 1", 3/4" and a smaller half-scale 1/2" high size. I always spray the sheets with matte acrylic or fixative so they won't smear when I varnish them.
I tried matte Mod Podge, but it didn't give enough shine, so I coated the covers with one light coat of gloss Mod Podge. My thought is that more expensive and "leather" books do have a slightly shinier surface.

Cut out covers. I always trace the edges of books with a matching Sharpie or other marker to mask the white edges. Color in the inner edges of books with the same color.
Inside: I like picture frame mat board as it's easy to cut with scissors and is simpler to use. Measure the board piece to fit the book interior. It should fit so a little cover overlaps the board on each side.


When dry, glue mat board inside cover with Tacky glue. Some books require two pieces of board for thickness to match the spine width.
Bookcase Idea:

I opened it up and it's a key holder box! I thought it would be perfect to turn into a kind of inventory box to store my miniature books until I need them. (The bonus being that they'll be easy to find! ha!) The nice thing is the box has sturdy hinges and a good clasp on the side to keep it closed. I just have to add a hanger on back if I want.
The box inside has two rows of wood strips with the key holder hooks. I removed the hooks, then found a photo online of books on shelves.


I'm really happy with how it turned out. So keep an eye open as you never know what you'll find to use for a project! Now to fill it....
So far there are just over 50 books in there... yes, a compulsive thing that I won't be happy until all the shelves are filled! Stay tuned. haa!
What are you working on? Feel free to share your latest find or project idea!
www.cverstraete.com
December 28, 2018
The Year in Miniature 2018
I always like to sum up what I've made for the year. Sometimes you think you haven't gotten much done until you look at the photos. And I realized looking at the calendar, I better hurry up and plan this! (Click photos for full size.) And I'd love to see what you made, so feel free to share your blogs or websites in the comments! (Not you spammers!)
(The problem is remembering... I'm sure I made things early in the year, too, but I'll list this starting in summer!)
July
The MiniDoll list chose this fantastic illustration as a theme. I had to do this in a book box. Eventually I will make and add the doll. It also got a first place at the county fair in August.

I also made these mini plants and was surprised to get a reserve grand champion at the county fair.

This is my goofy entry for the fair in their special contest. The theme was Baa Baa Black Sheep. It got second place.

October
I love making Halloween items, and not just in October! Of course I had to make a spooky table!

Had fun making more books and these bookends.

Also made these flowers.

I also finished decorating this Halloween cottage and painted the Lemax fence to age it.

Loved making the interior real colorful and patterned. The edges were painted black after this. The top floor has bright orange walls.

I didn't make him, but I just love this Skellie dog I found at JoAnn's. He goes with the Haunted Porch.

I love these mini zombie gnomes from Lemax. Made these little garden settings with them. The stones are florescent and actually glow a bright green in the dark!

Also made a non-spooky sewing table. Fun adding things for this. There was a pair of scissors and spools of thread added after this picture.

December
I had this half scale Greenleaf house sitting around forever. I like the style, but didn't have one idea about what to do with it. Then I thought, I don't have a haunted house in smaller size! So I've been working on it though I will be making a larger house later on. The hardest part is papering since I got it assembled from my friend, Tracy. So cutting patterns... then I have to get past my idea that it looks nice and try to grunge it up to look haunted! Still working on it. I really love the scrapbook papers I'm using. Not much to see yet, have one wall done and one room almost done. Taking awhile as have to measure the papers. The outside parts have to be added yet and then finished. I'm thinking of doing it gray painted, and putting corrugated card for roofing painted black. I also am trying to figure how to use some battery light strings in it.


A fun project - made this haunted book hutch for my longtime writer pal, Courtney. (Check out her Haunt Jaunts website!) She's not a miniaturist, but she loves books and spooky things, so this was perfect! The books below were included with it.


Mini Books - there are some things that are fun to make over and over. Mini books are one of them. There's something about a bunch of small things that are the same! I have a container full of books as I want to make a couple book scenes!

I also found this new glass garden shed at Goodwill - $5! Have to clean it up and add a floor. I see a shabby scene in this. And I found a small round lantern which was kind of different for a small scene.

I probably missed some things, but that's enough for now.
Hope you enjoyed seeing some of my latest creations. I appreciate your stopping by and sharing my love of minis. Wishing everyone a wonderful new year. I hope to have some new writing projects and book updates in the coming year!
Happy New Year!
November 21, 2018

November 14, 2018
Wee C Dollhouse Show Miniatures 2018-3
Here's the last photos of some of the miniatures on display at the annual Wee C Dollhouse Show in Elk Grove Village, Ill. See post 1 - post 2. Hope you enjoyed the virtual tour!


You can make it look like the whole building with walls inside a frame. Neat way to make a scene in limited space. You can also do something like this in a book box.

Small Window Box: Another fun idea for lots of detail in a small space. Love all the Raggedies!

I remember seeing these stand-up figures last year and thought they were funny. Someone bought them and put them in scenes:


That's it! Hope you enjoyed the tour!
November 13, 2018
Wee C Dollhouse #Miniatures Show 2018-2
Annual Wee C Dollhouse Show - some of the miniatures displays. See post 1 - post 3 - tomorrow.
Yesterday, I showed some of the amazing shops. Today's an assortment starting with Market Stalls. Click photos to see full size.

Pretty details.

Fun! Even teensier versions!
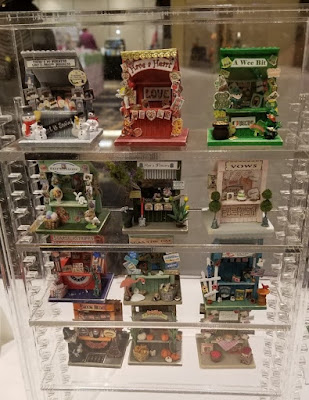
ROOMS - HOUSES:
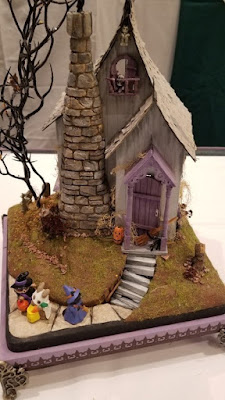
Loved this tiny witch cottage.
Pretty setting in a neat container.
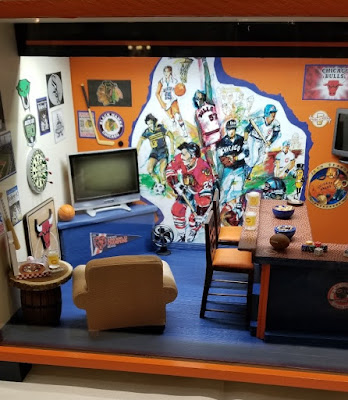
 Painting studio:

Come back tomorrow for post 3!
Yesterday, I showed some of the amazing shops. Today's an assortment starting with Market Stalls. Click photos to see full size.


Fun! Even teensier versions!

ROOMS - HOUSES:
Loved this tiny witch cottage.

Pretty setting in a neat container.


Come back tomorrow for post 3!
November 12, 2018
Wee C #Miniatures Show 2018-1
The annual display of dollhouse miniatures at the Wee C Dollhouse Show in Elk Grove Village, Ill.
Favorite show. Always have a good time here. Here's some of the great dollhouses and rooms on display this year. Tomorrow and next day - see post 2 - post 3. Click photos to see full size.
SHOPS:
Shops are always a fun theme in miniature as you can create that favorite business you always wanted or recreate a favorite place you liked to visit.
This was eye-catching.


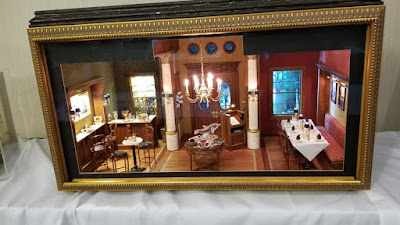


Of all the displays, this was my favorite. This is a half scale dollhouse turned into shops! The front, which I failed to get a photo of, was all brick. Inside, each room was a different store. I love how the hall has large windows with the names of the stores. Such a great idea!

Great detail in the butcher shop. Even the worn floor! And the meats and cheeses!

Love the hall and windows!

Ice cream parlor.

Come back tomorrow for post 2!
Favorite show. Always have a good time here. Here's some of the great dollhouses and rooms on display this year. Tomorrow and next day - see post 2 - post 3. Click photos to see full size.
SHOPS:
Shops are always a fun theme in miniature as you can create that favorite business you always wanted or recreate a favorite place you liked to visit.
This was eye-catching.


Of all the displays, this was my favorite. This is a half scale dollhouse turned into shops! The front, which I failed to get a photo of, was all brick. Inside, each room was a different store. I love how the hall has large windows with the names of the stores. Such a great idea!

Great detail in the butcher shop. Even the worn floor! And the meats and cheeses!

Love the hall and windows!

Ice cream parlor.

Come back tomorrow for post 2!
October 31, 2018
Happy #Halloween in Half Scale!

Finished the outside of my Half Scale Halloween Cottage. I wanted to do this one more colorful on the outside like the Halloween Porch. The front is a pebbled paper. The sides are corrugated card painted purple.
The inside is done, but I haven't finished all the furnishings so I put them aside for now. (see the beginning and the inside here. This was before the window trim was added.)
I have been thinking about doing a really spooky, run-down house. I have a half scale Greenleaf kit that's been sitting around a while unfinished, so we'll see. It won't leave my mind. ha!
Click photos for full size.
The fence is from Lemax Spooky Town. Definitely improved it by doing some aging with black and brown paints. I made brick walls at the sides using the Lemax cobblestone glued over wood. I aged that, too, and added some sand-painted, aged wood strips on the top. I still want to add some moss and vines.
See Pennywise the clown in the back? He and the boy trick-or-treater are from an IT figurine set.
The peak decoration is actually a plastic piece I painted. I tried something different for the window by putting scrapbook paper in as I wanted it to look like you're looking outside when you're in the house. The view is dark trees.

The other set had the boy with the balloon but this set had the girl which I wanted (not shown she'll be inside), so I added my own balloon.

Love the costumed dogs. Also from Lemax, as is the dead grass mat. (Which sheds a lot, I learned.) I'm going to add some of the loose grass to the dog bases so they blend in more.


I love all the tombstones. I keep adding more to the collection. I have other small ones but they're in front of the Half Scale Country House right now. (Some general pix here. Wow, I can't believe I'd started that house in 2014. Where does time go?)
I'll add more inside stuff later. And maybe, maybe I'll start working on the run-down house. (I'll bet I need more tombstones!)
Happy Halloween!

Subscribe to:
Posts (Atom)